Table of Contents
For Counselors: Create and assign Tasks
![]() Updated
by Customer Support
Updated
by Customer Support
Tasks are great tools for counselors, allowing them to assign work or learning opportunities, keep track of progress for reporting, and provide extra guidance as students navigate their college prep and career readiness journey. If you have any thoughts about the direction we're taking Tasks, please share feedback!
For quicker navigation, use the table of contents on the right to jump to a specific section 👉
Accessing Tasks
On the Tasks tab in Assignments, tasks are arranged in a table view, providing quick access to key details like title, topic, the Plan the task belongs to, assignees, dates, and status.
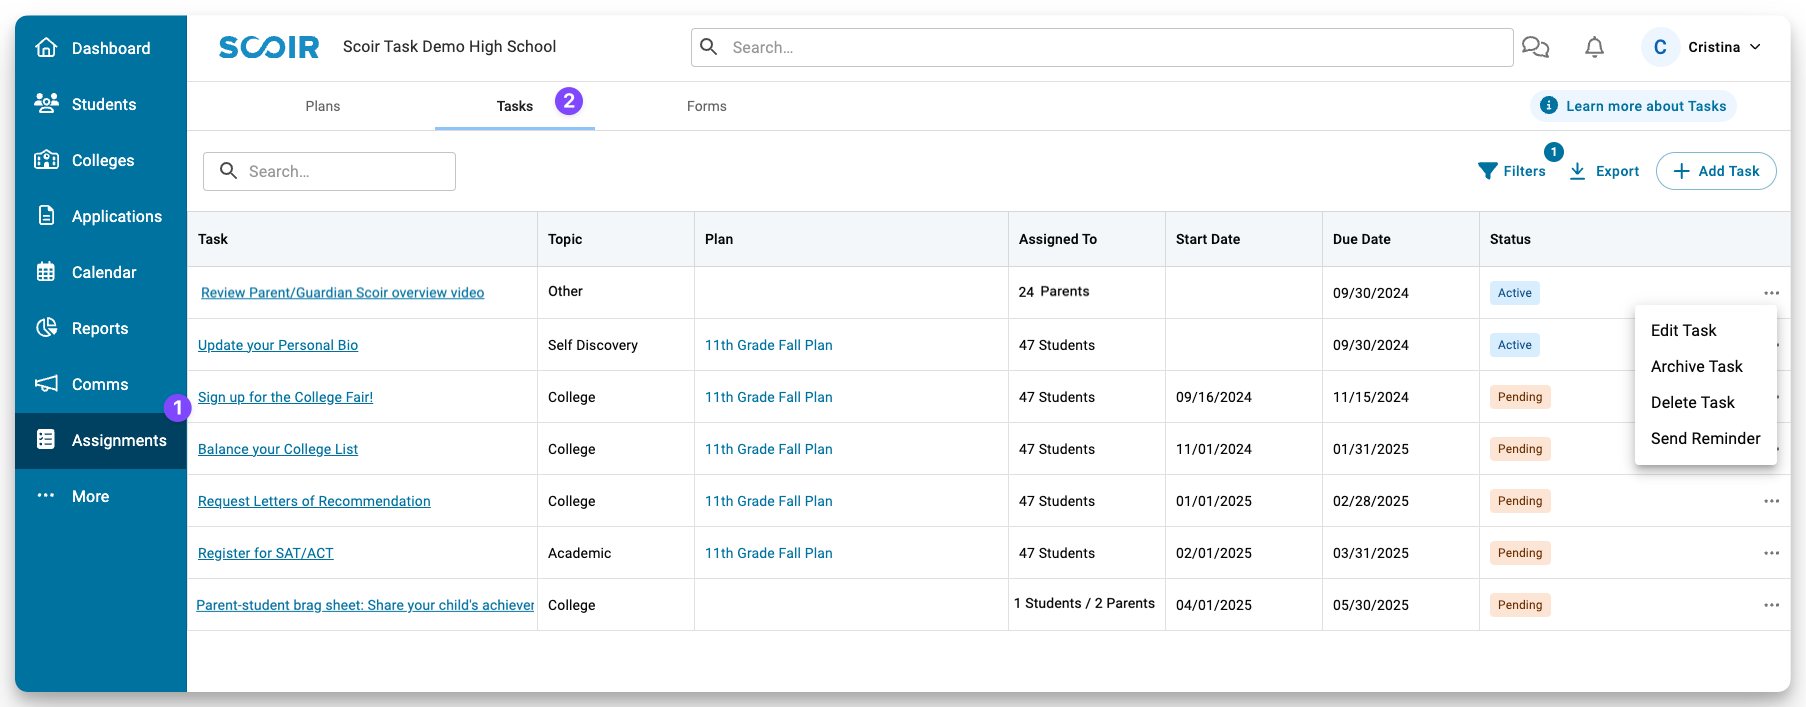
From the Tasks tab, you can:
- Create, edit, and delete tasks. You can also archive tasks that are no longer a priority or have remained incomplete for a long time to maintain an organized and manageable task list for students and parents.
- Filter tasks based on start date, due date, topic, and status
- Send reminders to those assigned to tasks
- Preview tasks to see their details and assignees
- If this task is associated with a Plan, you can access it from the Plan column
- Export tasks along with the corresponding student/parent information as a CSV file (we recommend using filters to narrow which assignees are included in the export file)
What does each task status mean?
Active - This status lets you know the assignment is underway. The start date has passed, students/parents have been assigned to it, but they have not yet completed it, and the due date has not been reached.
Overdue - This means the due date has passed, and assignees haven't finished the assignment.
Complete - Good news! 🎉 Everyone assigned this task have completed it.
Archived - This means you've chosen to archive or hide this task from your default view of tasks and from the assignees' list of incomplete tasks.
Creating a Task
- Go to Assignments > Tasks
- Click +Add Task
- In the dialog box, enter the details of your task like title, description, start date, and due date
- Expand the Task details section to add a new or existing topic to help categorize your task, include a form to collect information, a video link, and attachments. (Supported video providers: YouTube, Facebook, Twitch, SoundCloud, Streamable, Vimeo, Wistia, Mixcloud, DailyMotion, Kaltura, Loom)
- Once you've added the details, click Save
Your new task will now be listed in the table. Click on the title to view a preview of your task!
Related resource: For Counselors: Using Forms
Assign a Task to students and/or parents
For instructions on how to edit a task, head to the Editing/Deleting a Task section below.
- Go to your student roster and select the students you want to assign the task to, or whose parents you’d like to assign the task to. Use filters as needed to narrow down your list
- Click on the Manage Assignments icon above the roster
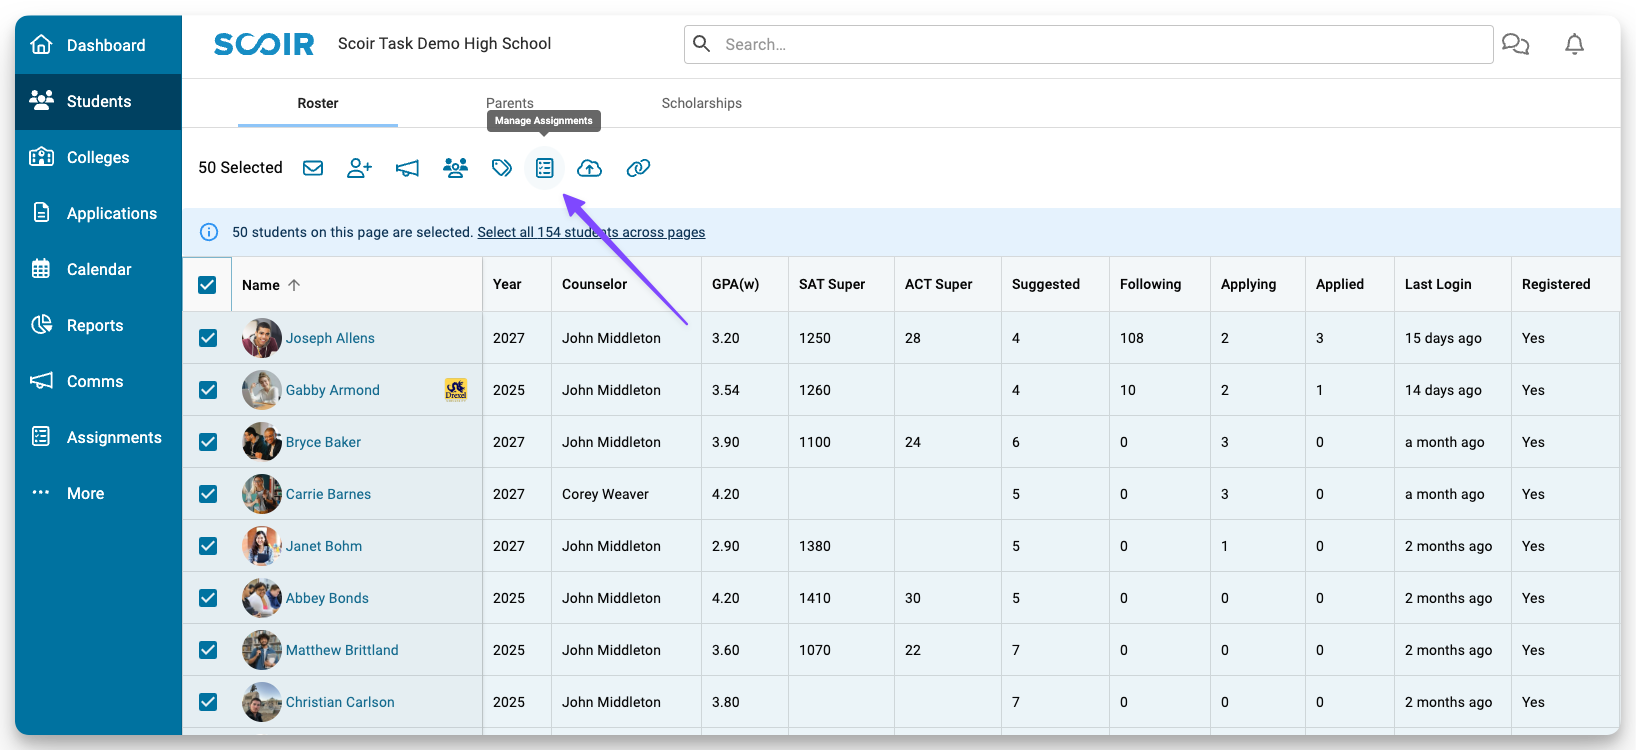
- Choose whether you'd like to Assign New Task or Assign Existing Task:
- For new tasks, follow the steps listed above in the Creating a task section above.
- For existing tasks, select one of your premade tasks
- From the Assign to dropdown, choose to assign the task to Students, Parents, or both. (Note: Assigning to parents creates a separate assignment for each parent. For example, If a student has two parents, both will receive an assignment. Likewise, parents with multiple students will receive an assignment for each child selected)
- Once you've entered all your details, click Assign
Now you can see and manage your assignment from the Tasks tab. Use the status column to keep track of progress.
Currently, students and parents can mark a task as complete even if they haven’t submitted an included form.
Assign Tasks to an individual student or their parents
There are three other options to to assign a task to an individual student and/or their parents:
Assign from the task preview (students only)
To assign from the task preview:
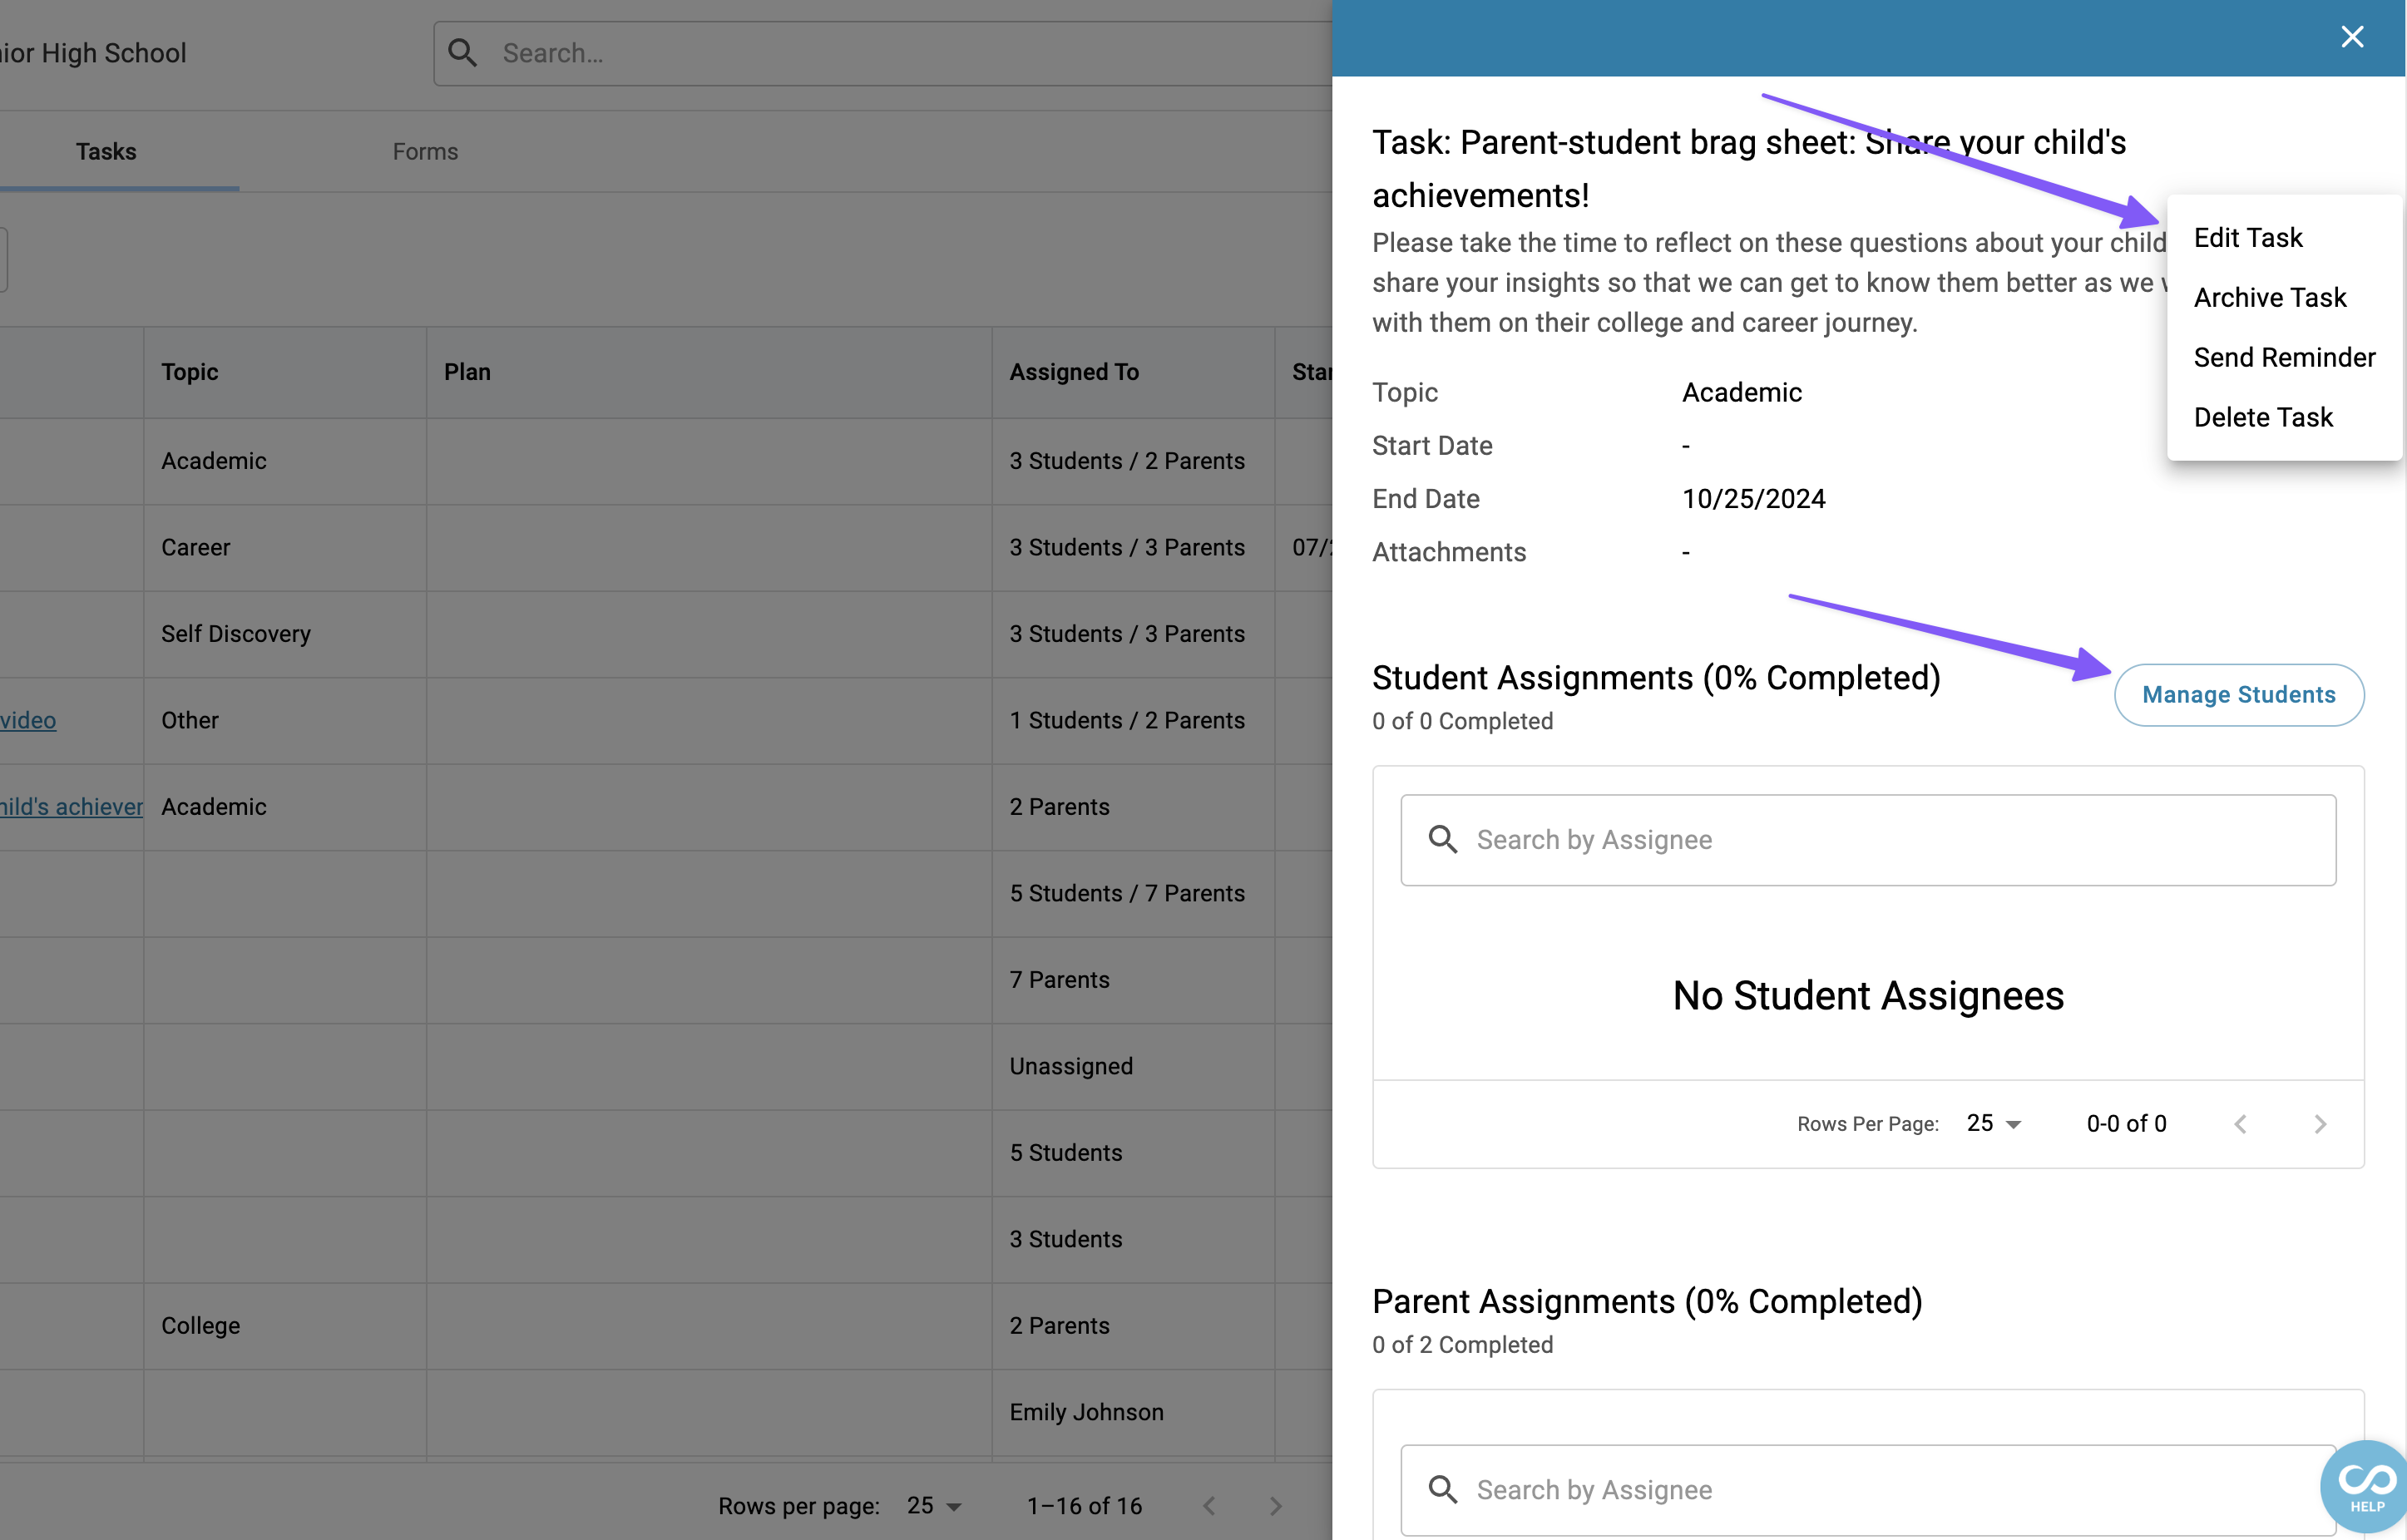
1. Go to the Task tab and click on any assignment to open its preview
2.In the Student Assignments section, you can see all assigned students. To add or remove students, click Manage Students, make your changes, and then click Save
3. To unassign parents, scroll to the Parent Assignments section, click the three dot icon to the right of the parent’s row, and select Unassign
Your changes will be reflected in the task preview.

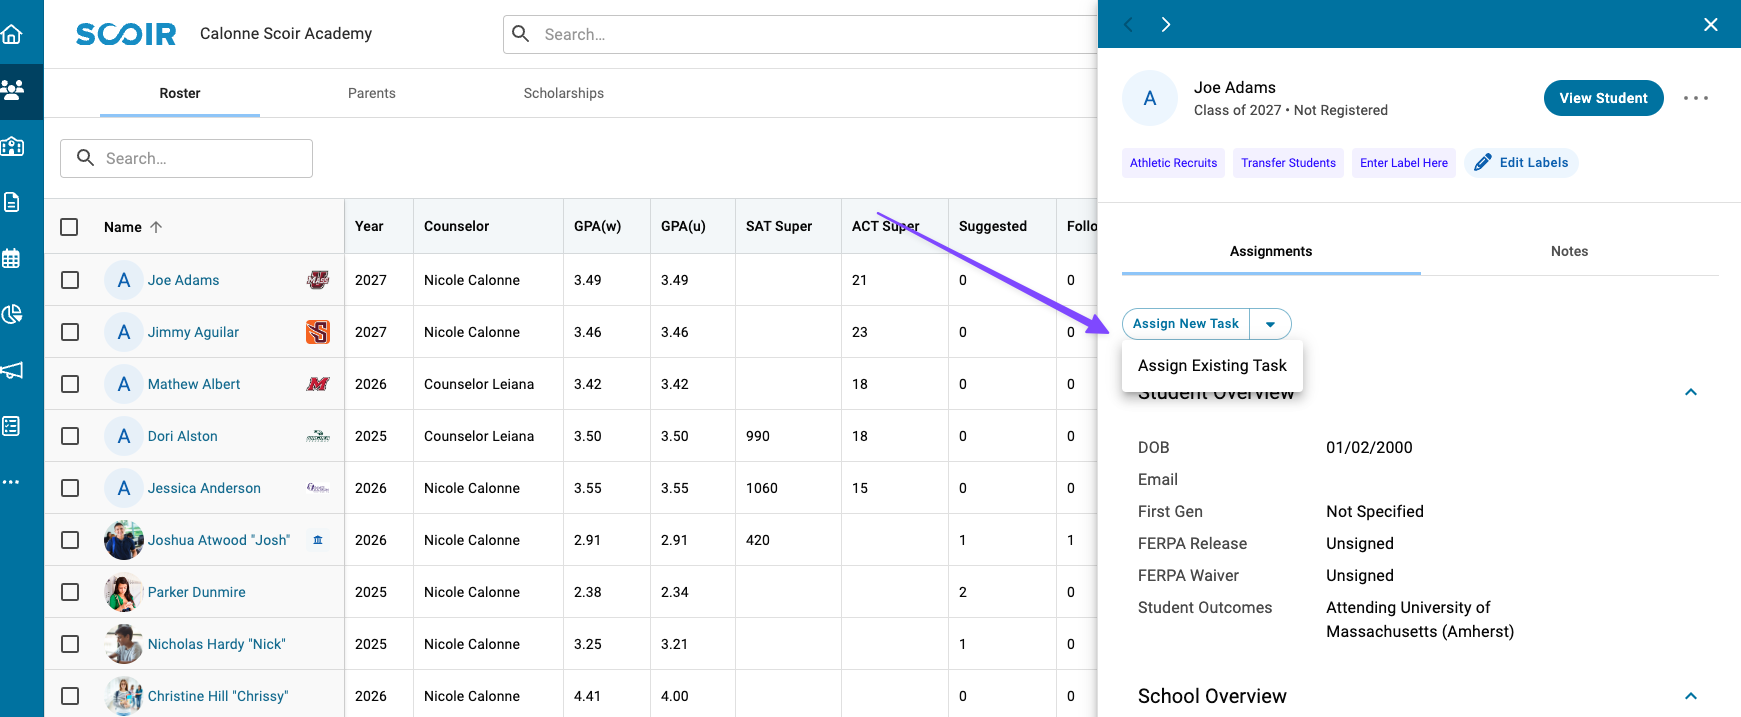
Assign from the student preview
2. Select Assign New Task or Assign Existing Task.
a. For new tasks, you'll be prompted to create a task.
b. For existing tasks, select one from the dropdown.
3. From the Assign to dropdown, choose if you’d like to assign this task to this student, their parents, or both
4. Click Assign
This task is now assigned to this individual student and/or their parents.
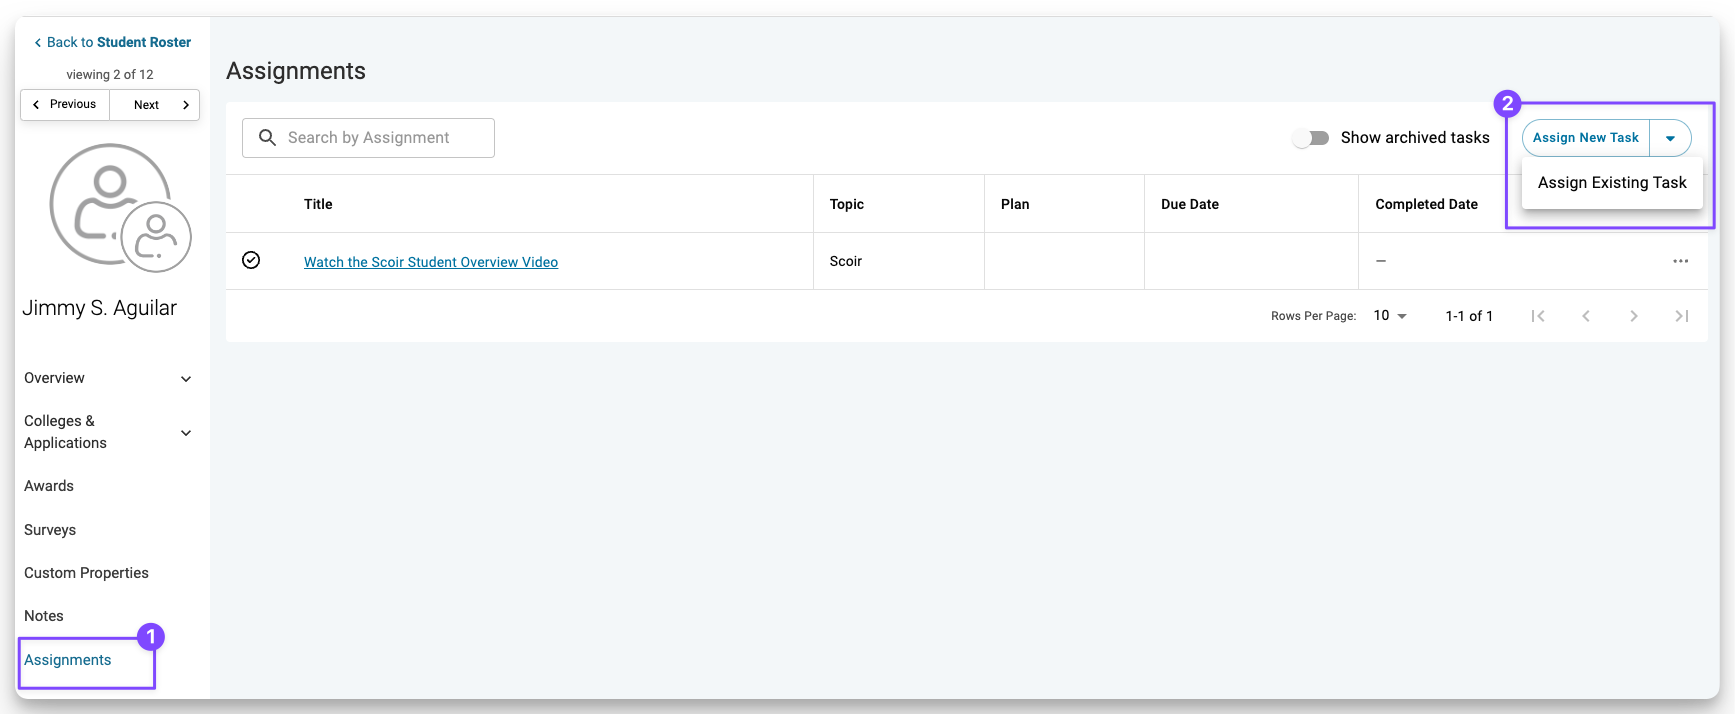
Assign from a student's profile
2. Select Assign New Task or Assign Existing Task.
a. For new tasks, you'll be prompted to create a task.
b. For existing tasks, select one from the dropdown.
3. From the Assign to dropdown, choose if you’d like to assign this task to this student, their parents, or both
4. Click Assign
This task is now assigned to this individual student and/or their parents.
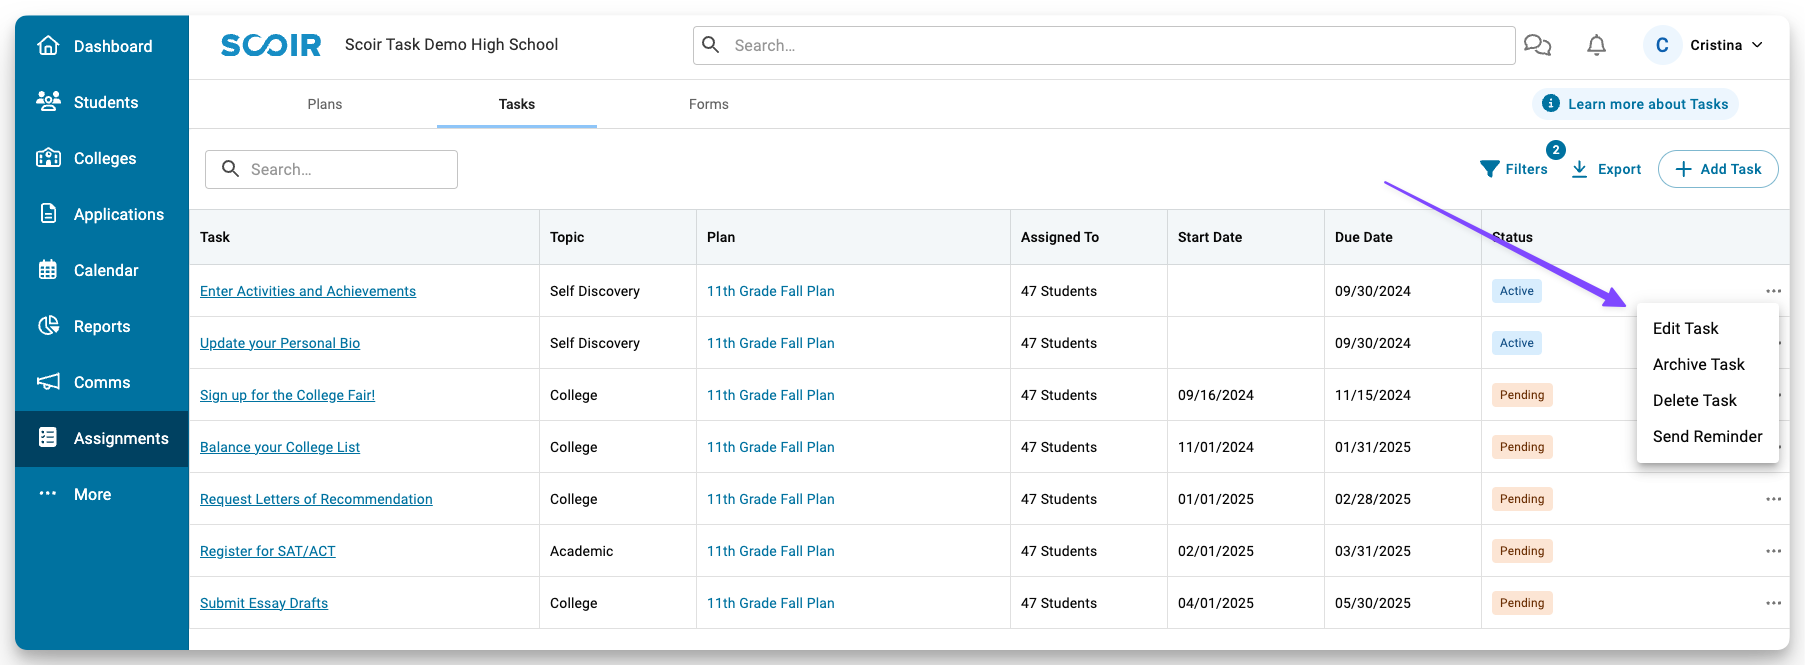
Editing, deleting, or archiving a Task
Delete a task or make changes to it's information even after the task has been created.
You also have the option to archive a task, which will remove it from both your default view of the task table and your students' lists of incomplete tasks. Even after archiving tasks, you can still access them using the Archived filter and students/parents can view them using the Show archived assignments toggle on their dashboard. And don't worry, you can still report on archived tasks, and assignees can continue to mark them as complete or incomplete.
- Go to the Tasks page and click on the (...) icon to the right of the task row. Alternatively, click on the (...) icon in the task preview
- Select Edit Task, Delete Task, or Archive Task
- When editing a task, you can modify all aspects of a task. However, the start date cannot be altered once it has passed, and a form cannot be added or removed once the task has been assigned to students/parents
- Click Save
Your changes will apply to everyone assigned to the task.
Duplicating a Task
Need to reuse a task without starting from scratch? Duplicating a task saves time and gives you the flexibility to make adjustments as needed. Whether you're assigning the same task to a different group of students or parents, or you need to move tasks into a Plan after creating them separately, duplication makes it easy. Simply copy the task, tweak the details, and assign it when you're ready!
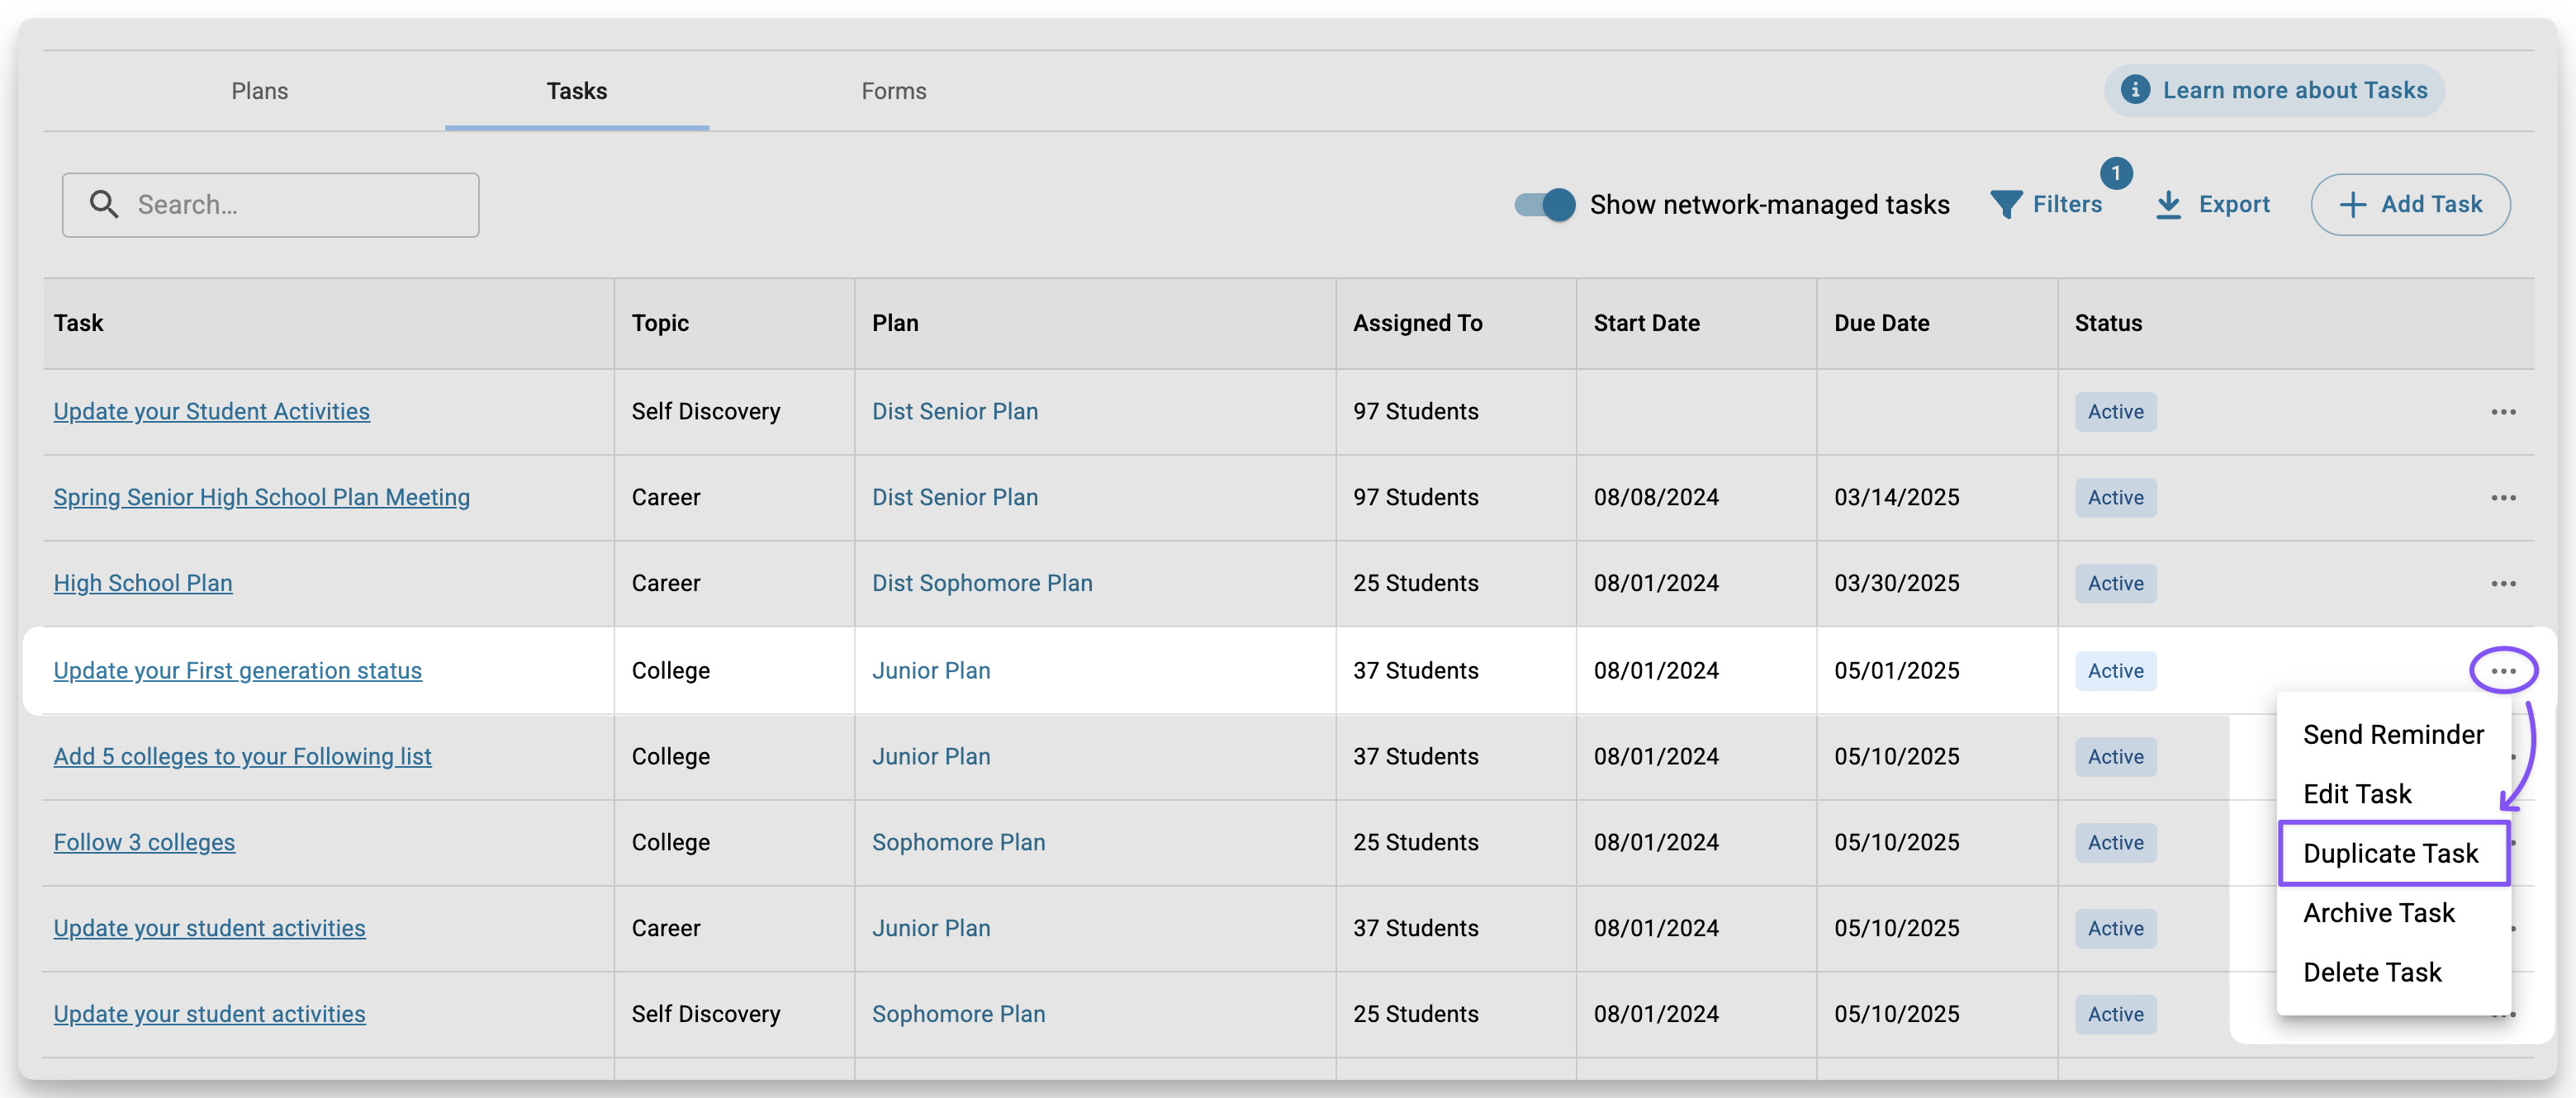
- Go to Assignments > Tasks. Here, you’ll find all the Tasks you or your team have created.
- Find the task you want to duplicate, then click the "More" button (•••) to the right of it. From the dropdown menu, select Duplicate Task.
- Choose where to duplicate the task:
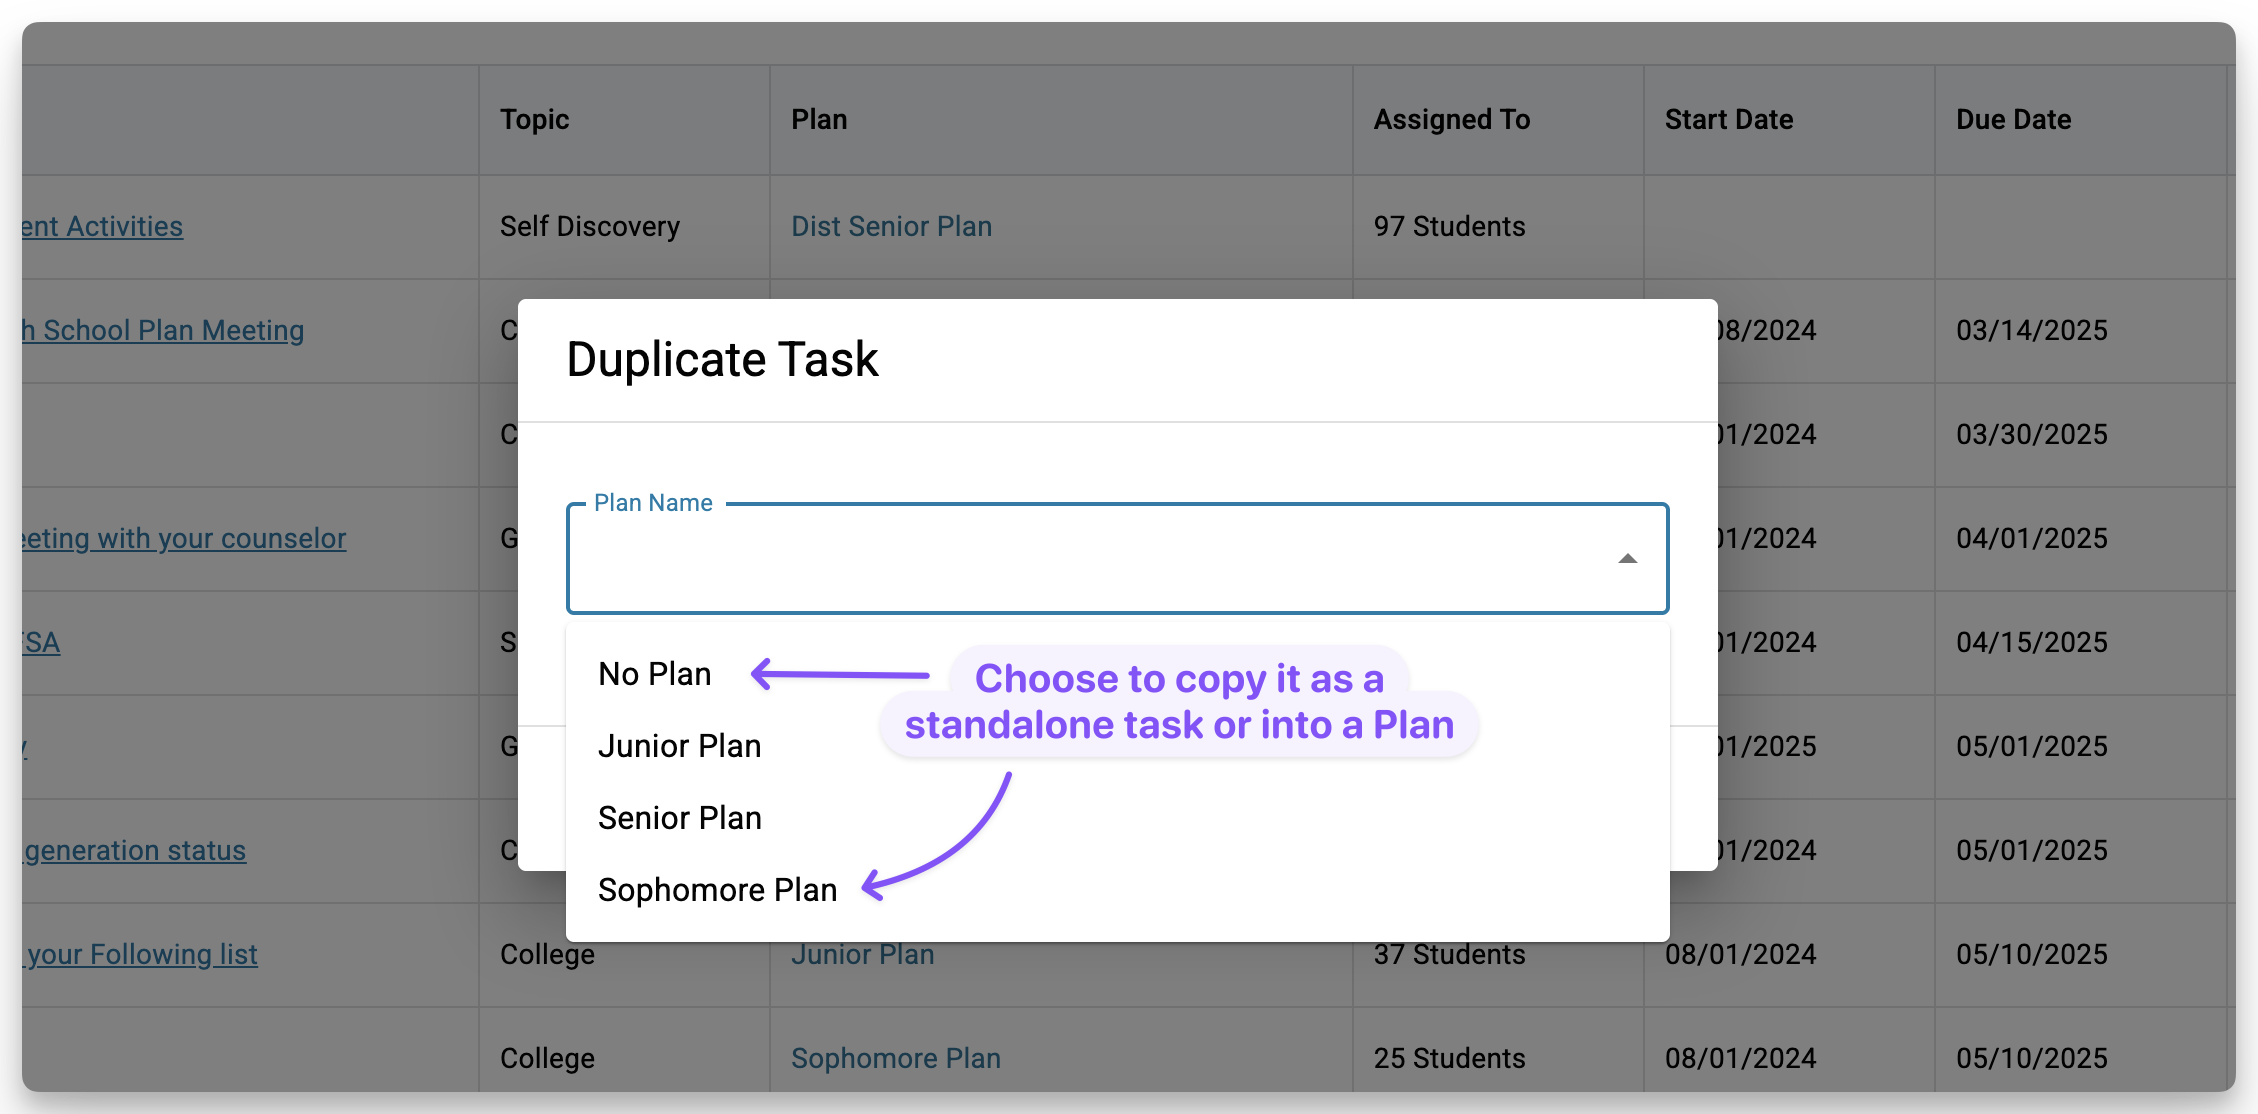
- As a standalone task (No Plan) → The task will appear right in the Tasks table—perfect for smaller student groups, parents/guardians, or tasks that don’t belong in a Plan. Duplicating a task doesn’t assign it automatically, so you’ll still need to assign it to students and/or parents/guardians.
- Into a Plan → Duplicate the task into one of your school’s Plans. You'll find it in the Plans tab within the chosen Plan, where you can manage it. Use this when you want to bring tasks created individually into a Plan. Plans are only for students, so don’t duplicate tasks meant for parents into a Plan.
- If the Plan is active (aka published), the task will be automatically assigned to the grade level associated with the Plan.
- If the Plan is in draft (aka not published), the task will only be assigned once the Plan is published.
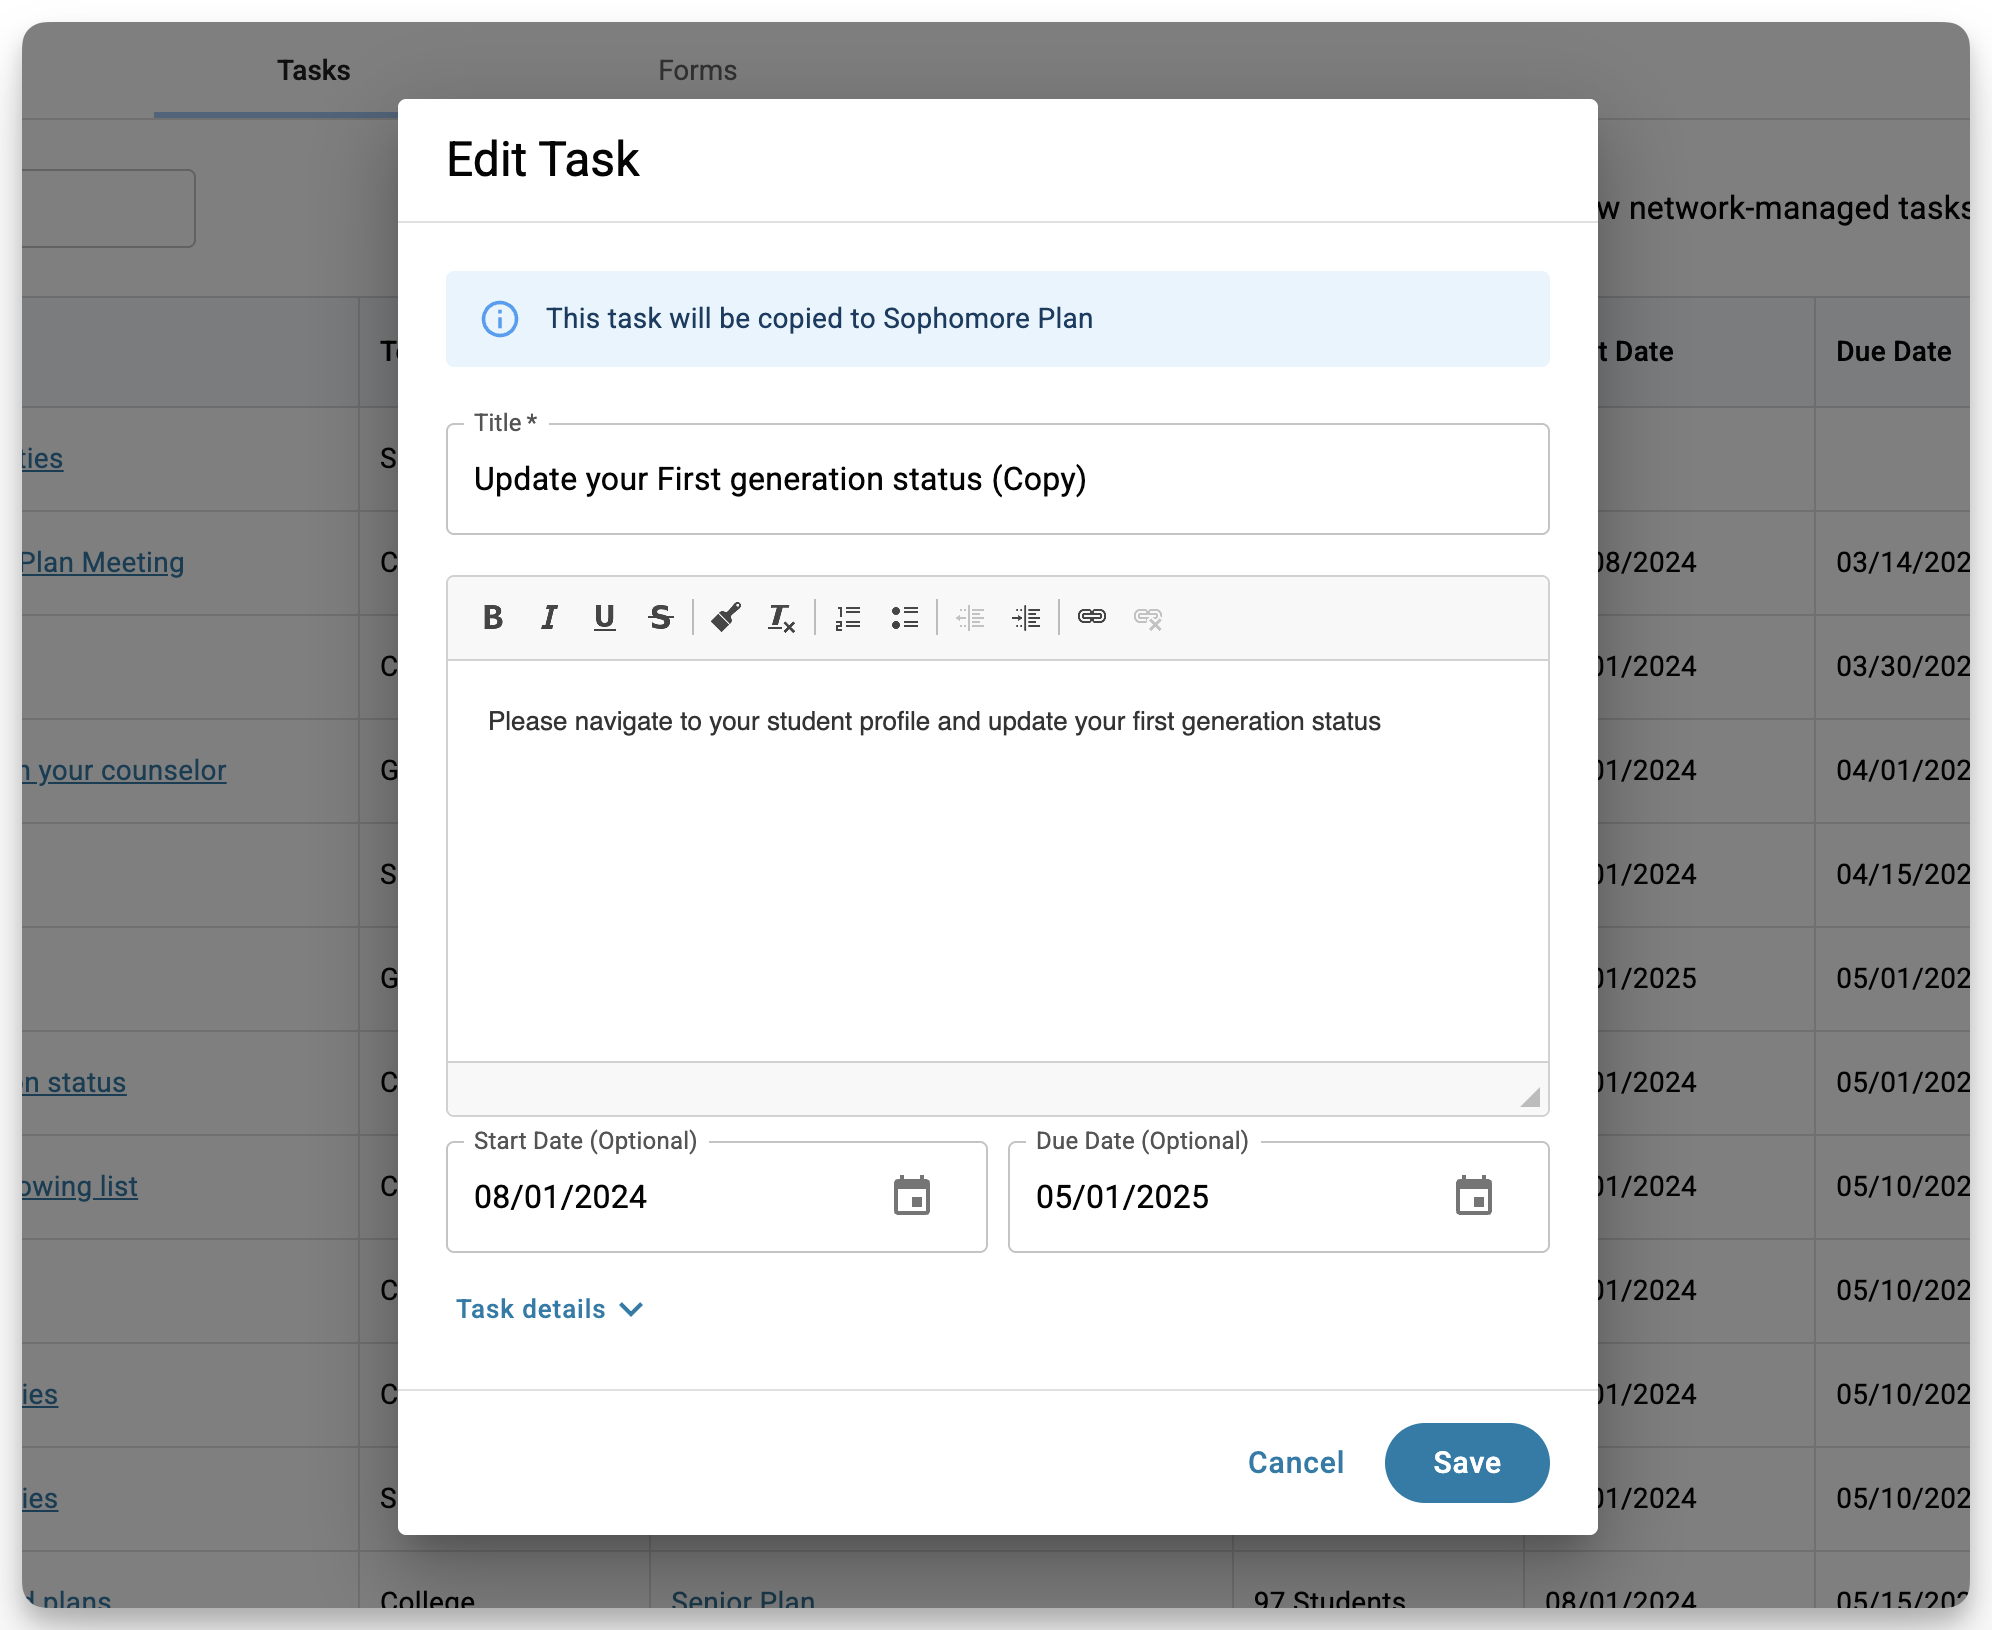
- Click Duplicate. This will create an exact copy of the original task and open it in the Task Editor, where you can make any changes. The task will start with the title "[Original Task Name] (Copy)," so you may want to rename it. Once you’ve made your changes, just click Save.
- What happens next?
- If duplicated as a standalone (not in a Plan), you can assign it to students and/or parents/guardians. once you’re ready
- If duplicated into an active Plan, the task is immediately assigned to students in the grade level linked to the Plan.
- If duplicated into a draft Plan, the task won’t be assigned until the Plan is published.
Remember:
- Plans are for students only → Don’t duplicate parent/guardian tasks into a Plan.
- All copies keep the original details, but you can edit them → This includes the description, dates, topic, links, file attachments, and any included forms.
Additional ways to manage Tasks
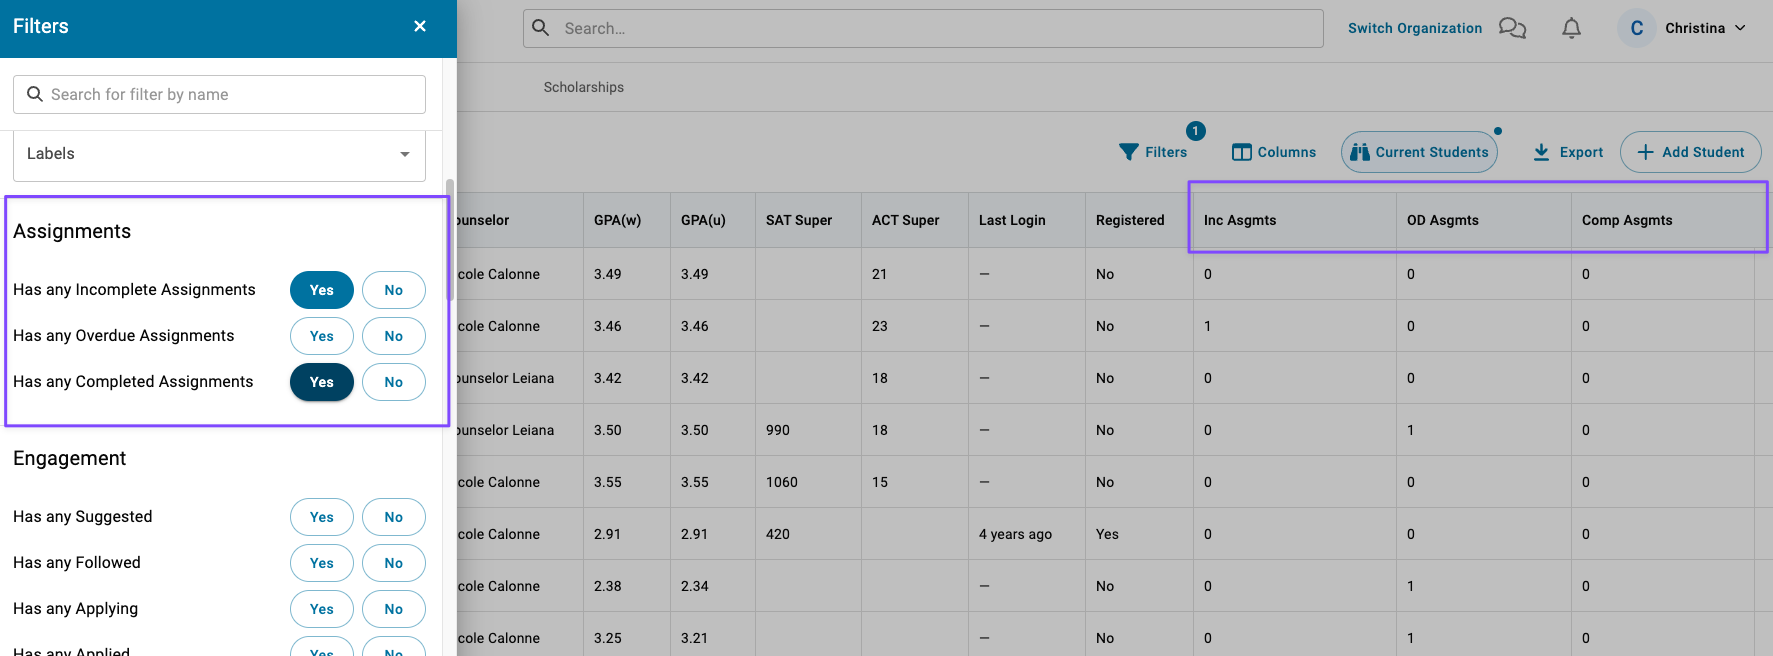
From the Student Roster, counselors can:
• Add columns for incomplete, completed, or overdue assignments, displaying the count of each type
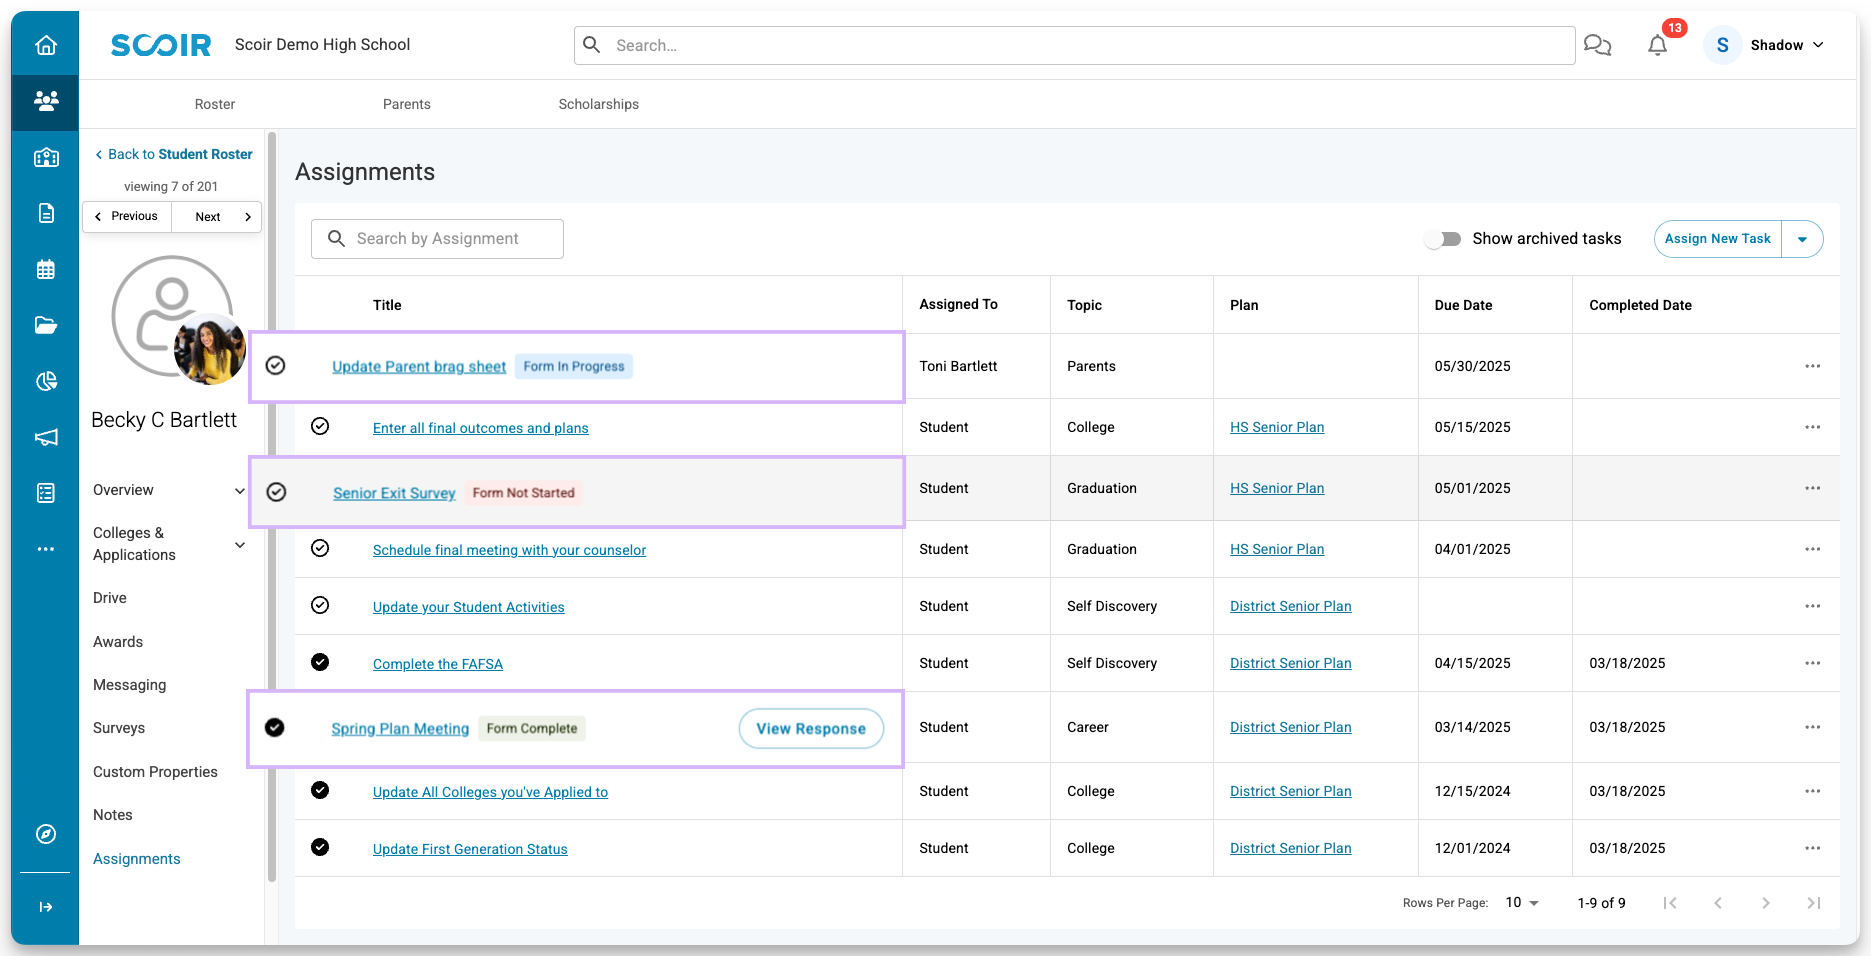
From the Assignments section of the student preview or profile, counselors can:
• Assign and un-assign a task
• View the associated Plan for a task, if it has one
• Mark tasks as complete or incomplete
•Access submitted form responses for a task and see status indicators showing whether a form is complete, in progress, or not started, making it easy to track progress.
•Use the Show archived tasks toggle to view archived tasks
From the task preview, counselors can:
• Edit or delete a task
• View the associated Plan for a task, if it has one
• Assign and unassign a task
• Mark tasks as complete or incomplete
Frequently asked questions
Why can't parents see their assignments?
To access assignments and other Scoir features, a parent’s account must be fully connected. If they’re missing access, it’s usually because they haven’t linked to their student yet.
For more guidance, check out this help article and share it with parents who may need assistance: For Parents/Guardians: How to create and link your account to your student and their school
Do I need special permissions to create tasks?
Are tasks automatically assigned to students or parents?
Can I assign tasks to parents directly from the parent roster?
Can I assign additional students or parents to a task?
How can I view all students or parents assigned to a task?
Can tasks be repurposed?
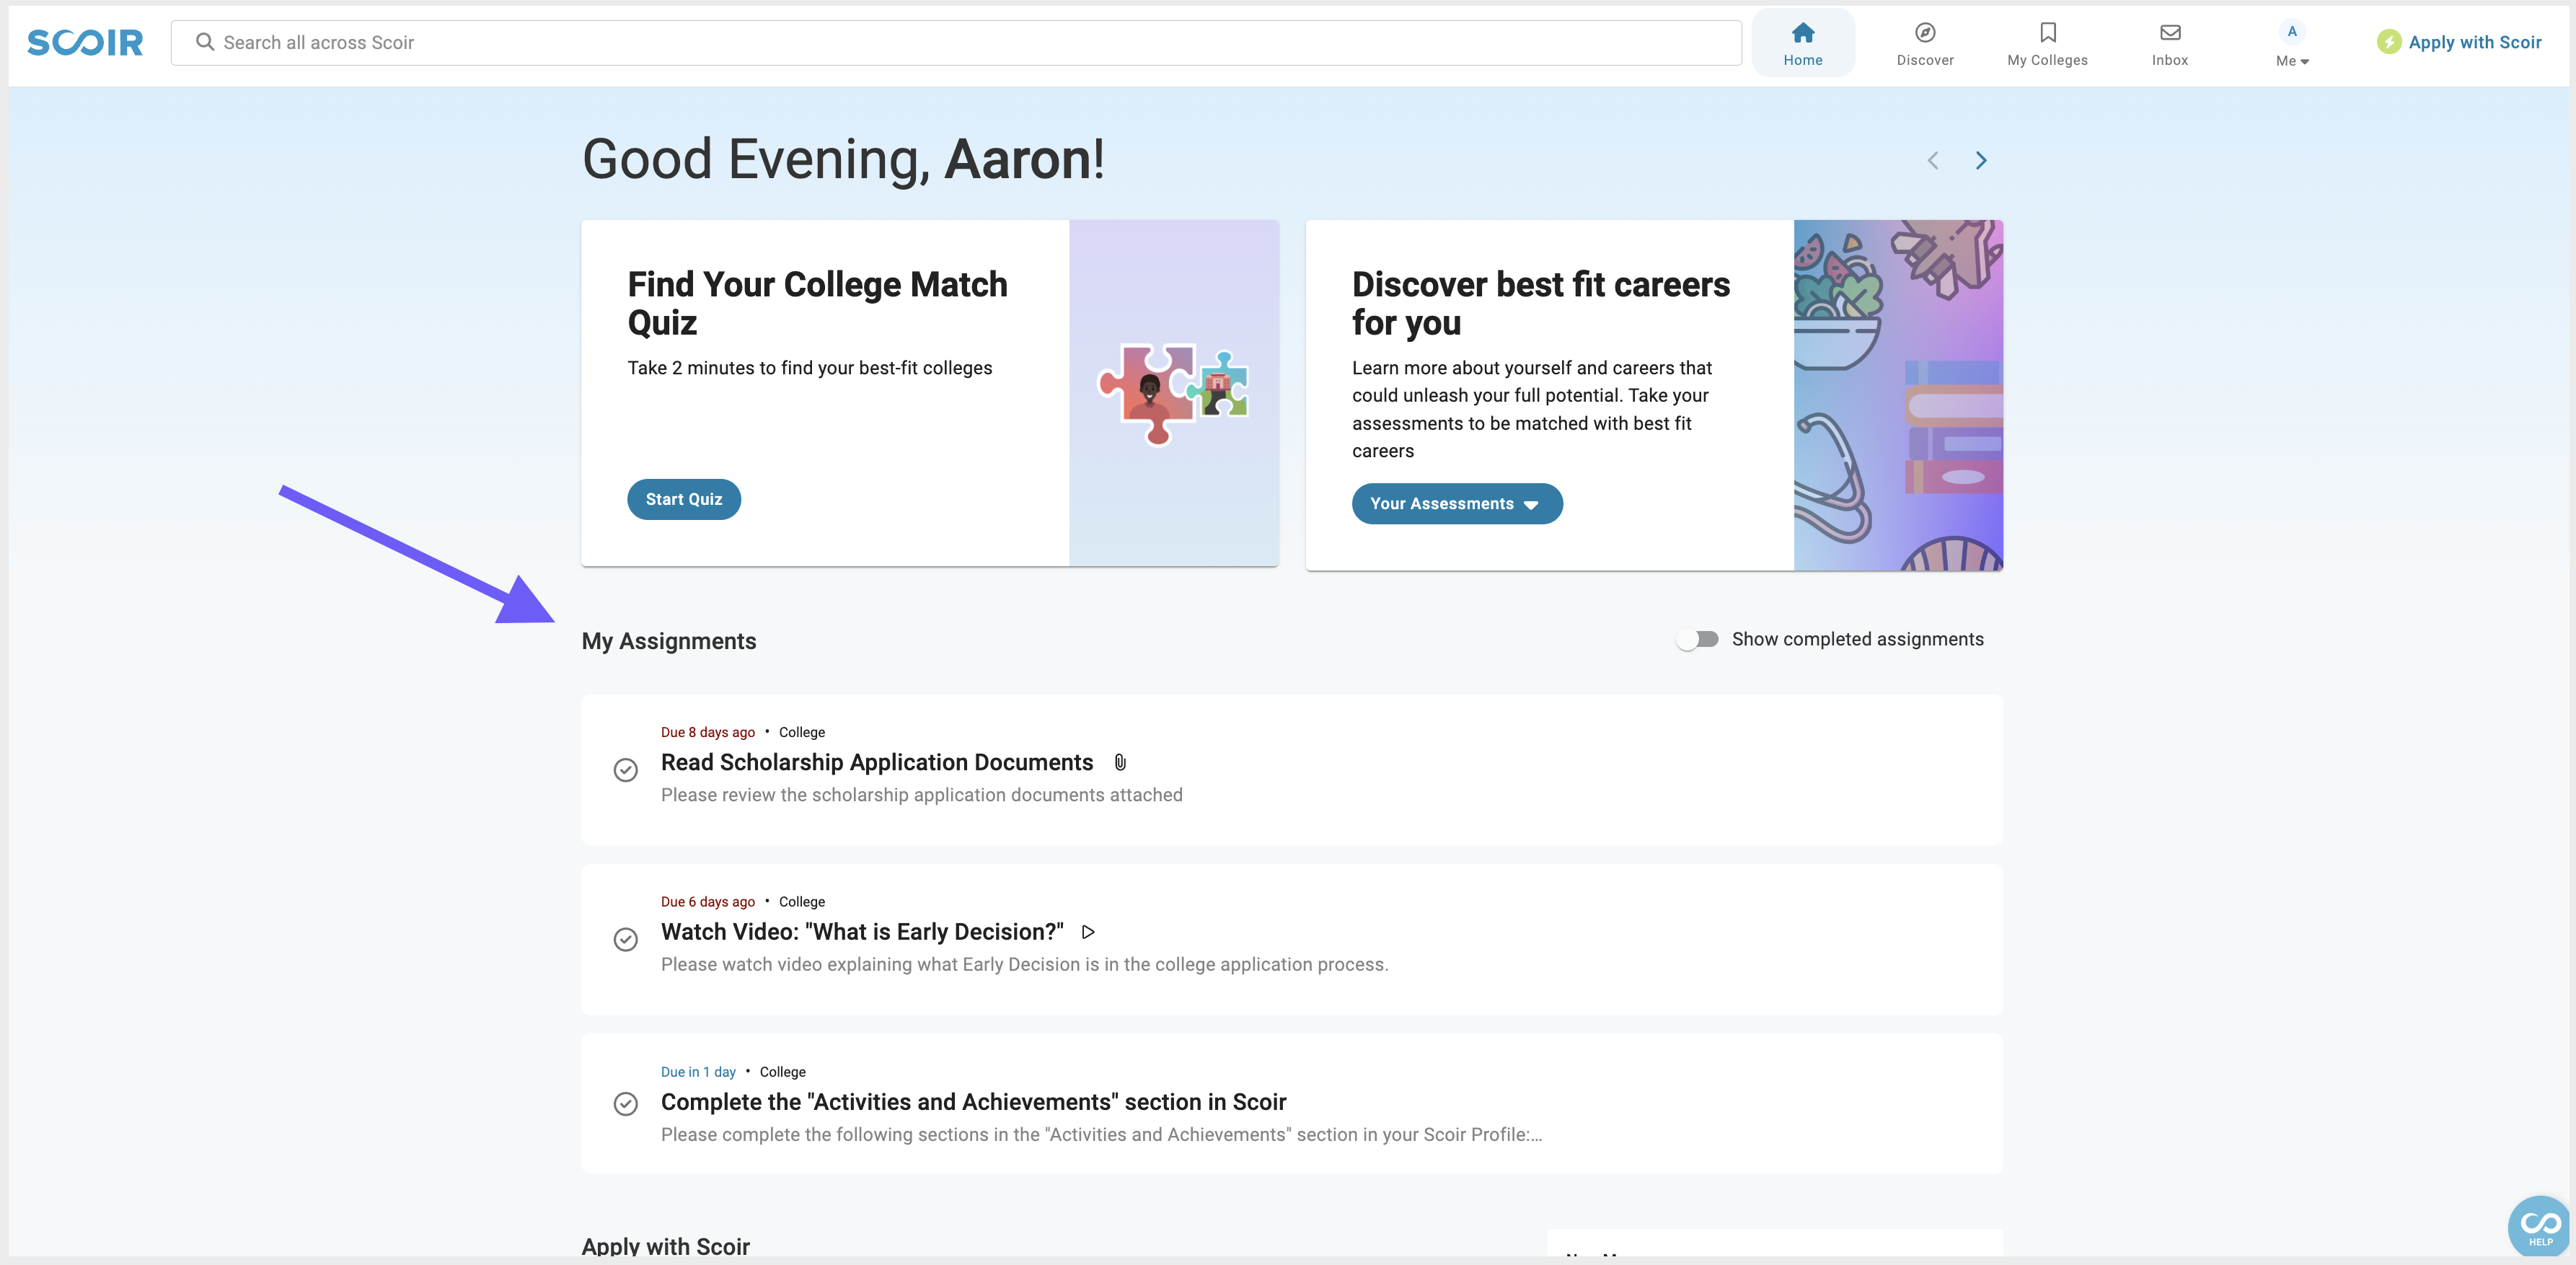
What do tasks look like for students and parents, and when do they become visible to them?
Tasks assigned without a start date will be automatically visible to asignees. Tasks with a start date become visible once the start date is met.
How will students and parents be notified about their tasks?
For new assignments, emails will be sent every hour to prevent overload. Within each hour, new assignments will be consolidated into a single email, indicating the count of new tasks. If an assignment has a future start date, assignees will receive an email at 8 am local time on that day.
Reminders will be sent immediately to students/parents via email.
What happens if a new student is rostered?
Are there any differences between task without a form and a task with a form?
Can parents see student tasks?
When should I consider archiving tasks?
- It is no longer relevant to the assignees who have not yet completed it
- The task has been open for an extended period
- It should not appear on a student’s or parent's default view of incomplete assignments
- The students are ready to move on to new tasks
What does archiving a Task look like for counselors and students?
- Once a task is archived, it no longer appears on their list of incomplete assignments, but they can still access archived tasks using the Show Archived Tasks toggle on their dashboard
-They can mark archived tasks as complete or incomplete, and the status (complete or incomplete) is still accurately reflected
For counselors:
- When a task is archived, its status is updated to "Archived," indicating that it’s no longer active
- Once archived, tasks do not appear on the Tasks page's default view or in the student profile's Assignments section. Use the Archived filter or turn on the Show archived tasks toggle to view them. Archived tasks are also not shown in the student preview on the student roster.
- Counselors can still generate reports on the completion status of archived tasks