In Scoir, counselors can send application documents in bulk or for individual students. This guide walks you through sending documents for individual students and highlights key differences for schools using the Common App integration.
If your school uses the Scoir + Common App integration, check out our short video on how to send documents.
Before You Begin
It’s recommended—but not required—for students to move colleges to the Applied column in My Colleges once they submit applications. This makes it easier to track progress and ensures they’ll receive Scoir’s email notifications when documents may need to be sent.
Common App Integration Requirements
If your school uses the Common App integration, students must complete the following in Common App before you can send documents:
Sign the FERPA Release Authorization
Indicate a start term and admission plan for each college
The student does not need to fully submit their application for you to send documents. Once documents are sent from Scoir to Common App, they will be held at Common App until the student submits their applications, at which point they are made available to the colleges for retrieval.
Checking Common App FERPA Status in Scoir
Once a student has connected their accounts, you can check if they've signed the FERPA Release Authorization—this is required before you can send any documents.
In the Student Roster, click Filters, then open the Common App section
Use the FERPA Status filter and select Not Signed to find students who still need to complete this step
To confirm FERPA is complete, filter by Waived or Not Waived, or check a student's profile under the Common App section.
How to Send Documents for a Student
Use the Searchbar to find the student and navigate to their profile
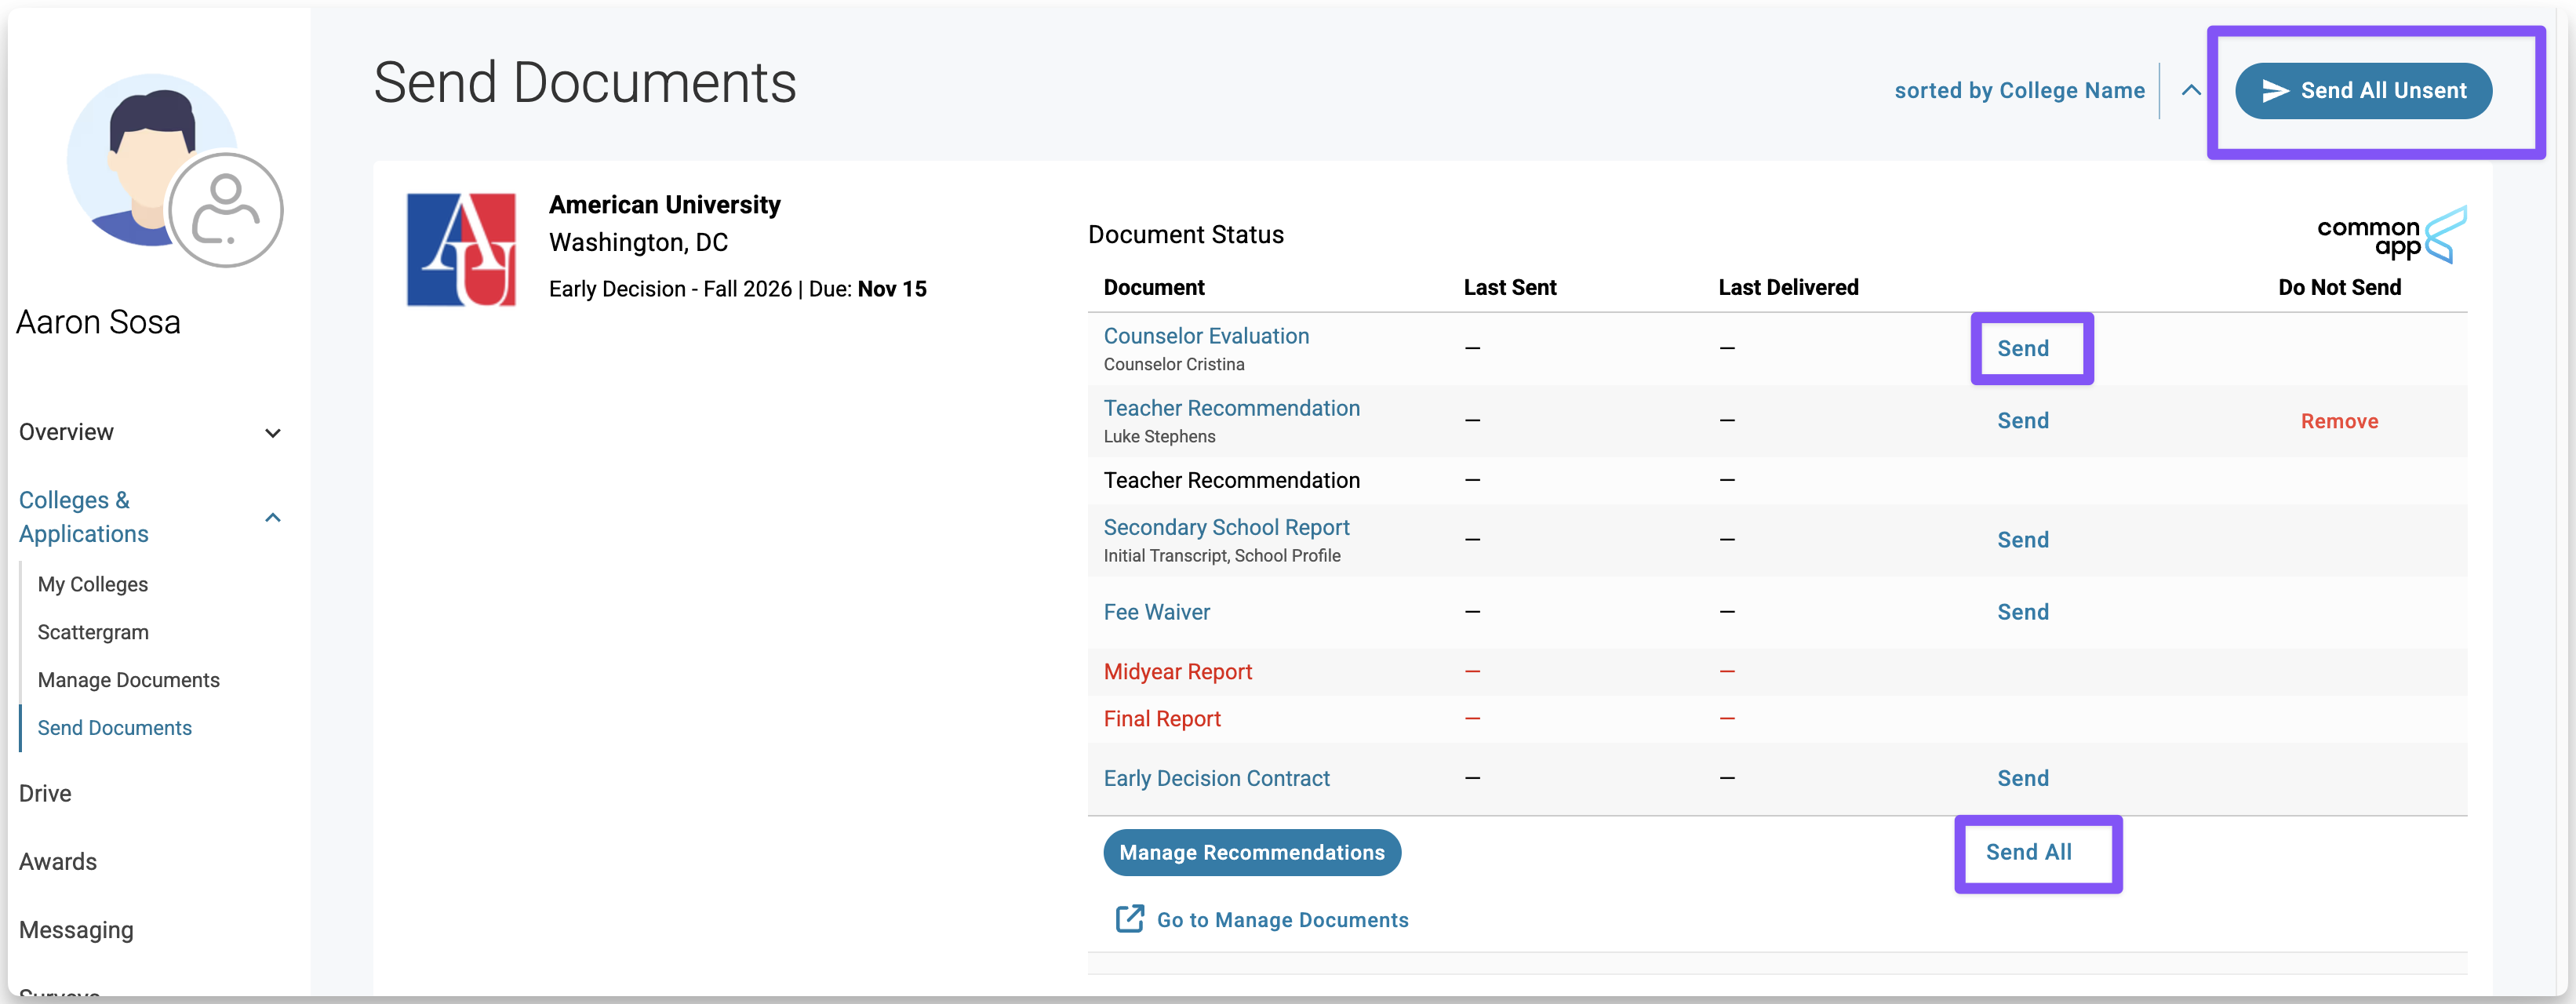
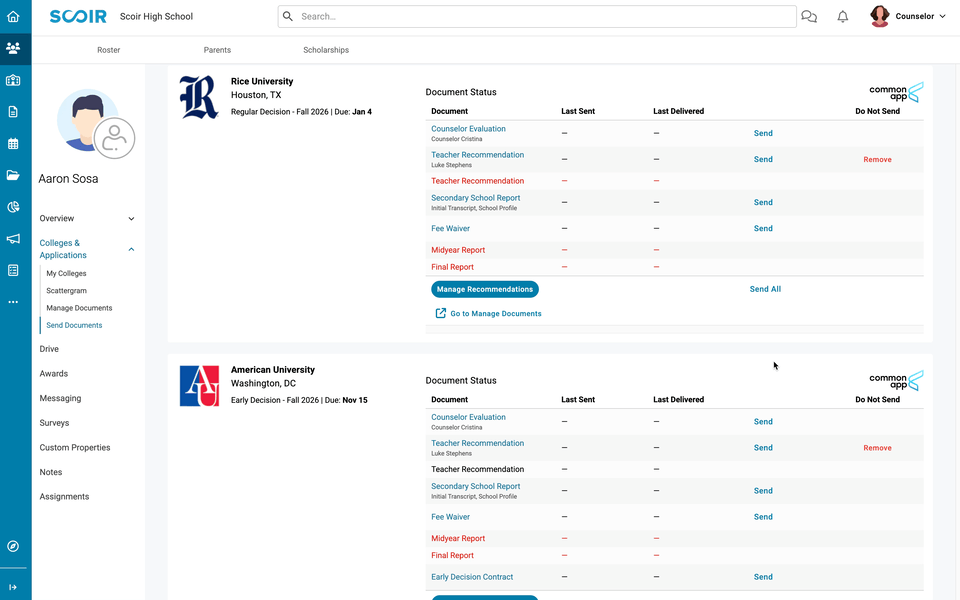
In the student’s profile, navigate to the Colleges & Applications section, expand it, and click Send Documents
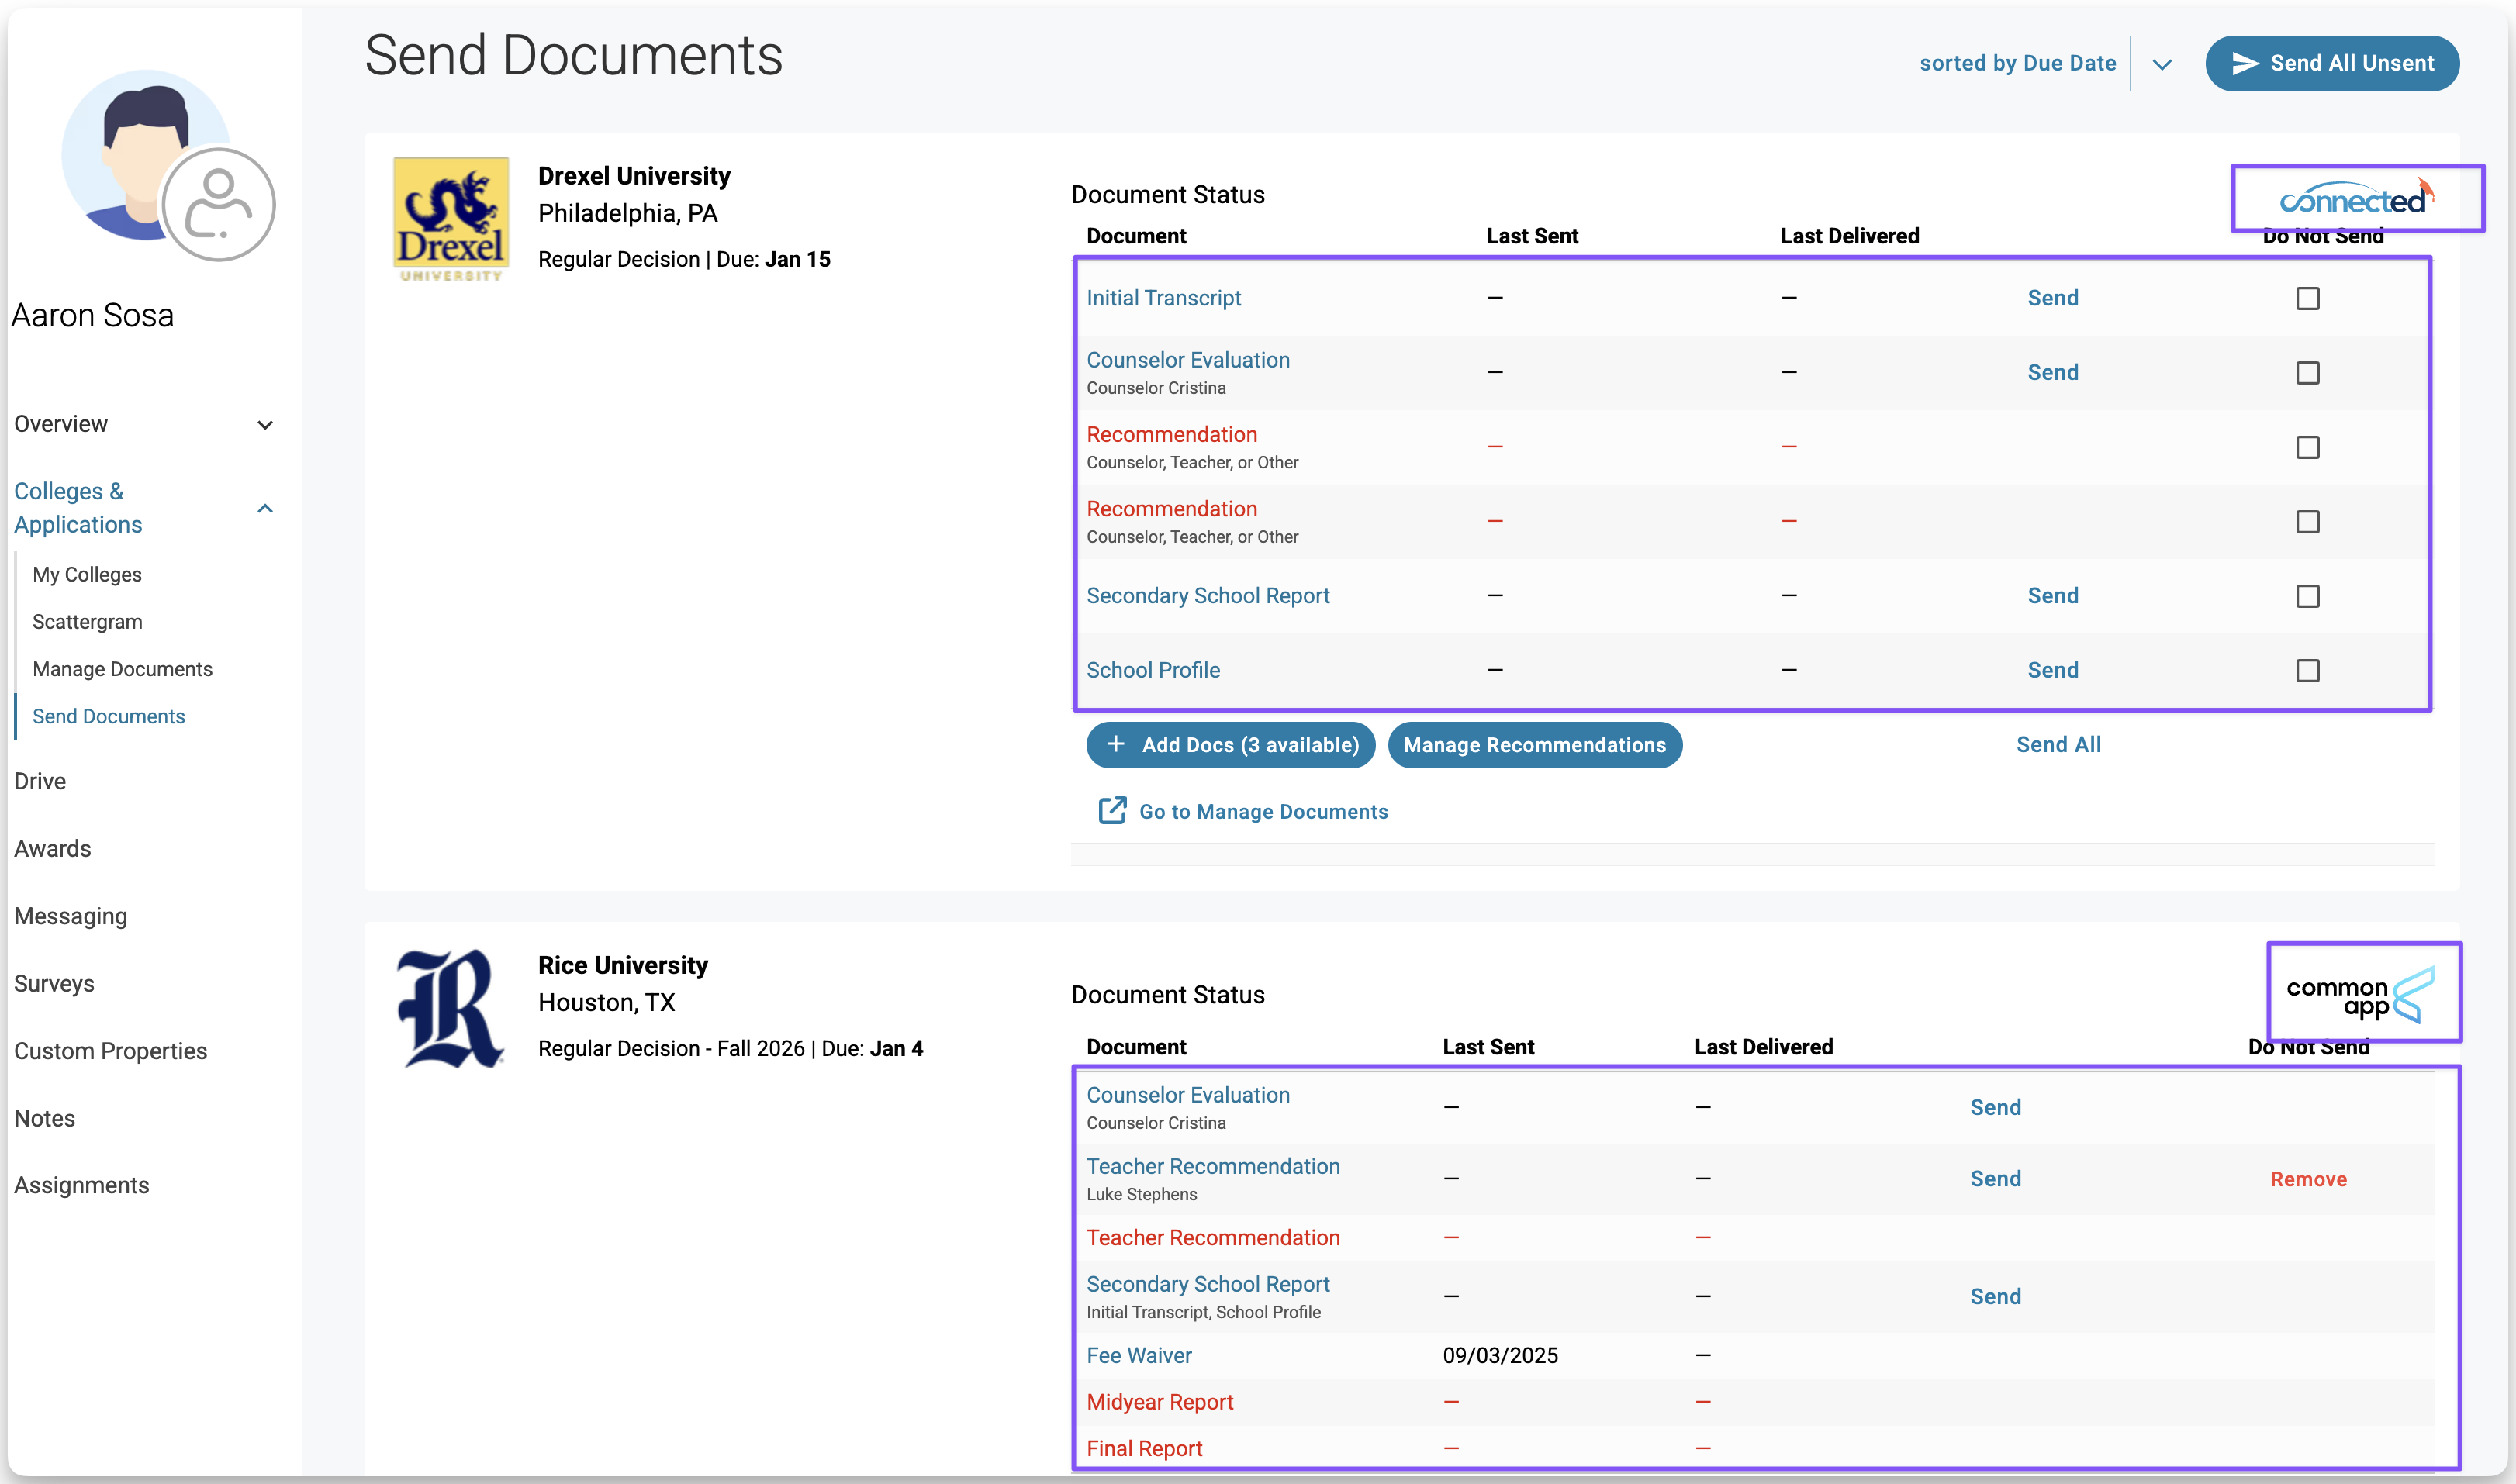
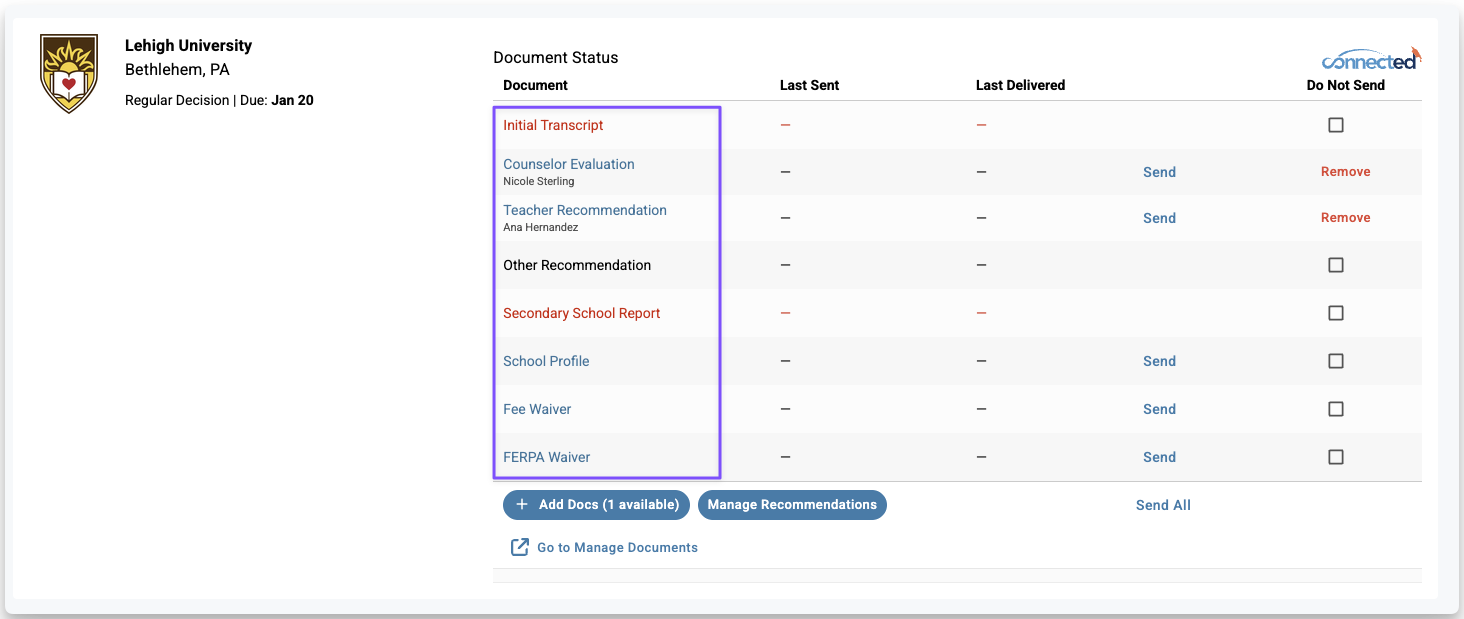
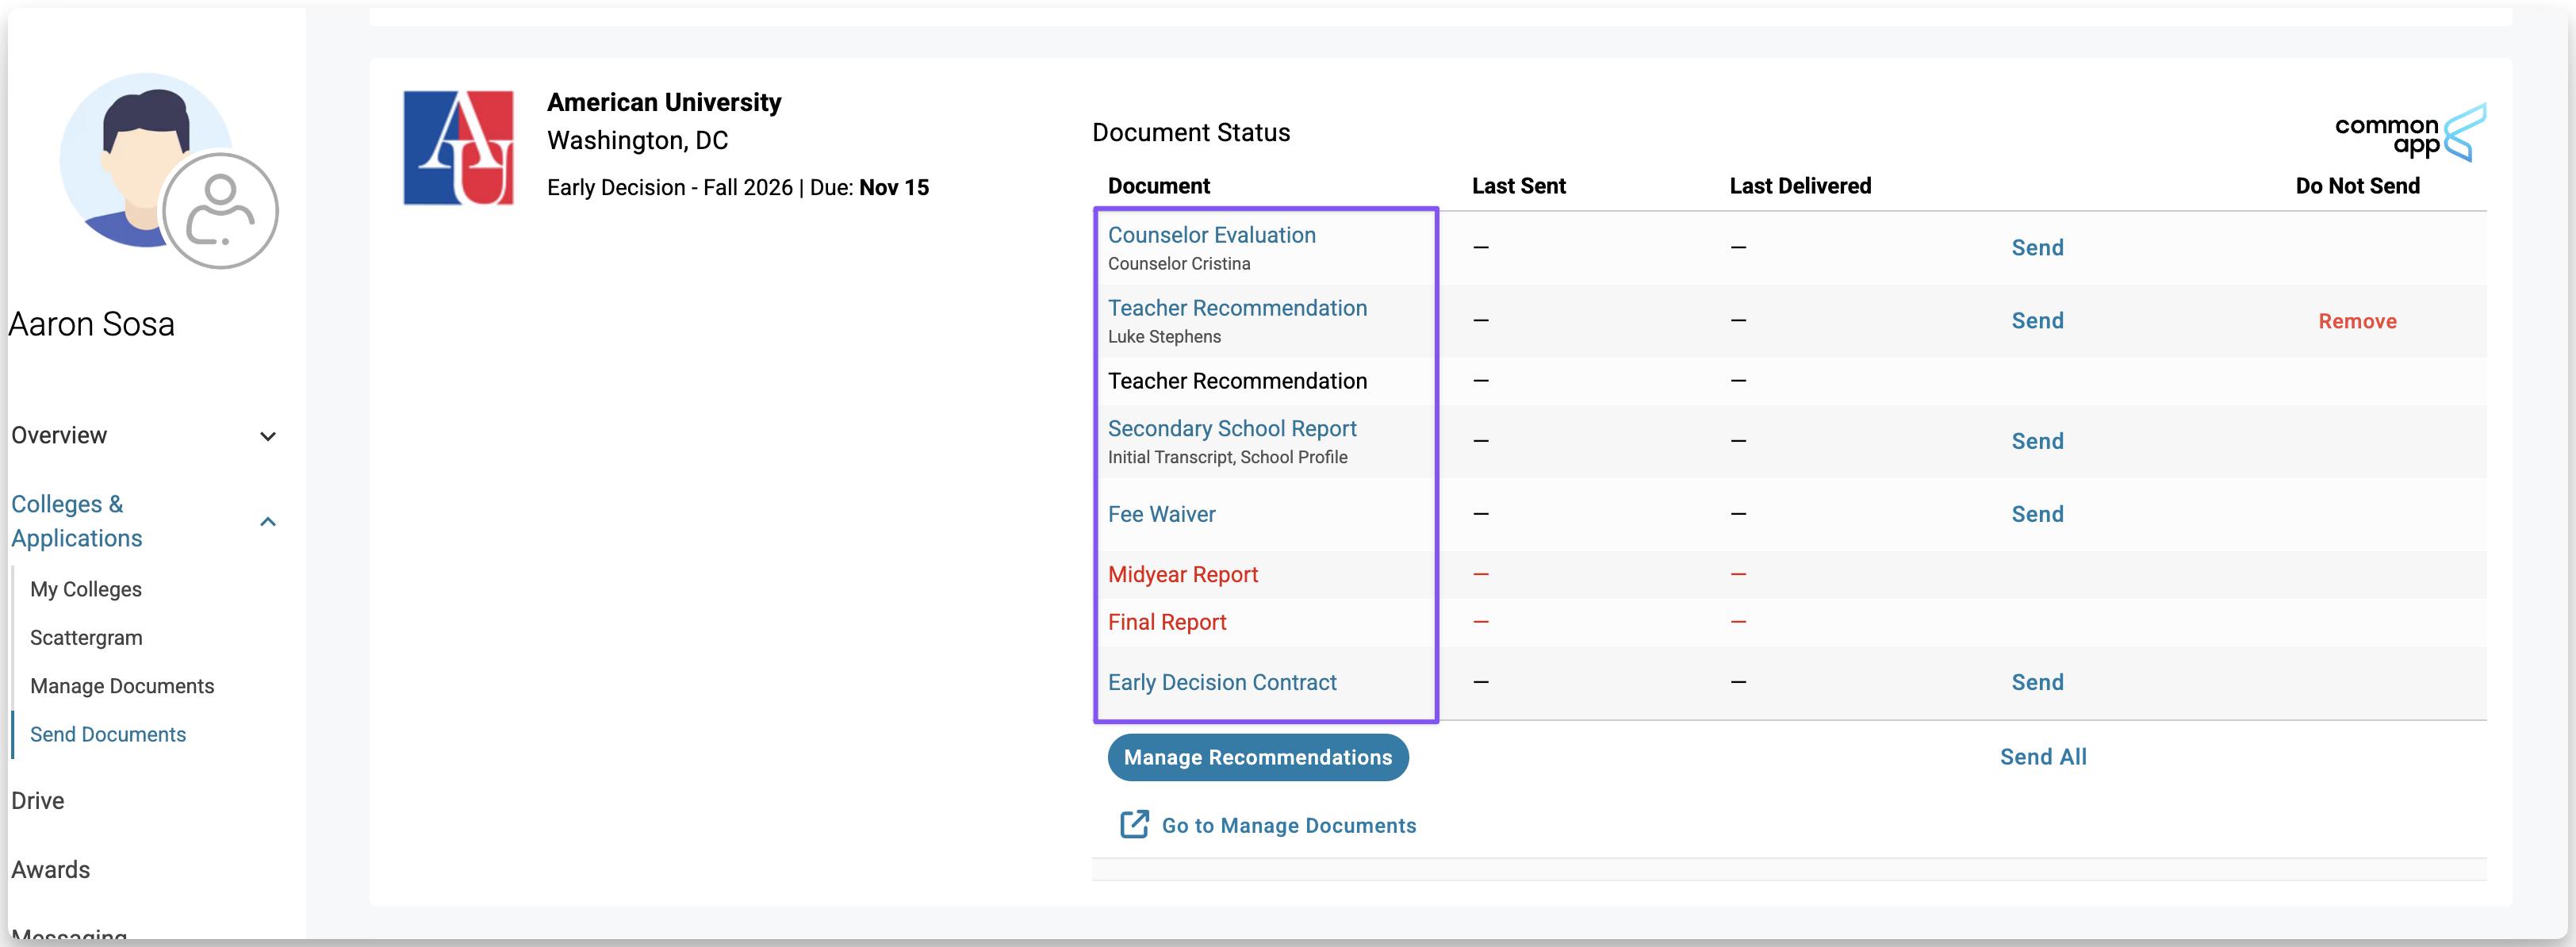
Here, you’ll see each college in the student’s Applying or Applied list and their document requirements.
If a college accepts documents electronically through Scoir, you’ll see “Connected” in the top-right corner of the college card
If your school is using the Common App integration and the school is synced from Common App, you’ll see a Common App label instead
For colleges that don’t accept electronic delivery, you’ll see options to download docs for manual sending
For each college, document requirements will be color-coded:
Documents in blue: On file and ready to send
Documents in red: Missing and required
Documents in black: Optional; these do not impact whether an application packet is considered complete
With the Common App integration, only standard Common App materials are supported for colleges a student is applying to through Common App. These differ from the document types you may be accustomed to working with in Scoir, and you’ll be limited to sending these standard forms. They appear in Scoir only after a student selects a start term and deadline in Common App for their schools.
School Reports are always required, but other required or optional documents may vary by college. Supported documents include:
School Report (required for all Common App applications)
Teacher Evaluations
Counselor Recommendation
Midyear Report
Final Report
Optional Report
Early Decision Agreement
Fee Waiver
If there are additional documents available to add to a student’s packet, click Add Docs to view the list and select which ones you want to include. (This option is not available for Common App colleges synced via the integration)
If a packet is missing a teacher or counselor recommendation, click Manage Recommendations to assign an available completed recommendation or replace one that’s already assigned.
If any documents are missing, they can be sent later once uploaded. You can click Manage Documents below the college. This will take you directly to the student’s Manage Documents page, already filtered for that college, where you can upload or create the missing document.
If there’s a document you don’t want to send to a particular college, check the Do Not Send box to the right of the document
If your school is using the Common App integration, the “Do Not Send” option is not available for Common App colleges.
Once you’re ready to begin sending, you can do so in the following ways:
Click Send next to a single document to send it to that specific college
Click Send All to send all available documents on file for that college
Or click Send All Unsent in the top right to send all unsent documents across all the student’s colleges.
The One-and-Done Rule For schools using the Common App integration: The ‘one-and-done’ policy means that when you send a document for one Common App college, that same document is made available to all colleges the student has applied to through Common App.
In Scoir, this means that once you send a document for any Common App college on a student’s list, that document is automatically sent to all other Common App colleges on their list as well. You’ll see the status update in real time as the document shows as Sent for each applicable college.
Scoir will also display a reminder about this policy before you send.
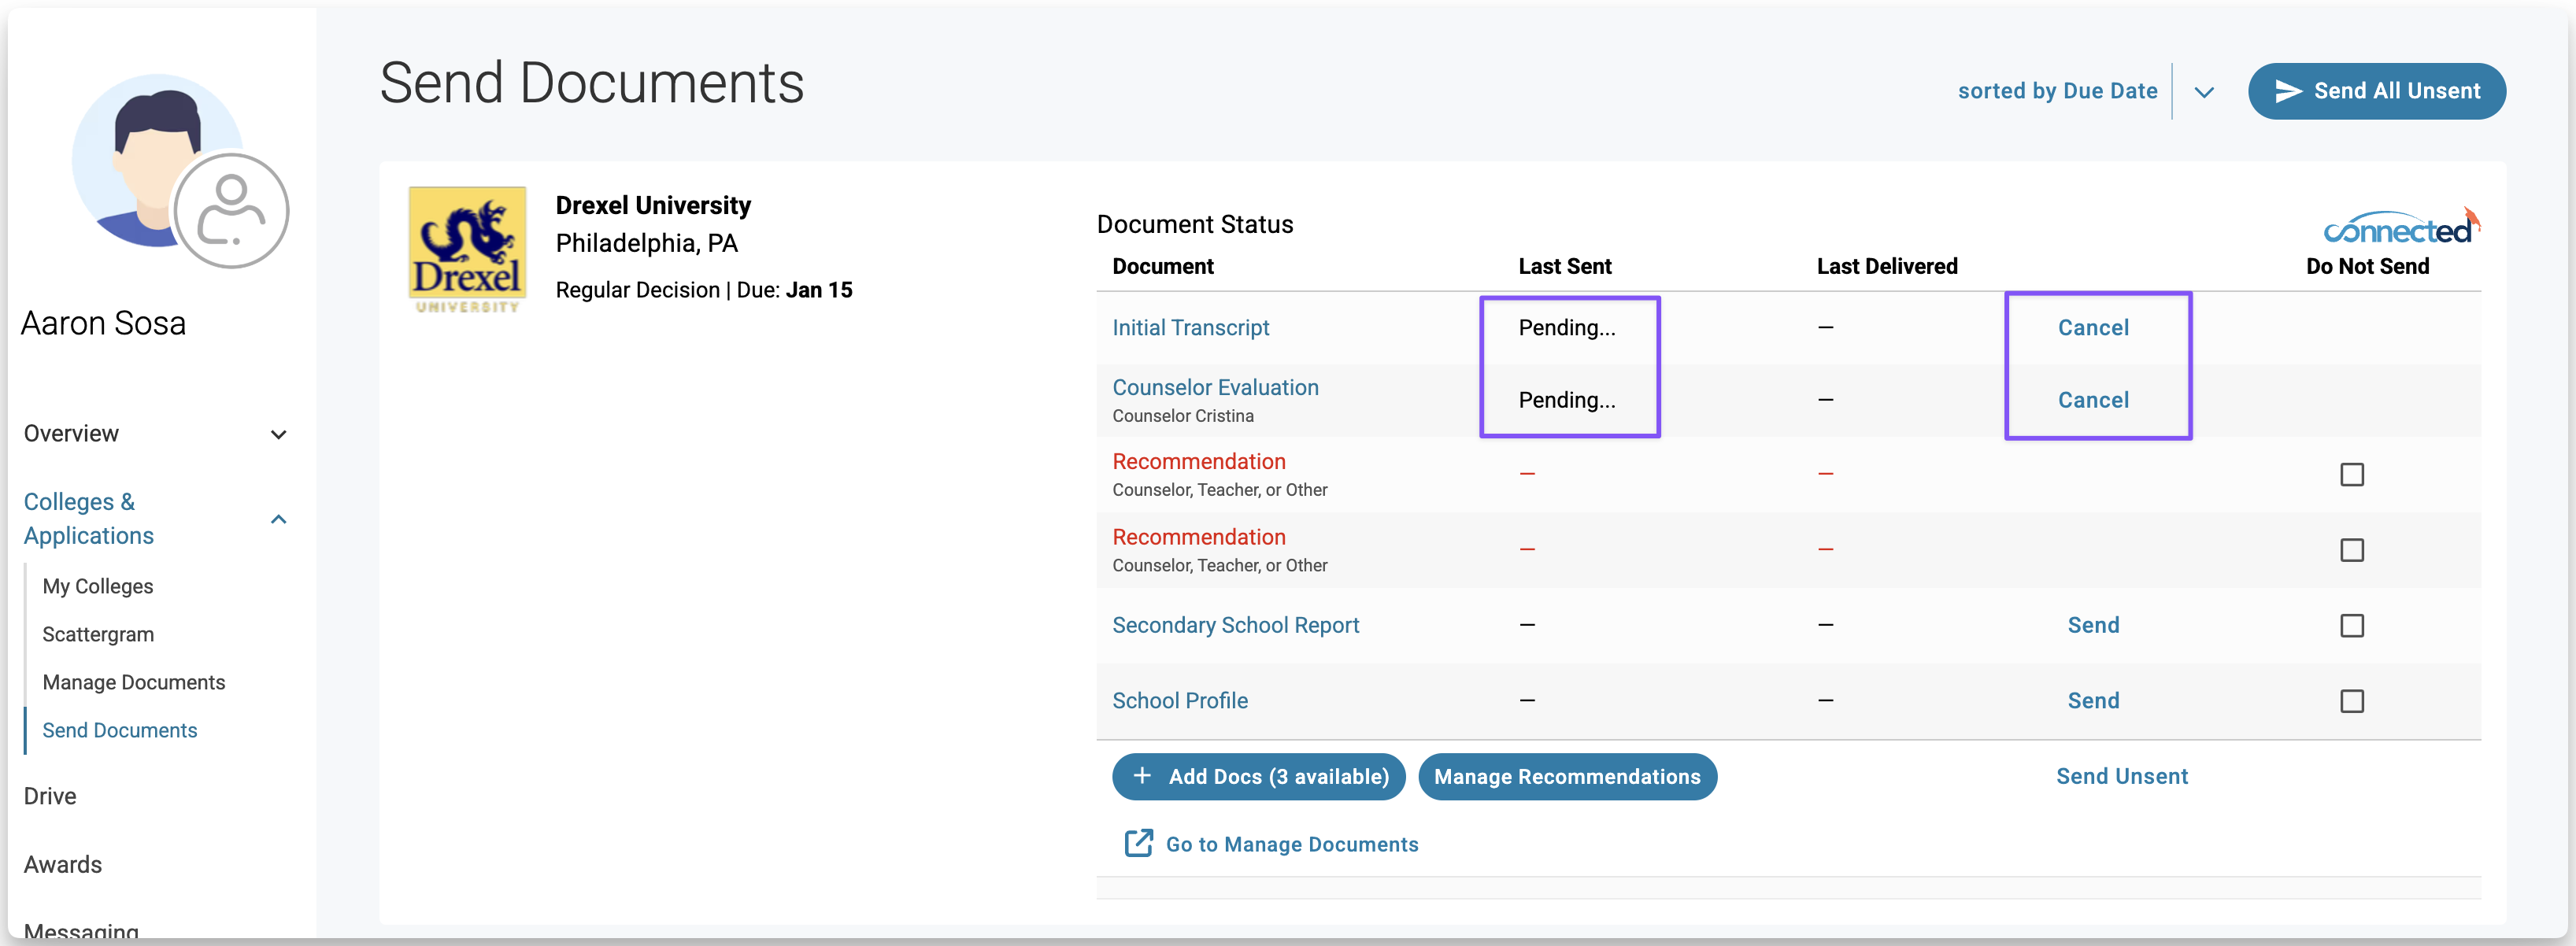
For colleges receiving documents directly from Scoir (not via the Common App integration): After sending, documents are placed in a queue and released in a nightly batch. Until the batch runs, their status shows as Pending, and you can still click Cancel to stop them from being sent. This batching process only applies to colleges that receive documents directly through Scoir.For Common App–synced colleges (via the integration): Documents are sent to Common App (not directly to the college). After the student submits their applications, Common App makes them available to each of those colleges. Unlike direct Scoir delivery, these aren’t batched nightly—they’re sent to Common App almost immediately (depending on volume).
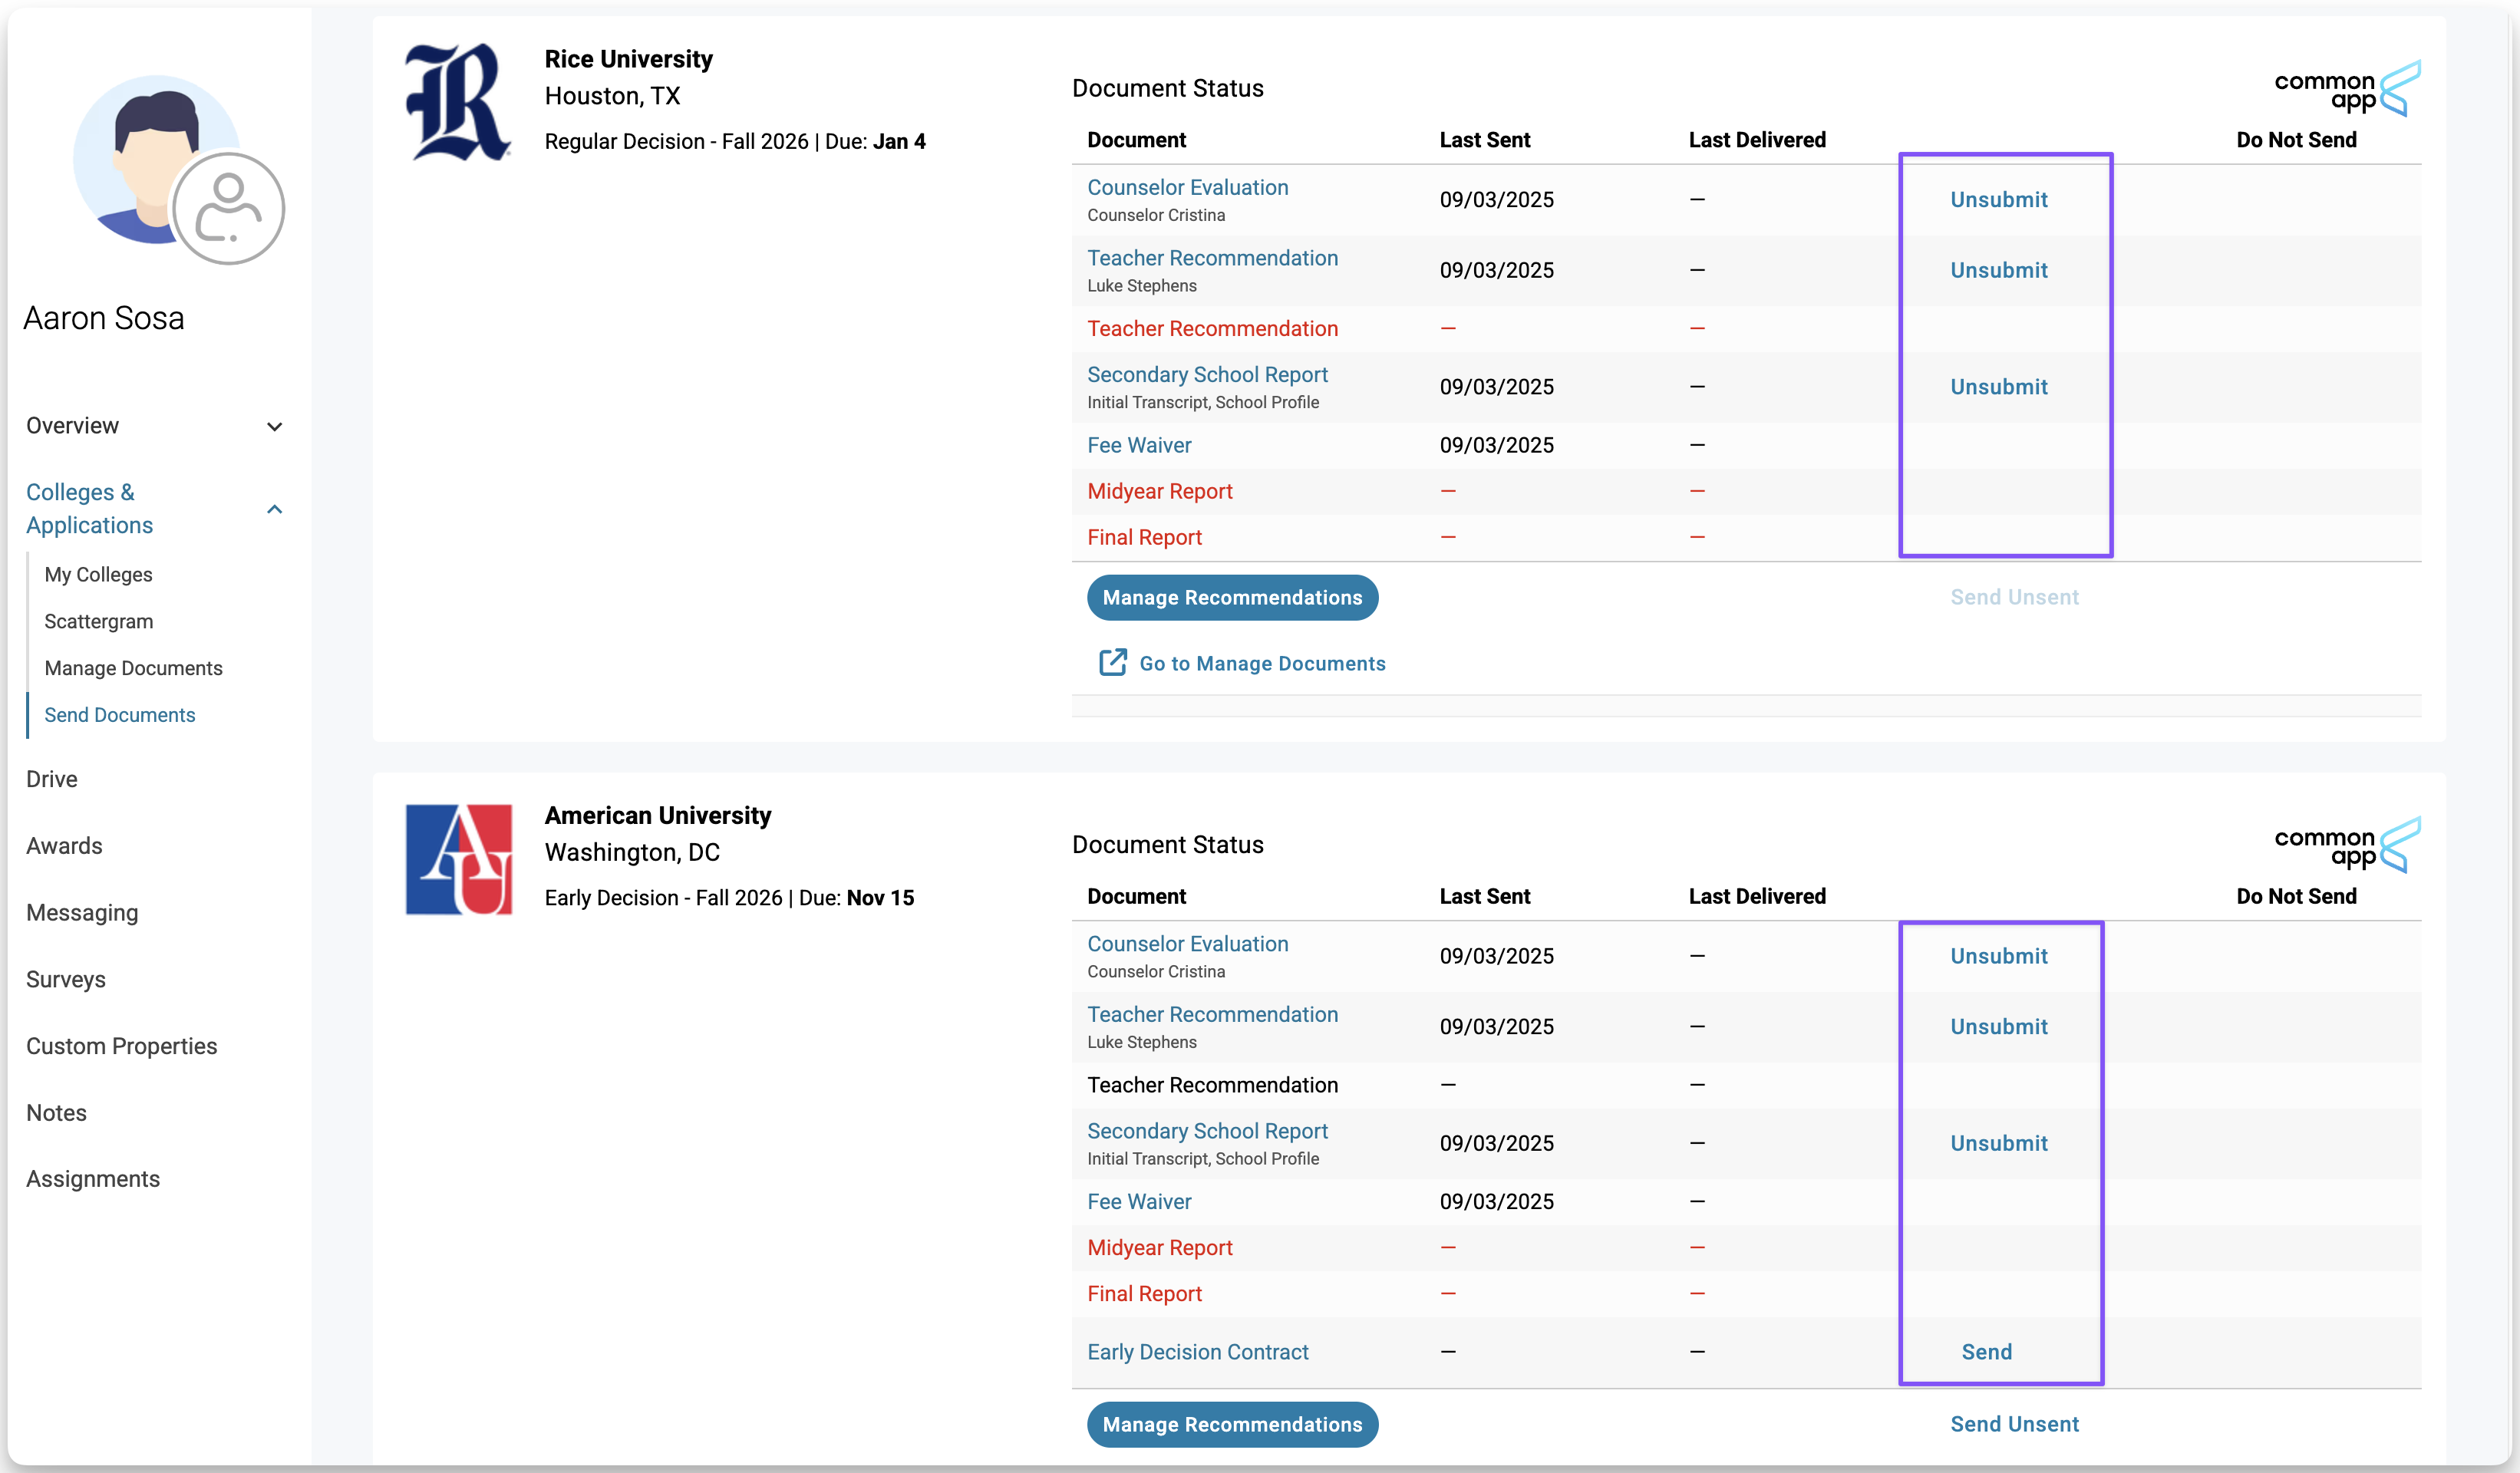
Unsubmitting Documents For Common App schools synced via the integration:
Counselor forms (e.g., School, Midyear, Final Reports, Counselor Evaluations): If none of the student’s Common App colleges have downloaded a counselor form, you can Unsubmit it for all Common App schools. However, once one Common App college downloads it, you can no longer unsubmit. To make changes, create and send an Optional Report. Exception: The Common App Fee Waiver and Early Decision Agreement cannot be unsubmitted once sent.
Teacher Recommendations: These behave differently. You can Unsubmit from schools that have not yet downloaded the teacher rec. You may choose to unsubmit for just one school or for all Common App colleges. If a particular college has already downloaded it, you cannot unsubmit for that school, but you can still unsubmit for the others.
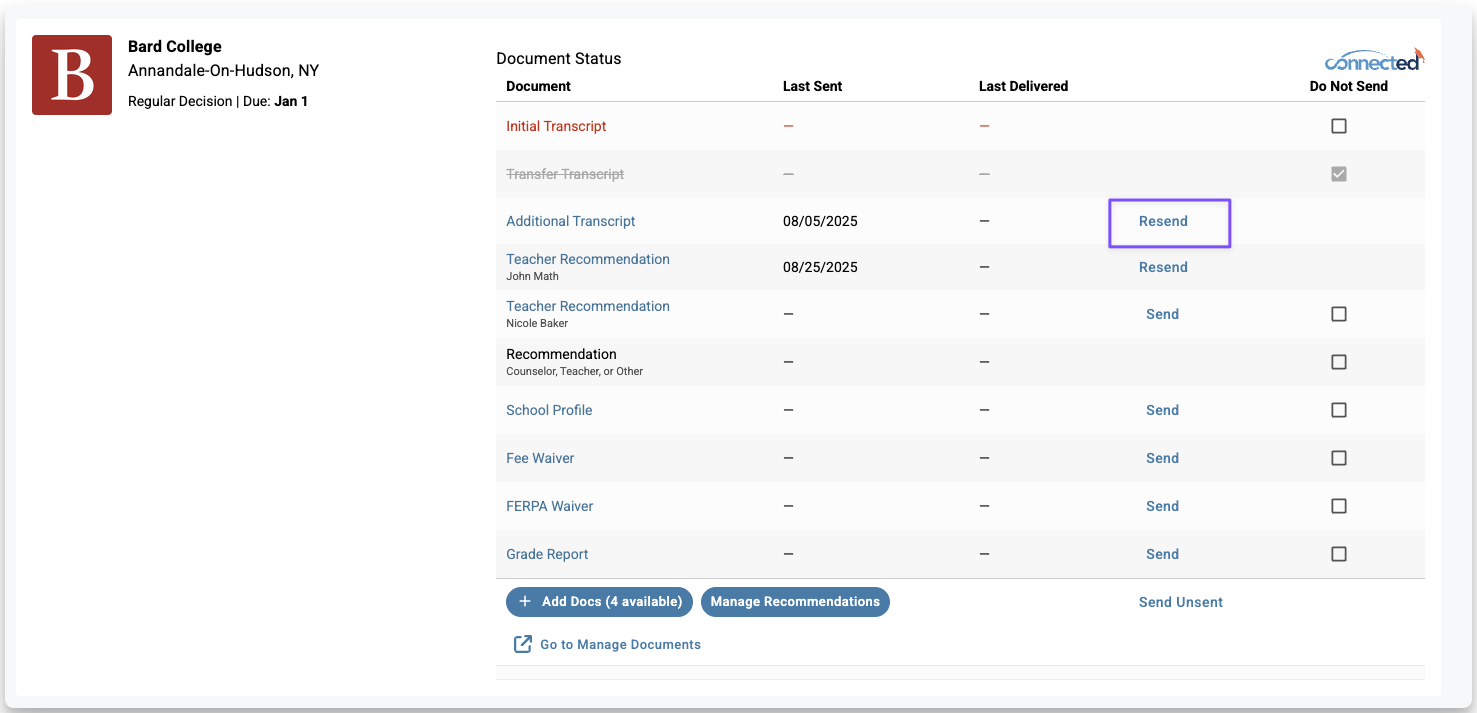
Counselors can Resend documents for non–Common App schools. You should only resend if you have made updates to the document as resending will update the last sent date
For Common App–synced colleges, the "Resend" option is not available.
Once a college has downloaded the document, you’ll see a date populate under Last Delivered
How to Track Document Status
After sending documents for a student, you can return to the Send Documents page on their profile to see their status:
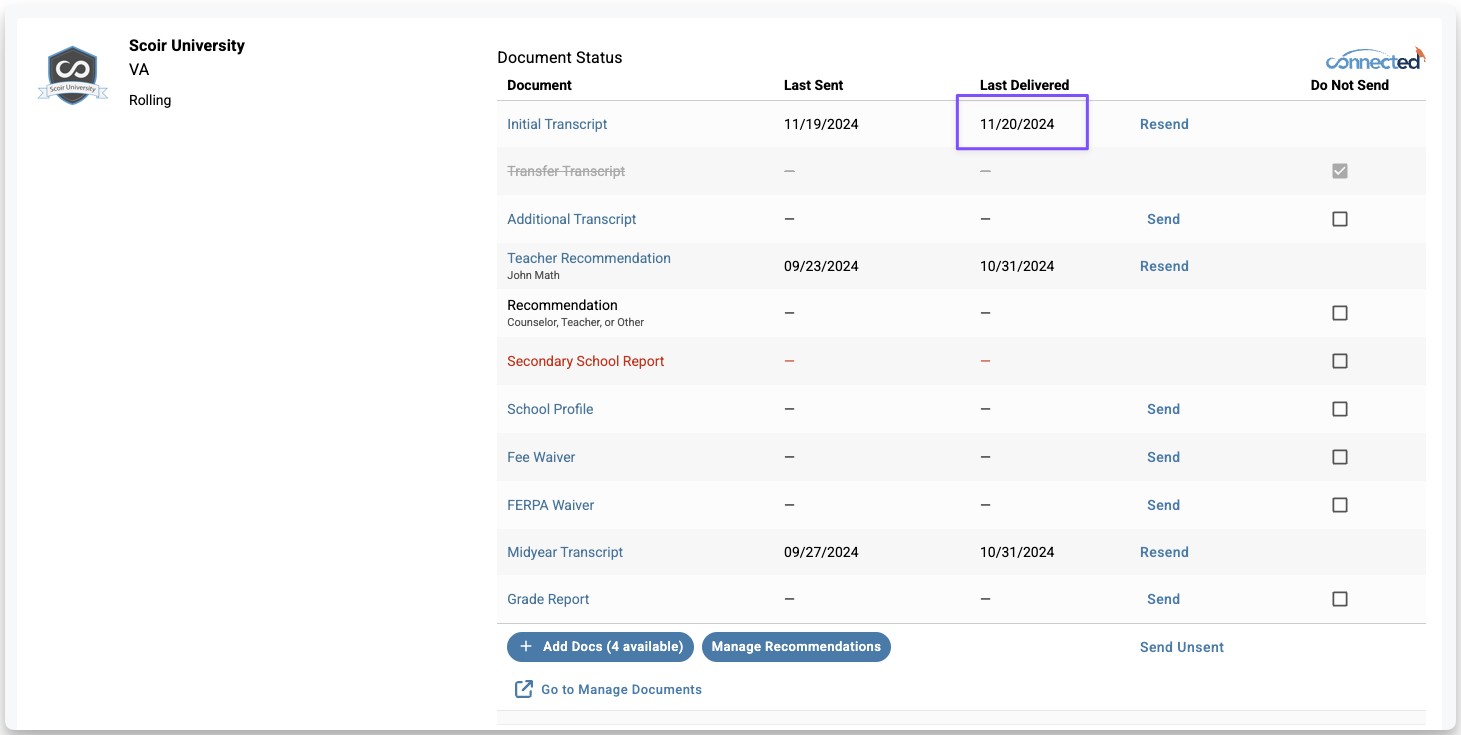
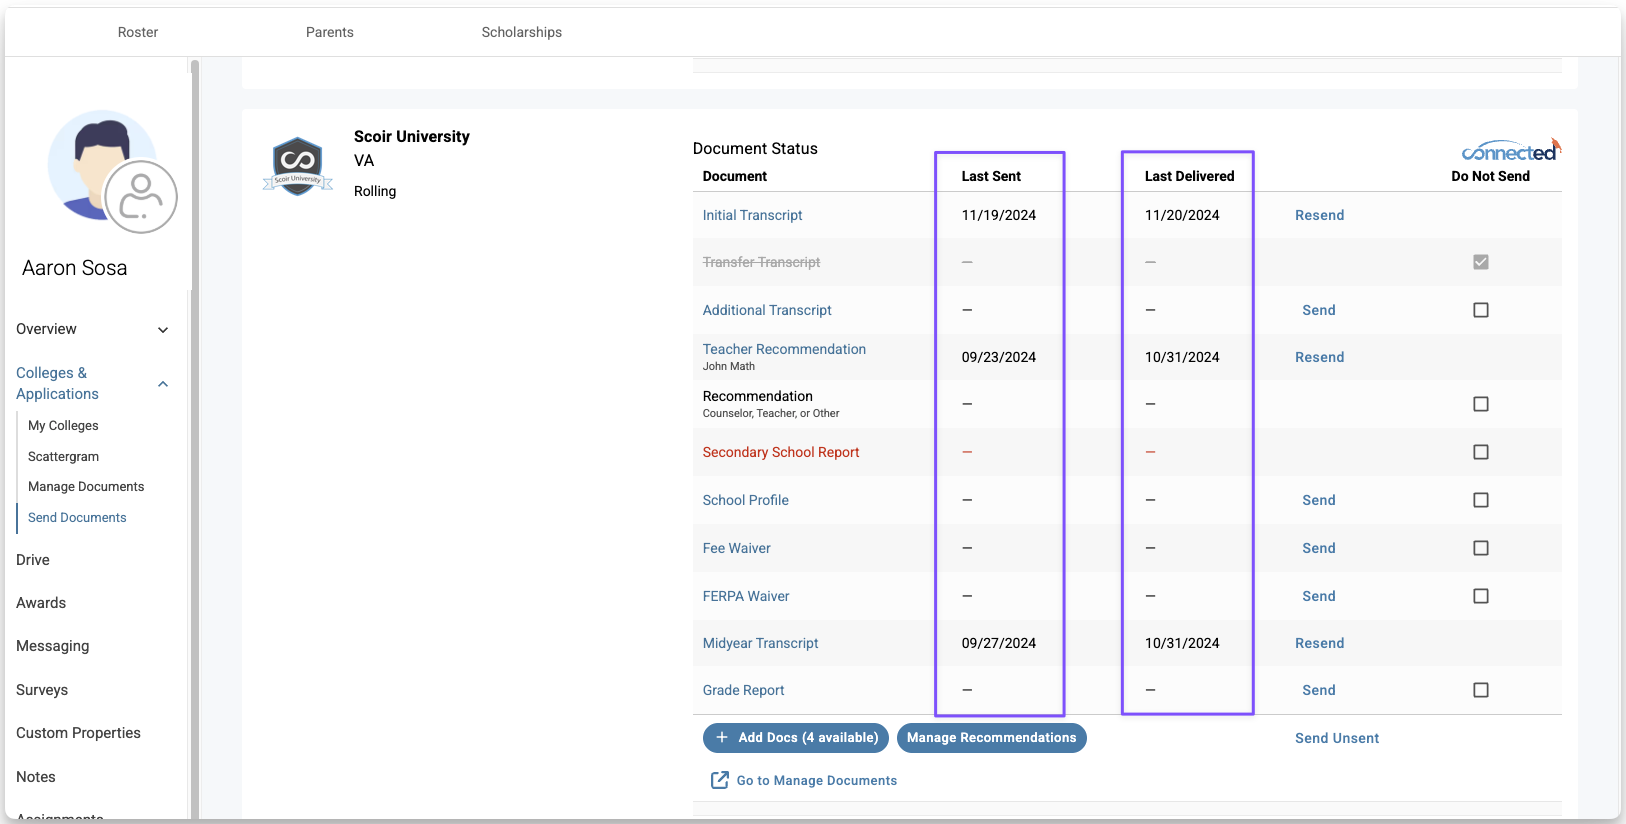
Last Sent – The date the document was sent
If your school is not using the Common App integration, this is the date you sent the document from Scoir directly to the college.
If your school is using the Common App integration, this is the date you sent the document from Scoir to Common App for colleges where the student is applying through Common App
Last Delivered – The date the college actually received the document
This may be when the document was delivered via SFTP, downloaded by the college, or retrieved from the Common App (if your school uses the integration)
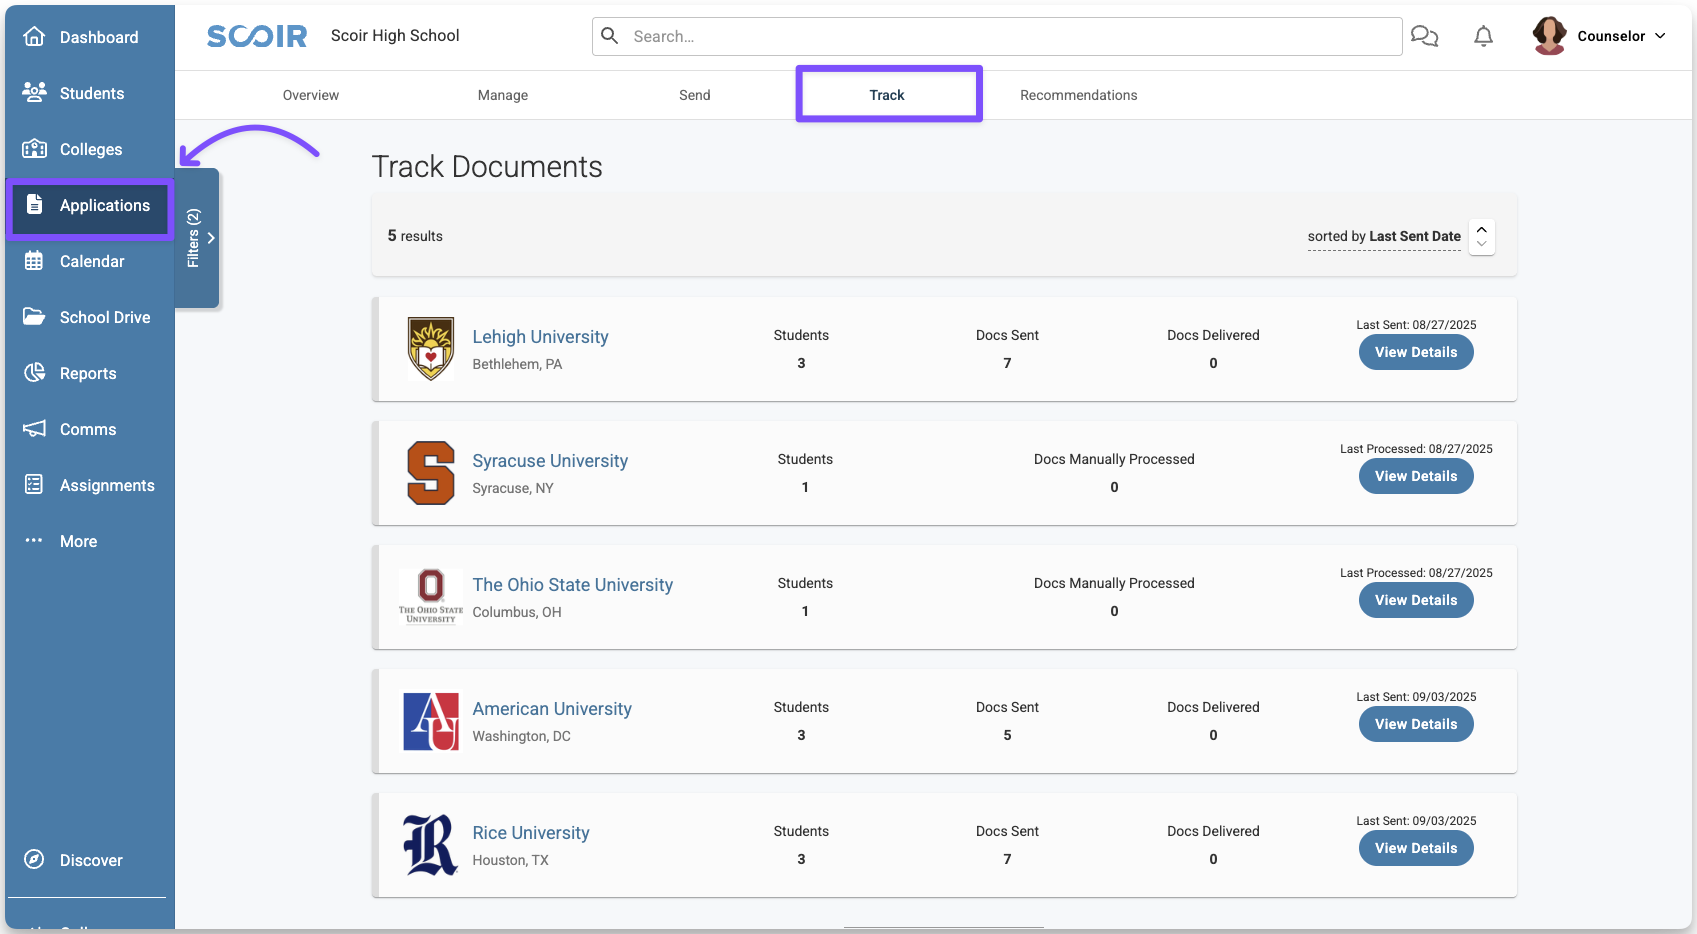
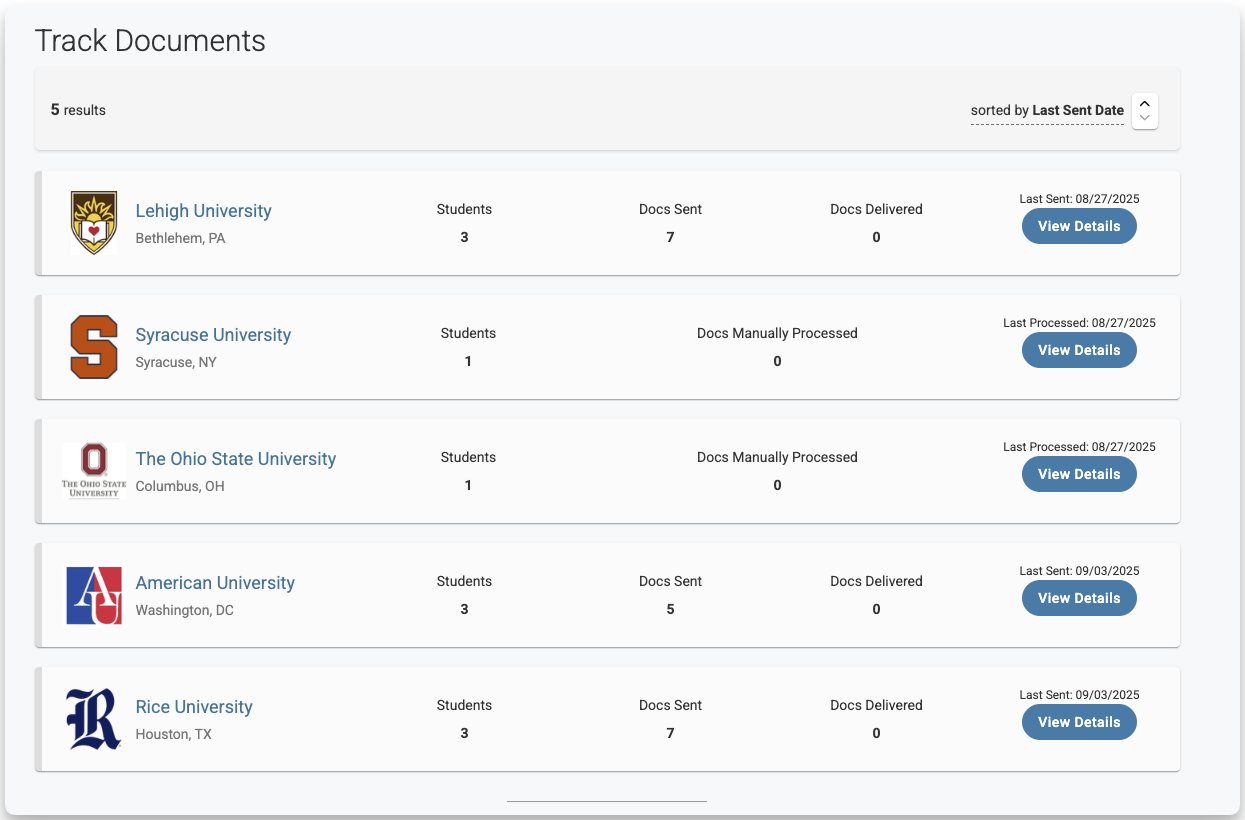
Tracking Documents by College
If you’d like to see documents sent to colleges (rather than tracking them by individual student):
Go to Applications > Track
Here you'll see:
The colleges you’ve sent documents to
The number of students applying to each
How many documents were sent or manually processed
How many were delivered
The date documents were last sent
Click View Details to see the list of students and the full application packet showing which documents were sent for each
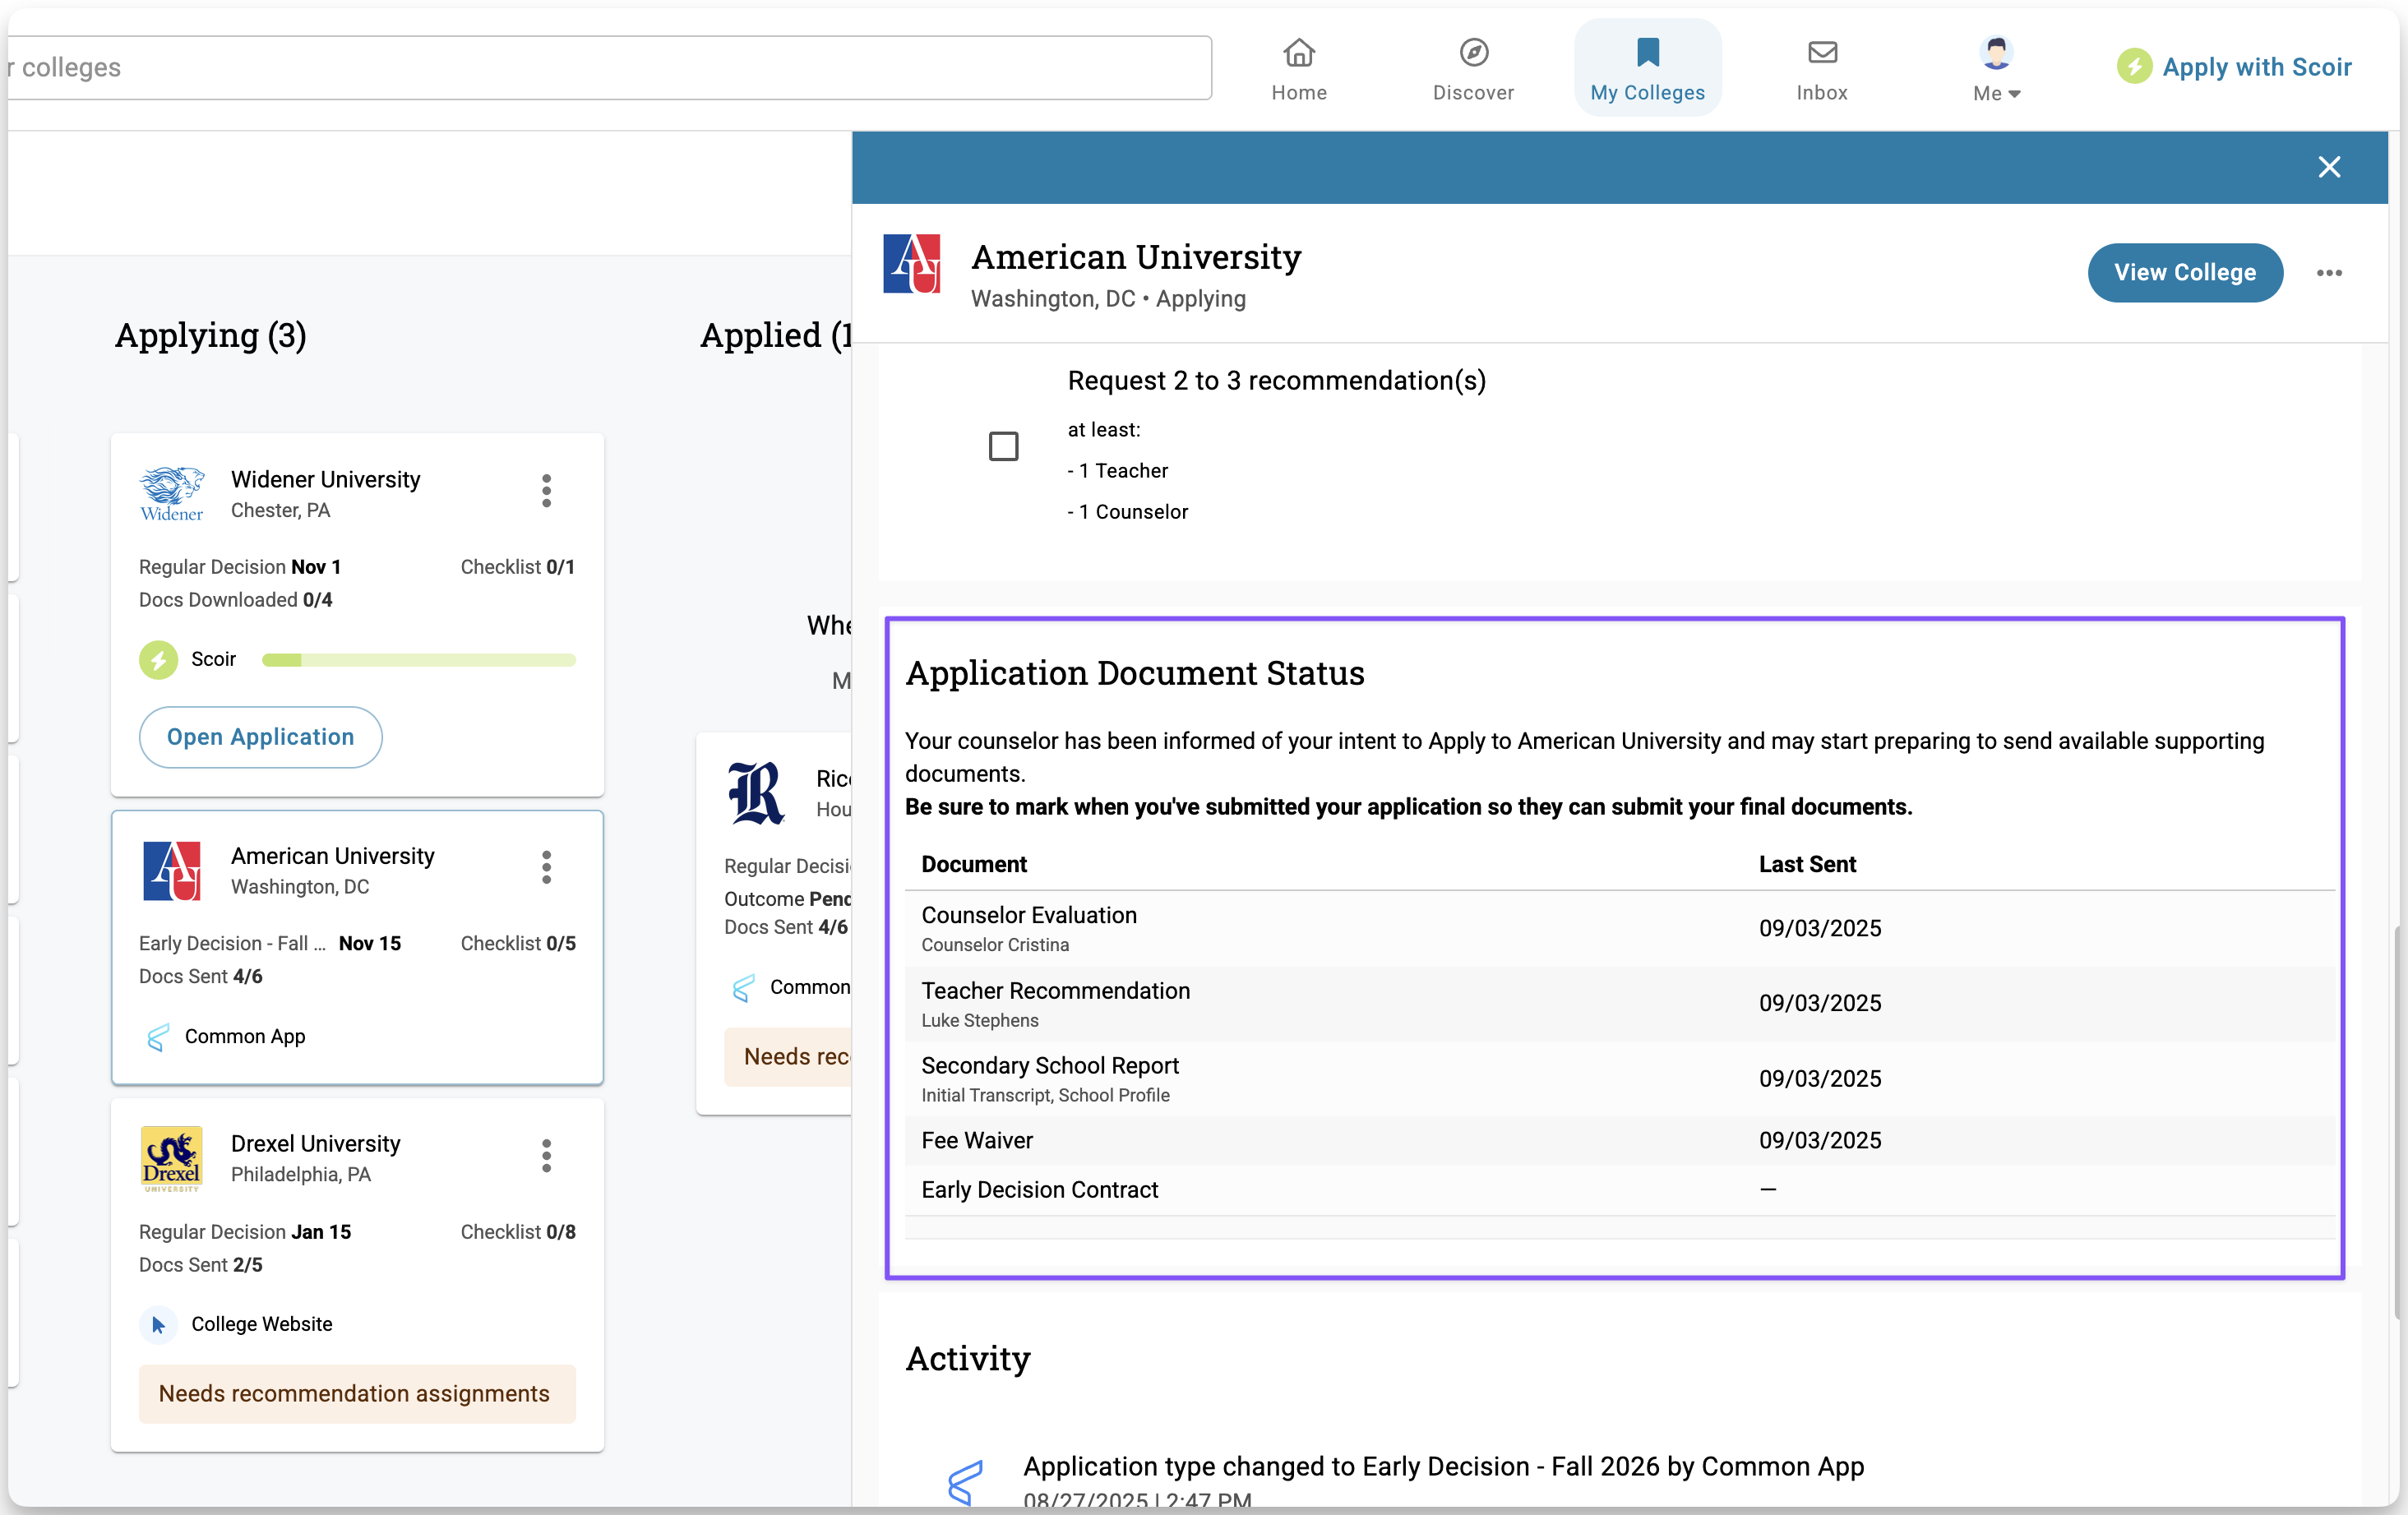
How Students Can Track Document Status
In Scoir, students can track the status of their application documents by opening a college tile in their My Colleges list. This opens a panel that includes an Application Document Status section.
When a document is created and on file, it will appear in that section.
Once the document is sent, a date will appear under Last Sent.
Students do not see when a document has been downloaded by the college.
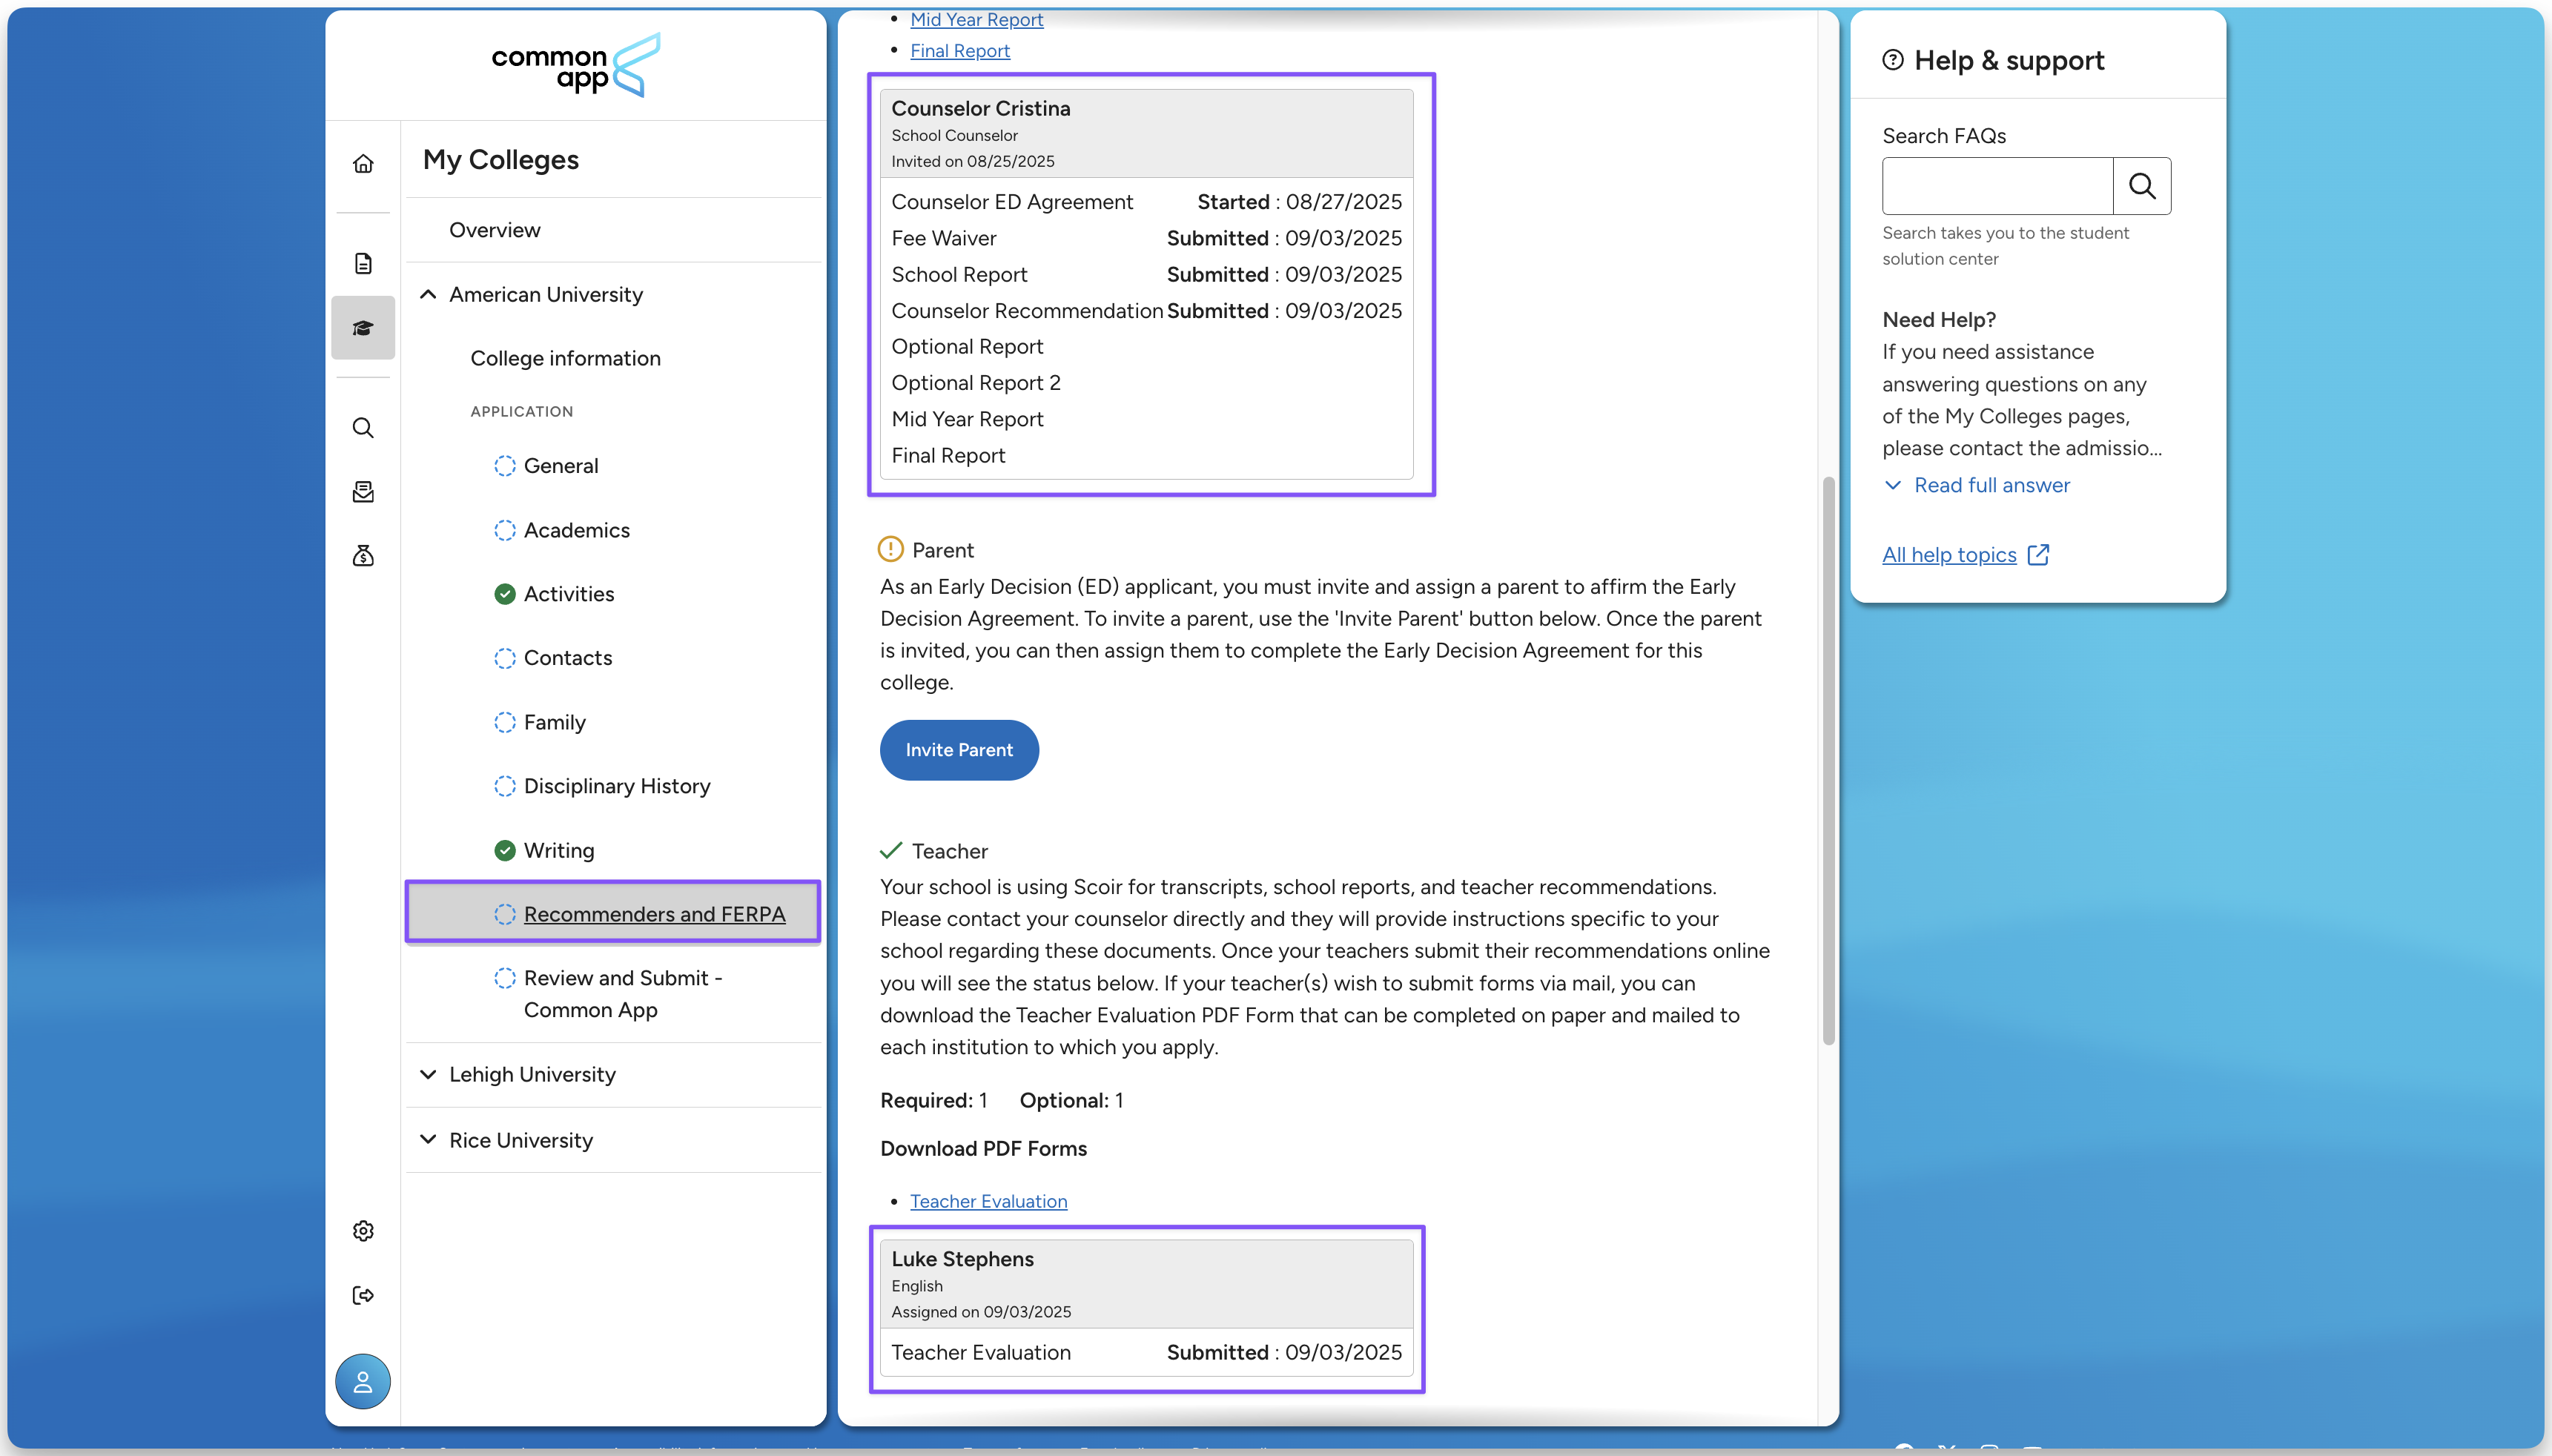
If your school uses the Common App integration, students can also track document activity in their Common App account:
For each college, the Recommenders and FERPA section will show when a document was started (created in Scoir) and when it was submitted (or sent) to Common App.
Download indicates the college is not yet accepting documents via Scoir and these packets must be mailed or emailed to the college directly outside of Scoir.