Apply with Scoir
Applicant resources
For Students: How to Apply Coalition with Scoir
For Non Scoir High School/International/Transfer Students: How many recommendations do I need?
Requesting Recommendations If Your School Does Not Use Scoir
For Non Scoir High School, International, and Transfer Students: Requesting transcripts, application documents, & letters of recommendation
Colleges resources
For Colleges: Scoir application integration checklist
For Colleges: Configuring your application
For Colleges: Application activation
For Colleges: Importing School Reference IDs
For Colleges: Testing your application
Recommender & supporter resources
Counselors
Getting started
For Counselors: Managing your account
Counselor Dashboard Overview
For Counselors/Teachers: Changing your email address
For Counselors: Creating a Demo Student Account
Using Scoir: A quick start guide for middle school counselors
Adding & managing students
For Counselors: Student roster overview
For Counselors: Add a new student
For Counselors: Student registration process
For Counselors: Labels overview
For Counselors: My student has a Scoir account but I can't see their data
For Counselors: Edit student profiles
For Counselors: Student transferring high schools
For Counselors: Archiving or Deleting Students in Scoir
For Counselors: Recording scholarships and awards for students
For Counselors: Create and manage Saved Views
Managing parents
For Counselors: Using the Parent Roster
Why can't parents see Scattergrams, Surveys, and other Scoir features?
College & career planning
Common App™ in Scoir
Counselors: Using Scoir with Common App
Counselors: Managing Fee Waivers for Common App
Counselors: Managing Common App Early Decision (ED) Agreements in Scoir
Scoir + Common App Integration – FAQ
For Counselors: Viewing students’ career interests
For Counselors: PrinciplesYou character assessment overview
For Counselors: Searching and filtering colleges
For Counselors: Suggesting colleges
For Counselors: Add a college to a student's college list
For Counselors: Manage colleges on behalf of a student
For Counselors: How to view a student's college list in table layout
For Counselors: Managing and using Scattergrams
For Counselors: Understanding List Scores
For Counselors: College Selectivity Levels & Student Match Levels overview
For Counselors: A guide to Predictive Chances with Scoir AI
For Counselors: Guide to Acceptance Likelihood and Intelligent Match
For Counselors: Set student outcomes and post-graduate plans
For Counselors: Discover Programs
For Counselors: Applications Overview
For Counselors: Admission Intelligence FAQ
Document management
School Drive & student Drives
Choosing the right way to share resources with students
For Counselors: Using School Drive
For Counselors: View and manage your student's Drive
For Counselors: Bulk add files & links to students' Drives
For Counselors: Adding a YouTube video to My Drive
Document preparation & uploading
For Counselors: Manage application materials
Counselors: Create a Secondary School Report (SSR) for Individual Students
Counselors: Midyear Reports and Transcripts
For Counselors: Final Reports and Transcripts
For Counselors: Grade Reports (Individual)
For Counselors: Application Fee Waivers
For Counselors: Digitally Signing Early Decision Contracts/Agreements
For Counselors: Completing second Early Decision contract for the same student
For Counselors: A Guide to Letters of Recommendation in Scoir
Counselors: Complete a counselor evaluation/recommendation
Counselors: Checking the status of teacher recommendation requests
Counselors: Uploading recommendations on Behalf of Others
For Counselors: Managing FERPA on behalf of a student
Understanding FERPA - Frequently asked questions
Document sending
Counselors: Bulk Sending Application Documents
For Counselors: Sending Application Documents for individual students
For Counselors: Understanding what "Complete Packets Ready to Send" means
For Counselors: Understanding the "Needs Attention" document status
For Counselors: Cancel sent documents - the send docs "undo" button 😮
For Counselors: Resending an updated transcript after it was already sent
For Counselors: Why aren't documents appearing in the list to be sent to colleges?
Tracking & troubleshooting
Assignments & surveys
For Counselors: Using Plans
For Counselors: Create and assign Tasks
For Counselors: Using Forms
For Counselors: Creating, publishing, and editing Surveys
For Counselors: Viewing Survey results
For Counselors: How do students and parents know that a survey was sent?
For Counselors: Creating brag sheets in Scoir
Uploading test scores & other data
Test Score Imports: ACT score imports
Test Score Imports: ACT and PreACT scores via rapid manual entry
Uploading College Board test scores
Manually adding TOEFL scores for each student
For Counselors: Importing Custom Properties
Bulk add/update Grade Report
Bulk add/update Senior Courses
Bulk add/update Student GPAs
Bulk add/update Transcripts
Reporting
For Counselors: Running reports on student data
For Counselors: Exporting reports from student roster view
For Counselors: Custom Properties and Property Groups
Communication & notifications
For Counselors: Messaging students & parents in Scoir
For Counselors: The Email Center
For Counselors: Sending and scheduling emails
For Counselors: Emailing users using the advanced email integration
For Counselors: Scoir Library & Email Subscription management
For Counselors: What notifications will students receive from Scoir?
For Counselors: Notifications & alerts
Calendar & scheduling
Using the calendar
For Counselors: Calendar overview
For Counselors: Linking your Scoir calendar to an external calendar
Visits & office hours
For Counselors: Scheduling in-person visits & availability
For Counselors: Scheduling virtual visits
For Counselors: Scheduling visits for non-college organizations
For Counselors: Scheduling multiple college visits within the same time slot
For Counselors: Students' notification of college visits
For Counselors: Understanding Scoir RSVP dates
For Counselors: Scheduling office hours
For Counselors: Office hours from the student perspective
For Counselors: Edit or delete a visit
Resources & checklists
Students
Account setup & management
For Students: Scoir student overview
For Students: Creating an account when invited by your high school
For Students: Creating an account on your own (non-Scoir high school student account)
For Students: How to tell if you are linked to a high school or not
For Students: Invite a parent or guardian to Scoir
For Students: What to do if you have multiple accounts
Students: Link your existing Scoir account to a high school
For Students: Change your email or add a backup email
For Students: Delete your account
Build your student profile
For Students: Update your personal information
For Students: First generation students
Students: How to Access and Sign Your FERPA in Scoir
For Students: Edit Your Academic Info (School, GPA, and Test Scores)
For Students: Record your activities and achievements
For Students: Create and export a resume
For Students: Using your Drive
Explore careers
For Students: Taking a career interest assessment
For Students: Taking the PrinciplesYou character assessment
For Students: Discover careers
For Students: Managing careers in your profile
For Students & Parents: Access College Guidance Network with single sign-on (SSO)
College planning
Explore colleges
For Students: Setting your college preferences
For Students: Student interest categories
For Students: Discover colleges
For Students: College profiles
For Students: Comparing colleges
For Students: Viewing Scattergrams
For Students: Discover Events
For Students: Discover Programs
Build & manage your college list
For Students: Understanding what it means to follow a college in Scoir
For Students: My Colleges
For Students: View your college list in a table layout
For Students & Parents: Create and Manage Views
The Balanced List Score
For Students: View & simulate your Predictive Chances for college admissions
For Students: Updating outcomes and post graduate plans
Students: How to Sign your FERPA in Common App
Application documents & resources
For Students: Understanding Test Optional, Test Free & Test Required SAT/ACT Scores
Students: Requesting a Fee Waiver in Scoir
For Students: Early Decision Contracts in Scoir
For Scoir connected students: Requesting transcripts
Students: Requesting Teacher Recommendations if Your School Uses Scoir
For Students: Checklist for ensuring application document delivery
Students: Using Scoir & Common App if Your School Doesn't Connect Them
Students: Requesting Fee Waivers for Common App
Students: Completing an Early Decision (ED) Agreement for Common App
Students: Getting Started with Scoir & Common App
Students: Connecting Common App & Scoir
Assignments
Office hours & visits
Scoir mobile app
College Admissions
Staff setup & management
For Colleges: Add & invite admissions staff
For Colleges: Admissions Officer Roles & Permissions
For Colleges: Remove admissions staff
Integrating Slate with Scoir
Integrating Slate with Scoir
Step 1: Prepare Slate for Scoir Documents and Record Creation
Step 2: Connect Slate and Scoir
Step 3: Map Scoir Student Data and Documents in Slate
For Colleges: Troubleshooting Slate integration with Scoir
Colleges: Scoir Audience Integration with Slate
Applications & documents
Application rounds & requirements
Understanding Application Rounds in Scoir
Creating Application Document Requirements
Creating an Application Deadline
For Colleges: Editing, copying, and deleting Application Requirements
Receiving documents
For Colleges: Scoir Index File
For Colleges: Set up SFTP integration to recieve documents from Scoir
For Colleges: Troubleshoot configuration of SFTP integration with Scoir
For Colleges: Slate Mapping
For Colleges: Supported Document Types
For Non-Slate Colleges: Configuring File Preferences
For Colleges: Downloading & reviewing documents
For Colleges: Grade Reports
For Colleges: The Scoir CSV/Manifest file
For Colleges: How to access student application documents in Scoir
Managing college profile content
For Colleges: Premium Presence overview
Colleges: Create & manage Posts, Events, and Programs
For Colleges: Events
For Colleges: Programs
For Colleges: Guidelines for college profile header photos
Student & guardian messaging
For Colleges: Outreach Messaging overview
For Colleges: Create one-time messages
For Colleges: Create automated messages
Explore high schools & schedule visits
Data insights
District Administrators
For District Admins: Logging into your Network account
For District Admins: Getting started with a Network account
For District Admins: Adding and managing users in your Network account
For District Admins: Network roles and permissions
For District Admins: District communications
For District Admins: Setting up and enabling Advanced Email features
School Administrators
School account setup: Data requirements
Grades 9-12
Grades 9-12: Scoir data gathering instructions (Naviance & SIS for students, parents, and teachers)
Grades 9-12: Scoir data gathering instructions (Naviance, ClassLink & SIS for parents)
Grades 9-12: Scoir data gathering instructions (Naviance, Clever & SIS for parents)
Grades 9-12: Scoir data gathering instructions (ClassLink & SIS for parents)
Grades 9-12: Scoir data gathering instructions (Clever & SIS for parents)
Grades 9-12: Exporting data from your Student Information System (SIS)
Grades 6-8
Grades 6-8: Exporting data from your Student Information System (SIS)
Grades 6-8: Scoir data gathering instructions for account setup (Clever)
Grades 6-8: Scoir data gathering instructions for account setup (ClassLink)
Grades 6-12
Grades 6-12: Scoir data gathering instructions (ClassLink & SIS for parents)
Grades 6-12: Scoir data gathering instructions (Clever & SIS for parents)
Grades 6-12: Scoir data gathering instructions (Naviance, ClassLink & SIS for parents)
Grades 6-12: Scoir data gathering instructions (Naviance & SIS for students, parents, and teachers)
Grades 6-12: Exporting data from your Student Information System (SIS)
Grades 6-12: Scoir data gathering instructions (Naviance, Clever & SIS for parents)
System-Specific Instructions
School account settings
School Settings Overview
Enable application materials (Documents)
Setting your high school student email domain
Setting up and enabling Advanced Email
Ensuring Scoir access and emails will be delivered
Request a GPA scale change
Display school photos for students on their profile
Set Up Your School Reports Template
Managing Student Transcript Settings
Configuring FERPA Waiver & Release Forms
Managing Recommendation Settings
School logo and template for teacher recommendations
Student self-reporting for GPA and test scores
Pending Acknowledgement
Predictive Chances and Scattergram display settings
For Counselors: Overriding a college's application document requirements
Can counselors control who sees Balanced List scores?
Can counselors adjust Balanced List minimums?
Can Balanced List Scores be based on just colleges marked as Applying and Applied?
User setup & roles
Users page overview
Adding and removing counselors and other staff to Scoir
Inviting faculty and staff
Understanding and assigning roles and permissions
Inviting Students
Assigning counselors to students
Inviting parents or guardians
Inform students, families, and staff about Scoir with these templates
Data uploads
Parents
Account setup & management
Parents/Guardians: Managing your email notifications
For Parents/Guardians: Changing your email address
For Parents & Guardians: Getting to Know Your Dashboard
For Parents: How to create and link your account to your student and their school
For Parents/Guardians: Change your Scoir password
Supporting your students
For Parents/Guardians: View your student’s college list
For Parents: View your student’s college list in a table layout
For Parents/Guardians: Suggesting colleges to your student
For Parents/Guardians: Unsuggesting a college for my student
For Parents/Guardians: View and simulate your student’s Predictive Chances
For Parents: View and manage your student’s Drive
For Parents/Guardians: Digitally signing your student's early decision contract
How parents can sign the FERPA release
Searching for colleges
For Parents/Guardians: Searching for colleges
For Parents/Guardians: Viewing college profiles
For Parents/Guardians: Viewing Scattergrams
For Parents/Guardians: Comparing colleges
For Parents/Guardians: Financial information & estimates
For Parents/Guardians: Discover College Events
For Parents/Guardians: Discover Programs
Assignments
Scoir mobile app
Teachers
Community Based Organizations (CBOs)
Product Updates
Table of Contents
- Browse by topic
- District Administrators
- For District Admins: Getting started with a Network account
For District Admins: Getting started with a Network account
If your school community includes multiple schools or campuses within a district, Scoir enables you to connect these schools into a Network. This way, you can use Scoir to oversee performance, manage goals, and collaborate seamlessly with other schools in your district from a single account. To get started, log into your district account and take a quick tour of the guide below.
For quicker navigation, use the table of contents on the right to jump to a specific section 👉
Network Dashboard
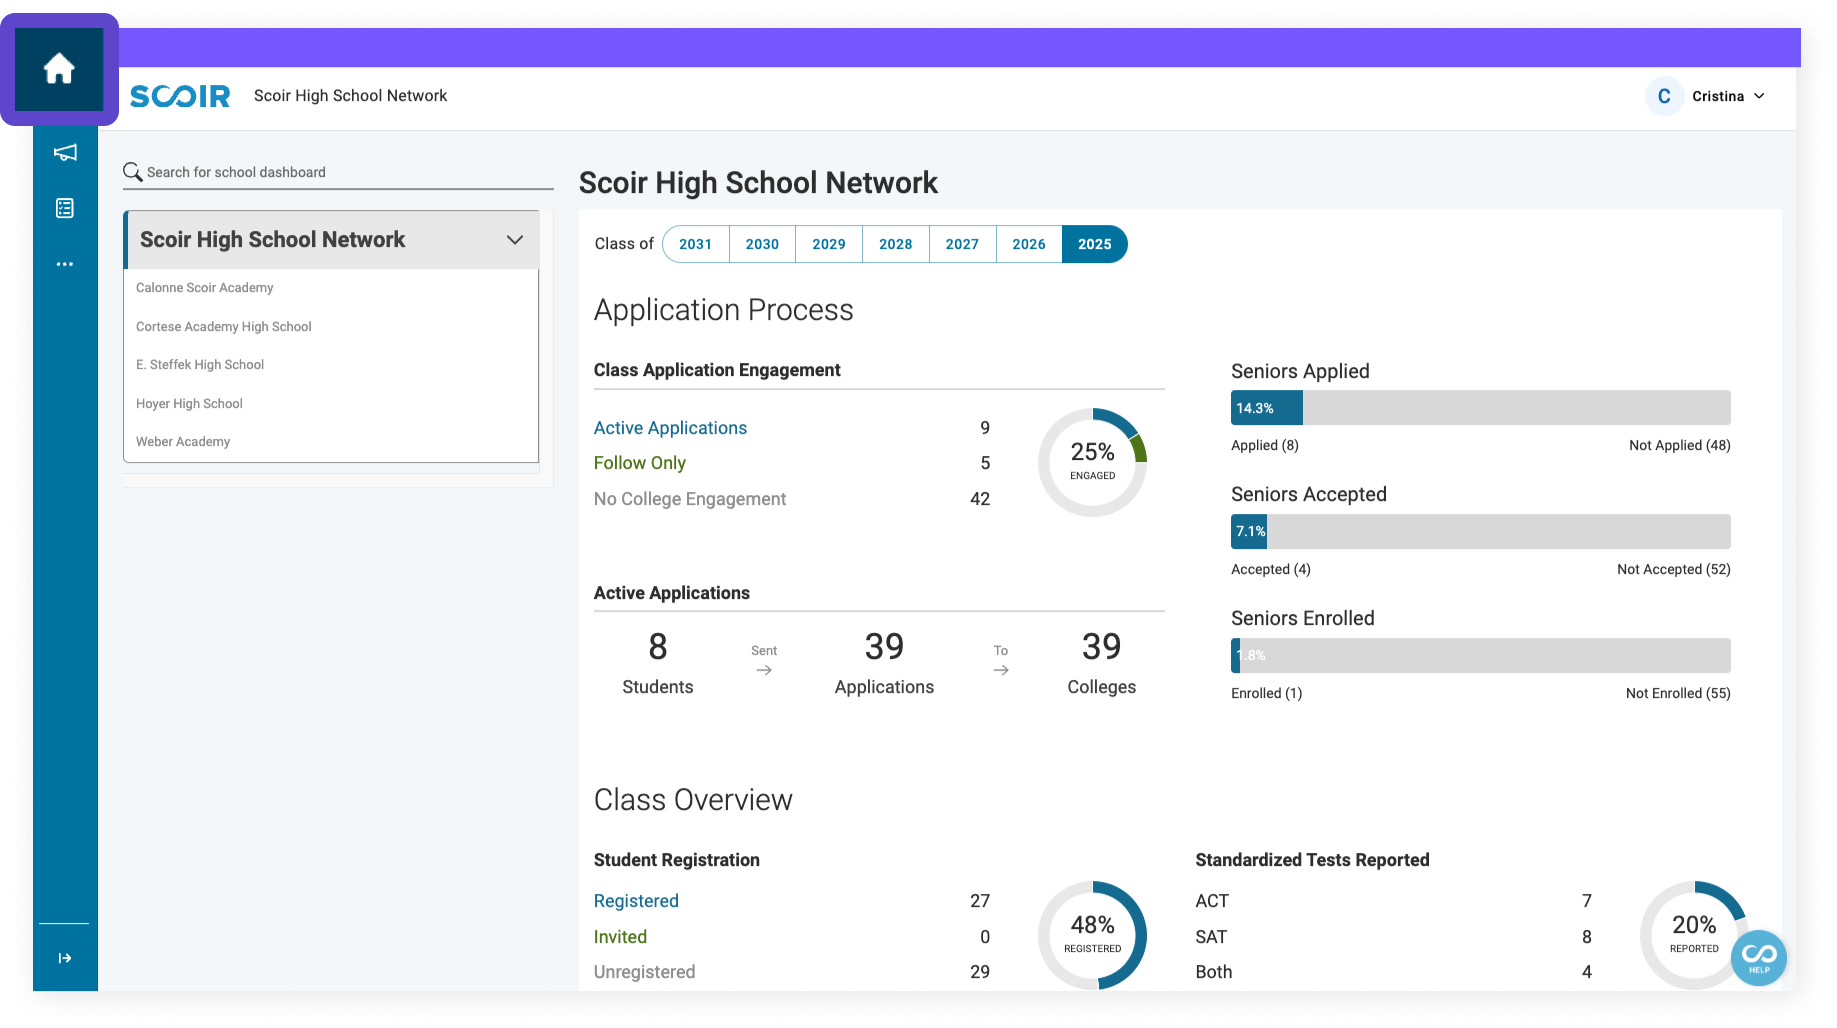
With our Network Dashboard, you get a bird's eye view of all the schools in your district with performance insights like:
- Application Process (class application engagement and active applications)
- Class Overview (student registration and activity, career profile completion, and reported standardized test scores)
- College Data and Outcomes (including historical outcomes)
- Student Performance (GPA, reported test scores, etc.)
You can also dive into each individual school's performance. Goal-tracking becomes much easier when viewing college and career readiness progress and performance by grade level.
Comms
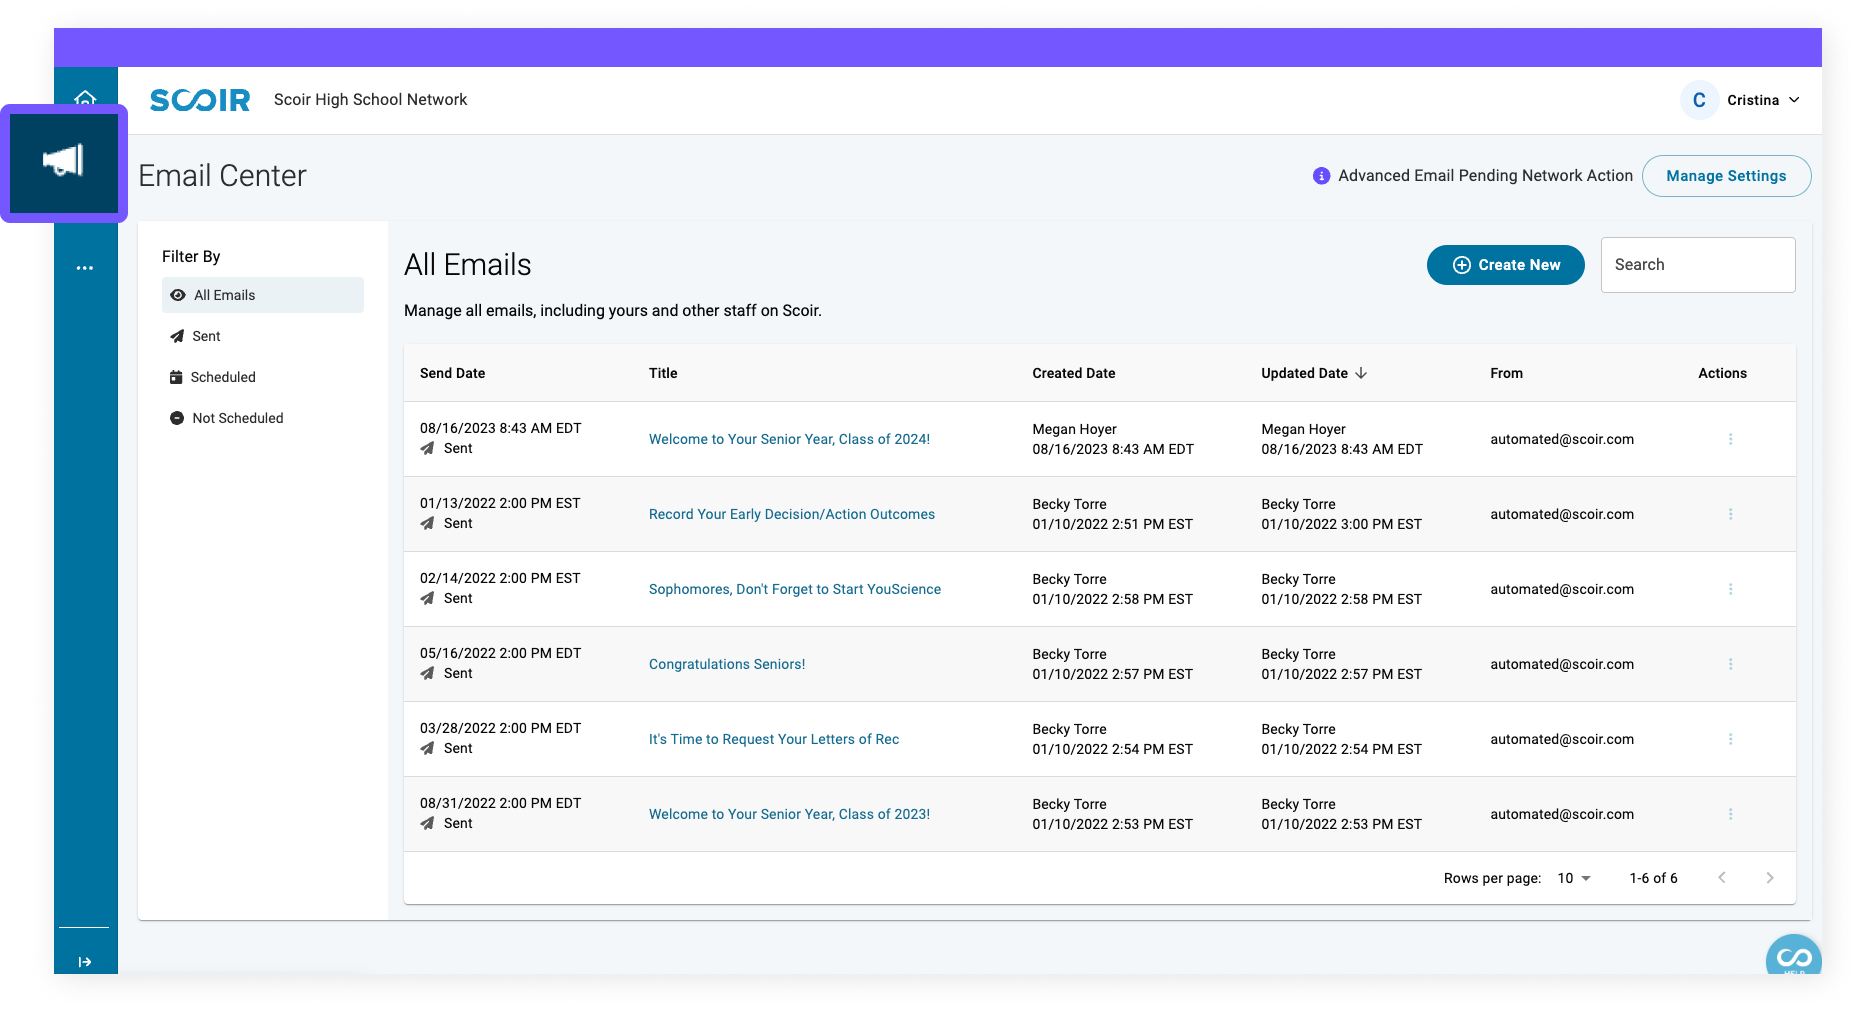
Here, you’ll access the Email Center, where you can email all the schools in your district and send messages to counselors, students, and their parents or guardians. Draft, schedule, and monitor messages easily. You can also track email statuses, authors, and recipients and edit or delete messages before sending. Learn more
Assignments
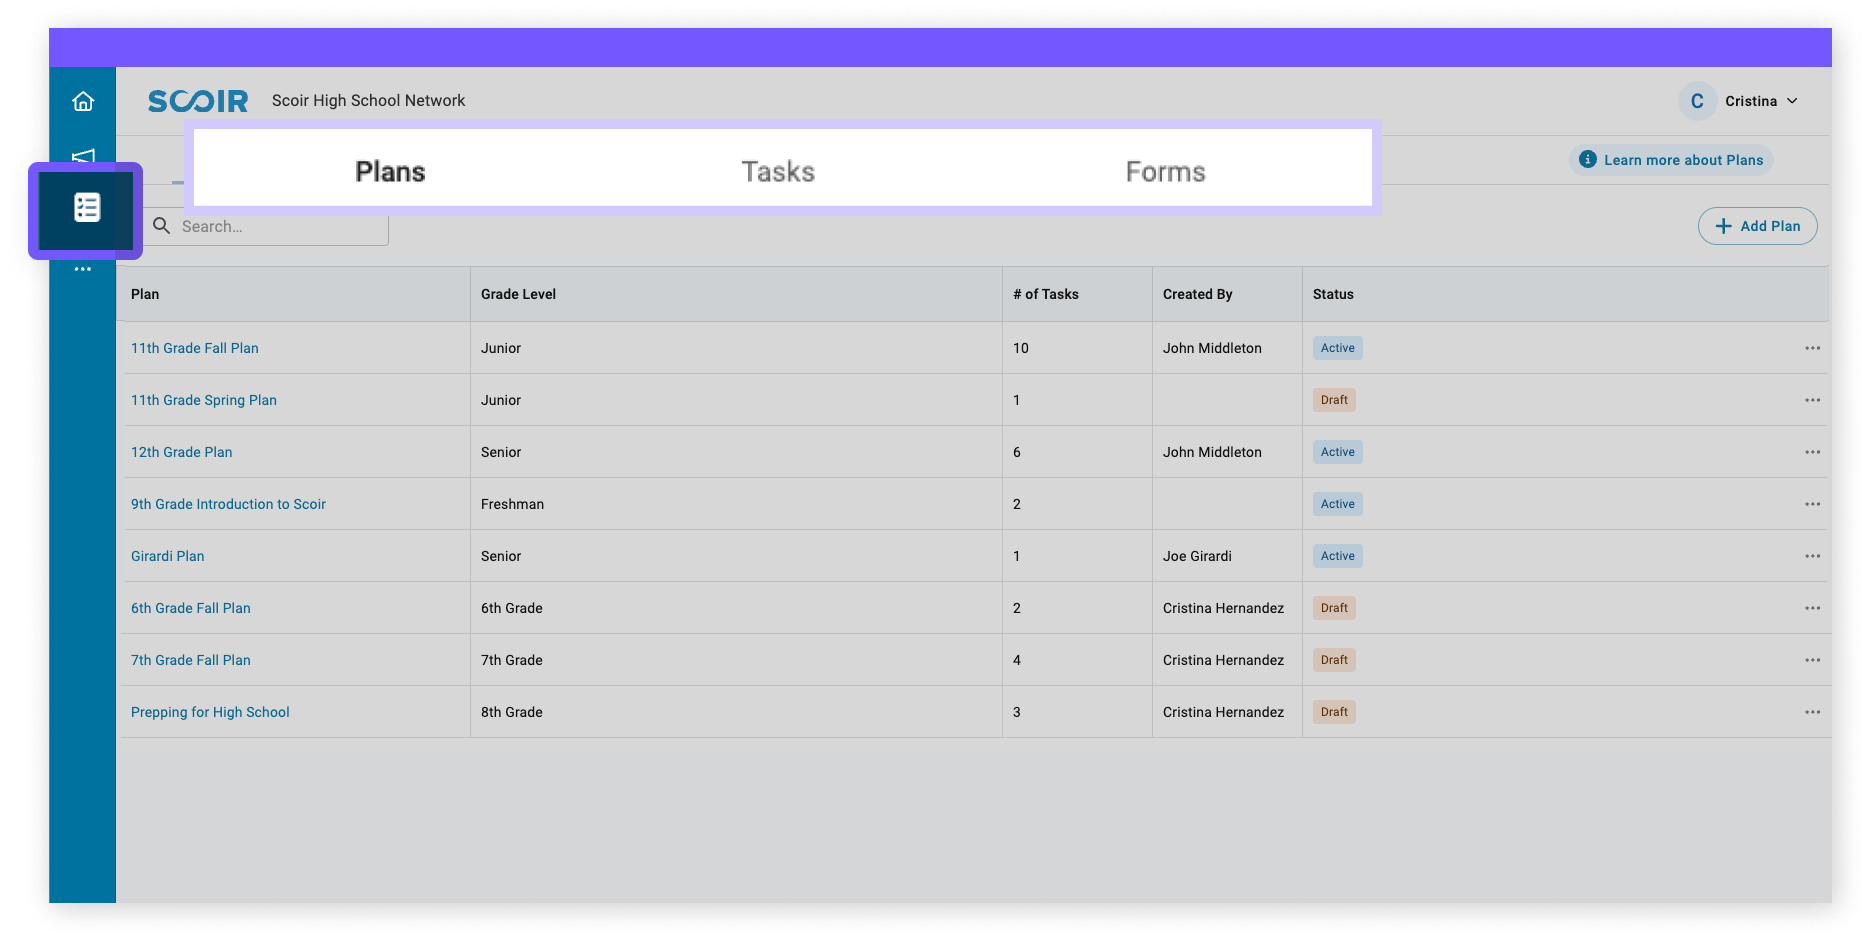
Here, you'll access Plans, Tasks, and Forms. These are helpful tools that can be used at the district level to create standardized guidance curriculums for all the students in your district, making it easy for you to provide consistent guidance across the board.
Plus, by using these tools at the district level, you can ensure that student progress on Tasks and information collected from Form responses can move with them if they change schools within the district.This means better reporting and tracking for everyone! Take a look at the sections below to learn more about these features.
Plans
Use Plans to create a set of recurring tasks (which can include Forms) that can be automatically assigned to specific grade levels across your district and reused year after year. Additionally, counselors can view (but not edit) district plans that apply to students at their school. This is particularly helpful for districts with standardized milestones or annual student tasks. Additionally, if Plans are published at the district level, students' tasks and forms history can stay with them if they move to another school in the district. Learn how to use Plans
Tasks
Once you've created a Plan and added tasks, this space makes it easy to see all the tasks and important details like the Plan it belongs to, start date, end date, and status. You can click on a task name to get a quick preview or click on the Plan name to see the overview. Use filters to sort tasks by start date, due date, topic, and status to find exactly what you need. You can also export a CSV file with all the students assigned to the tasks, including their completion status for each task.
Forms
Use Forms to standardize your data collection needs. You can create questionnaires, such as junior interest surveys or senior exit surveys, to gather specific information for local reports or educational guidelines. Customize the forms to fit your district's requirements by adding questions and details using the form builder.
Additionally, you can map form fields to custom properties. This enables you to collect valuable information from students that is made available on the school student rosters. Counselors can then build customized views and easily export this data to fulfill requirements. Once created, these forms can be included in a task for student access across all schools in the district. Plus, when students transfer between schools within your district, their form responses can move with them. Learn how to use Forms
Network Settings
In Network Settings, you can create and manage custom properties.
Custom Properties
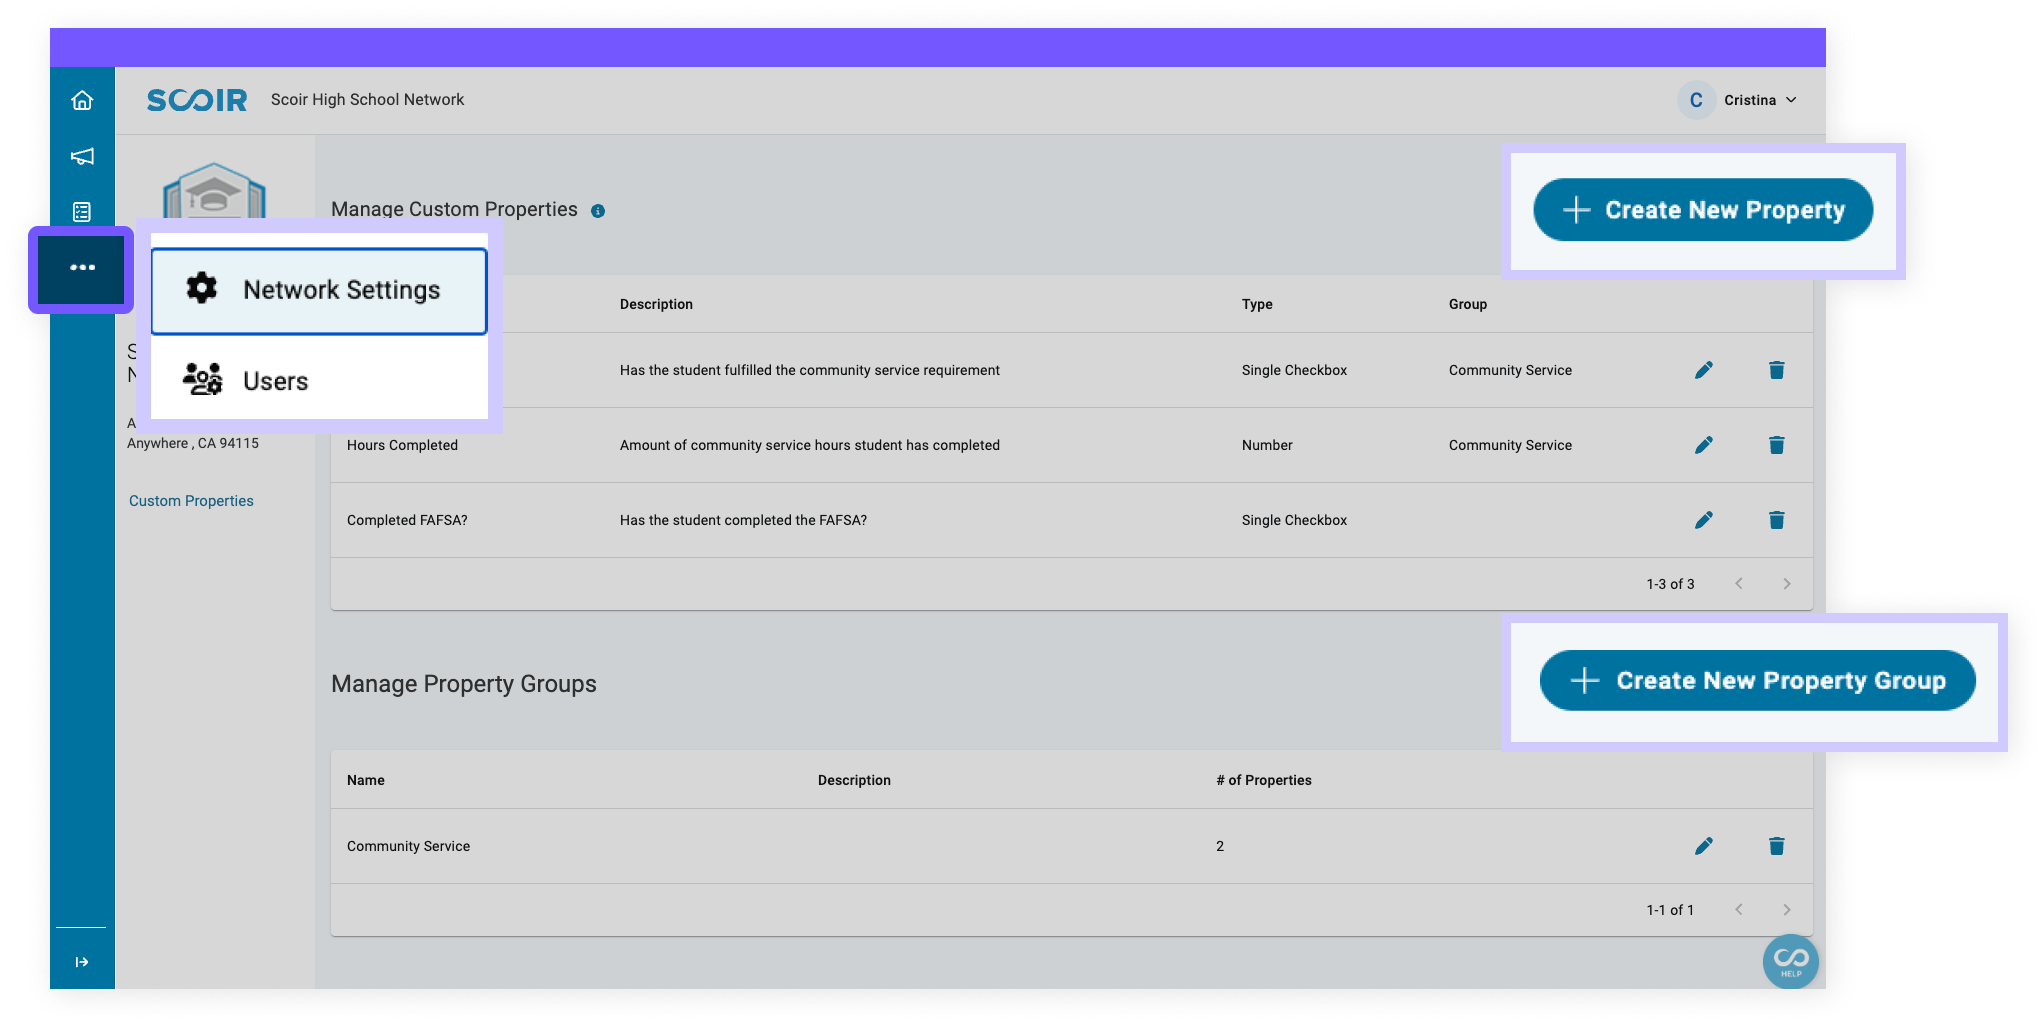
Custom Properties are fields you create to track specific student information in your district. If there's no existing field for the data you need, you can create your own. Once set up at the district level, these fields can be used across all schools in your network, ensuring consistent data for any reporting requirements. Setting up these properties at the network level also makes it possible for custom property data to transfer with students between schools, so information is not lost.
If you’d like to capture this unique information directly from students, We recommend using custom properties in a form. This makes sure that when students fill out the form, their responses automatically update the custom property fields, which are then reflected in the student roster visible to counselors. Learn how to create Custom Properties
Users
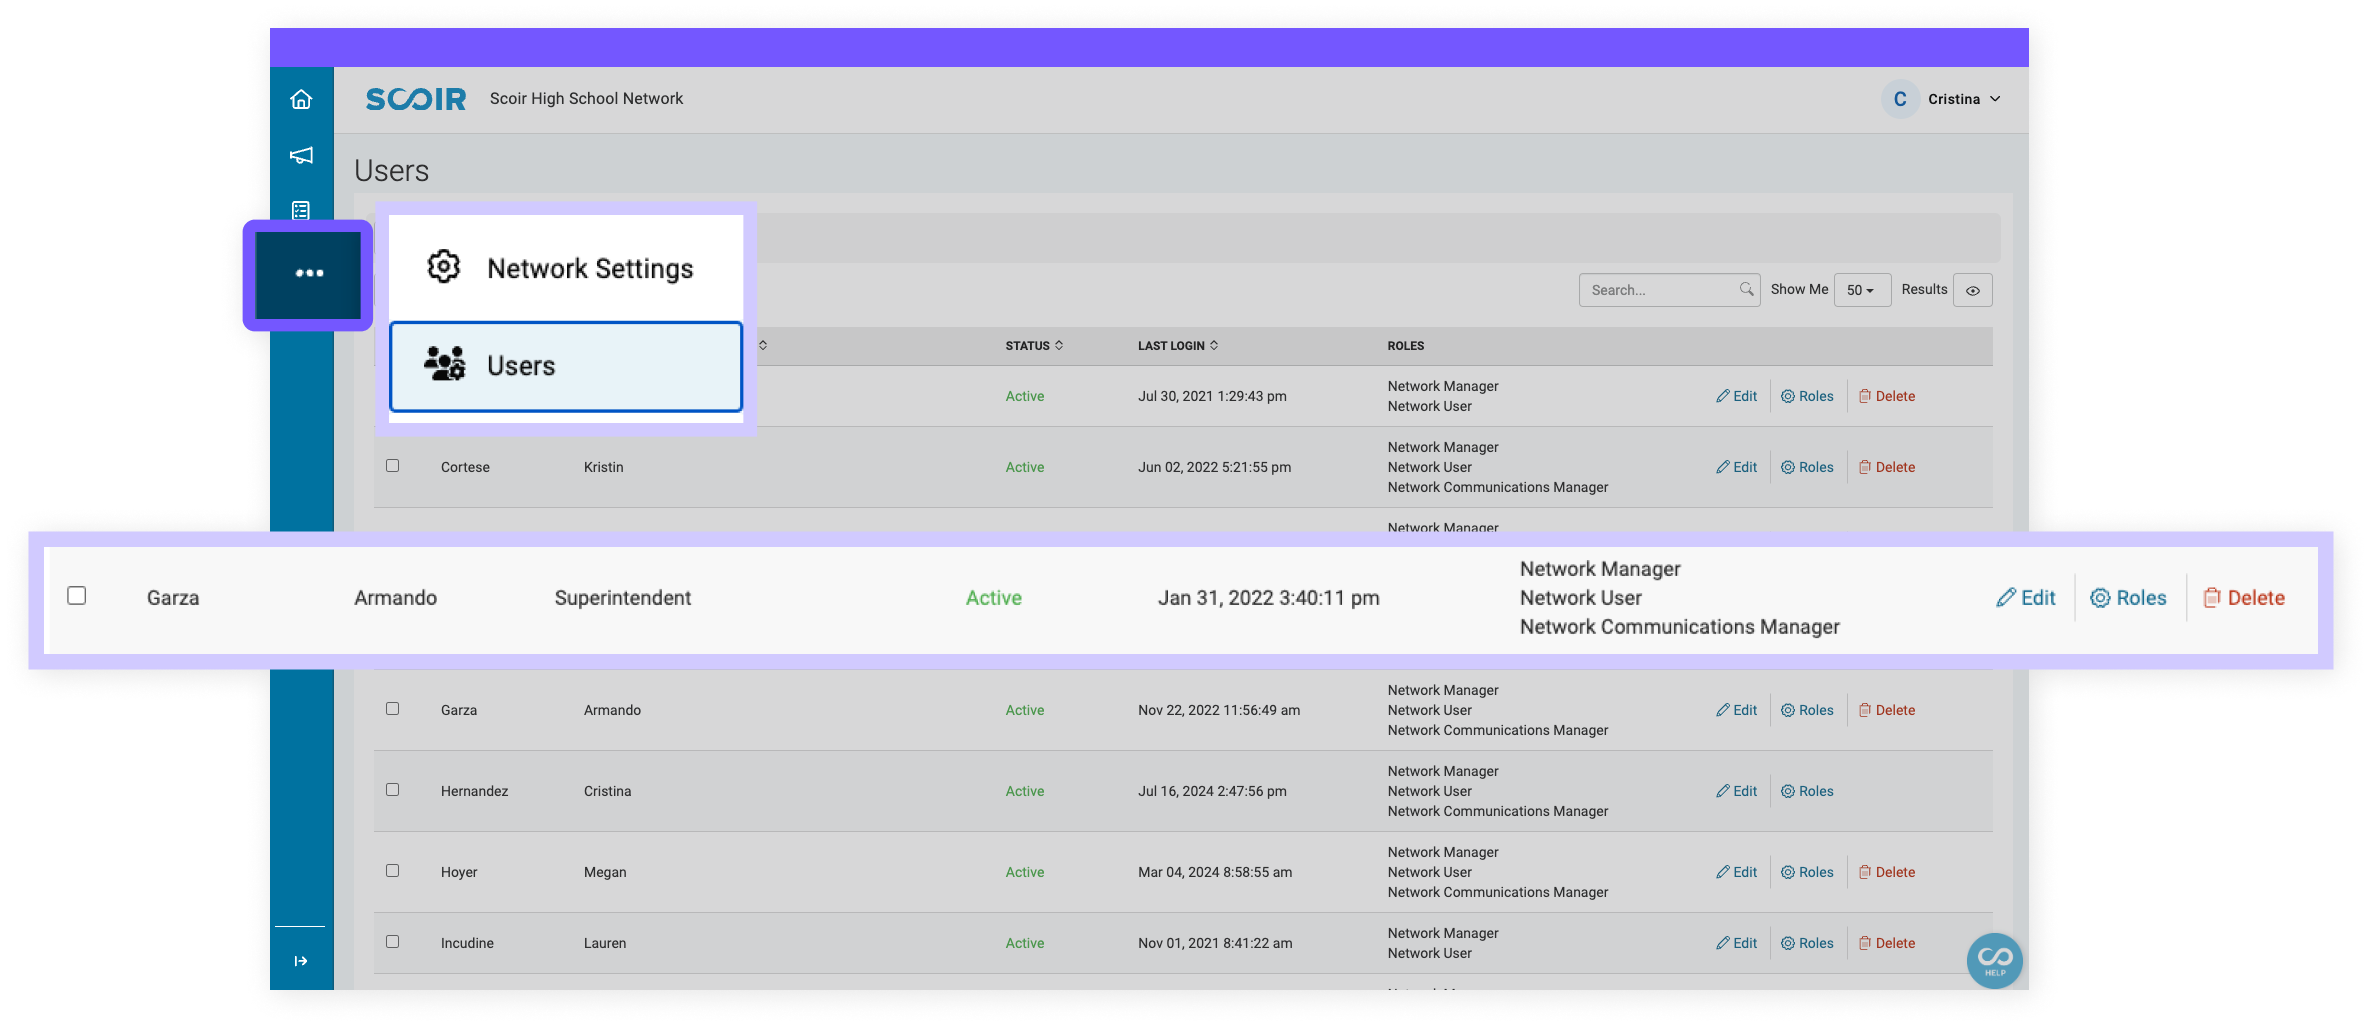
Go to Users to add and manage staff members and edit their roles. Learn more
Your Profile
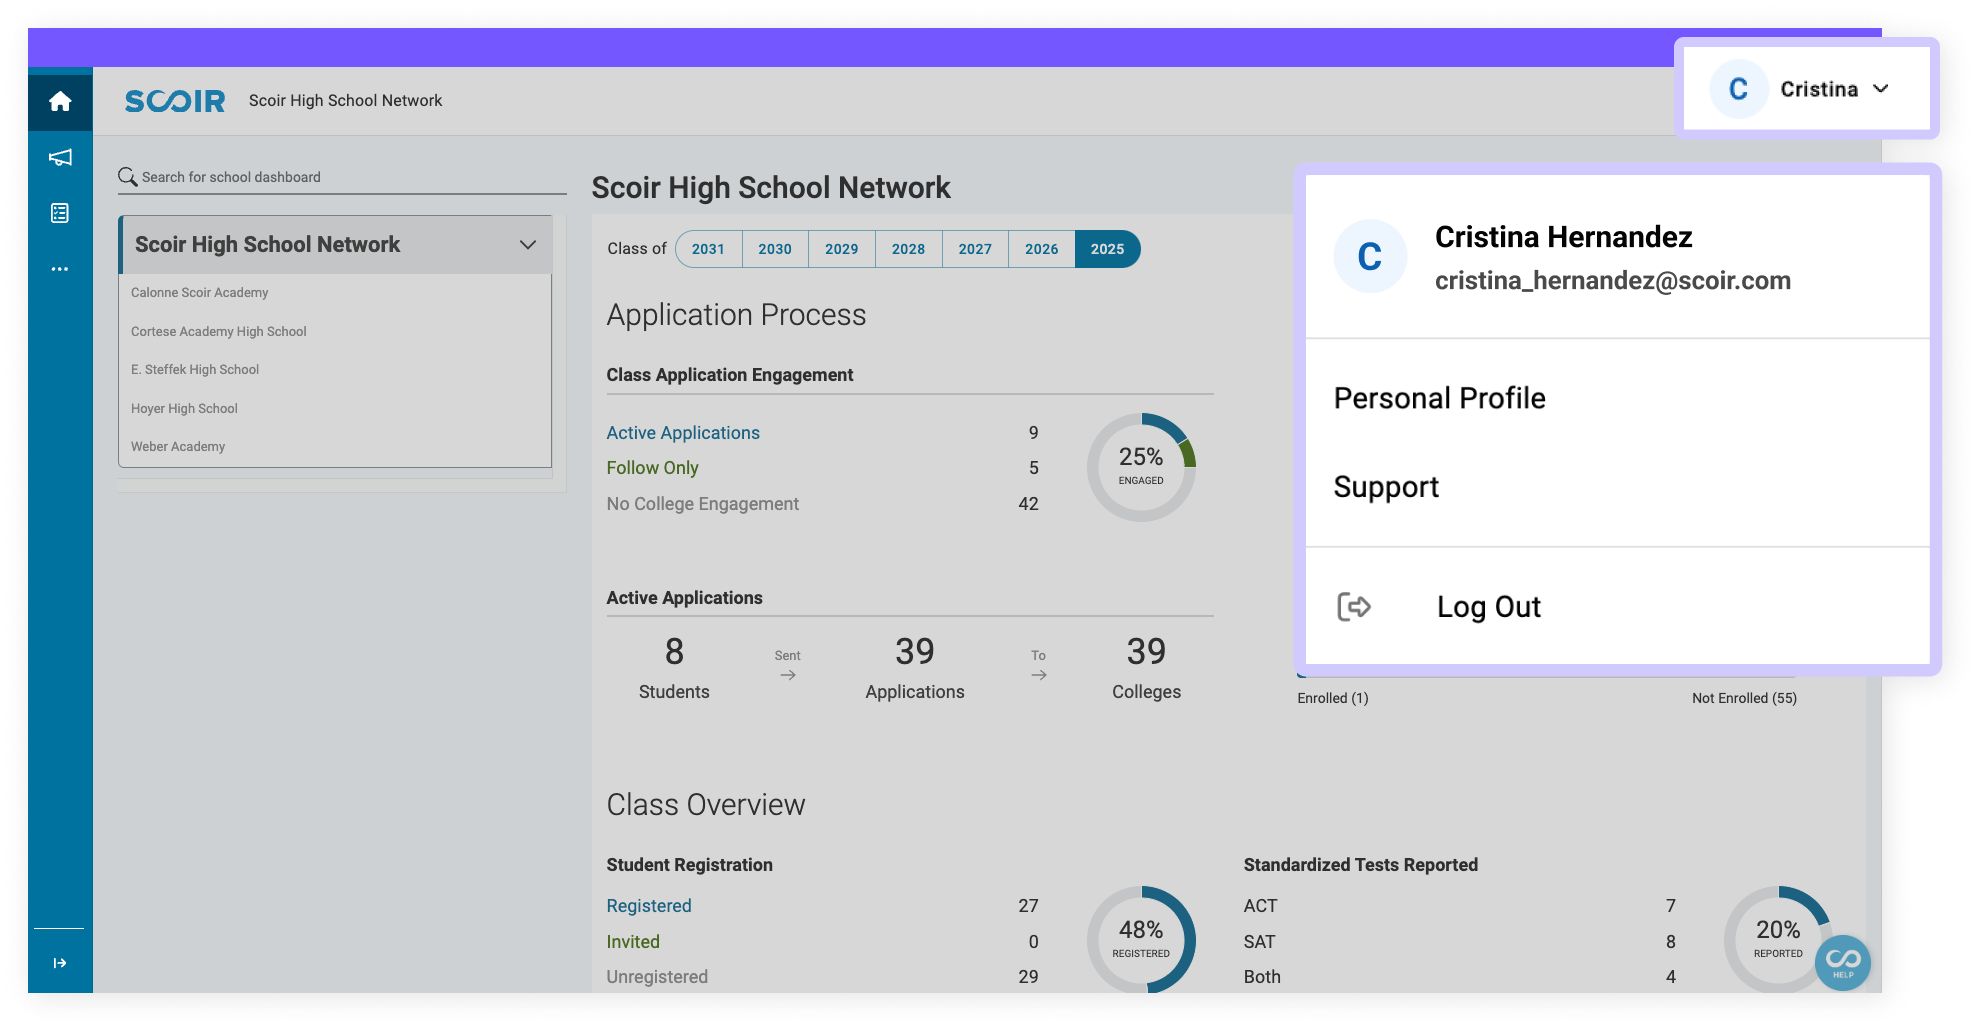
Personal Profile
Select Personal Profile to update your title easily, contact details, notification preferences, account email, or reset your password.
Support
Click on Support to access our Help Center, where you can find articles to help answer your questions.
We hope this guide has been useful in helping you get started with your Network account! If you're not currently using Network Management with Scoir, please feel free to reach out to your Customer Success Manager to discuss activating this feature.